Writing the Dynamics CRM plugin
A Dynamics CRM plugin is a powerful way to extend the
out-of-the-box behavior of the product with custom code. The plugin
that we are building for this exercise invokes the service we built
above.
Before starting, ensure that you have downloaded the Dynamics CRM 2011 SDK and installed the microsoft.xrm.sdk.dll assembly in the Global Assembly Cache.
In the existing Chapter3-DynamicsCRM Visual Studio 2010 solution, add a new Class Library project named Chapter3-DynamicsCRM.AcctPlugin to the solution.
Add a new reference to this project and point to the microsoft.xrm.sdk.dll assembly. This assembly contains the interfaces and types that we need to correctly define a plugin.
Now,
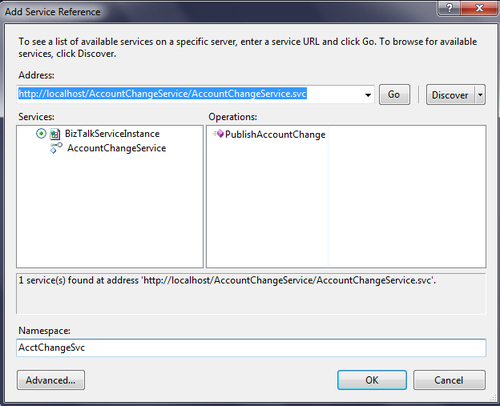
we need a service reference to our BizTalk-generated WCF endpoint.
Choose to add a new Service Reference to the project. Point to our
previously created service and set the namespace to AcctChangeSvc:
Add a new class file named AccountEventPlugin.cs to the project.
At the top of the new class, add two additional "using" statements pointing to Microsoft.Xrm.Sdk and System.ServiceModel. These assemblies have all that we need to define the plugin and consume our BizTalk-generated service.
The public class should implement the IPlugin interface, which has a single required operation, named Execute:
public class AccountEventPlugin : IPlugin
{
public void Execute(IServiceProvider serviceProvider)
{
}
}
Depending
on your use case, you may need to store the result of a successful
plugin invocation on a Dynamics CRM record. In this scenario, we will
simply log details of our plugin execution to the machine's Event Log.
Hence the first line in the Execute operation is as follows:
System.Diagnostics.EventLog.
WriteEntry("Application", "Plugin invoked successfully", System.
Diagnostics.EventLogEntryType.Information);
Next up, we need to acquire context about the data entity being passed to the plugin. The IPipelineExecutionContext holds such information in addition to the runtime environment that the plugin is executing in:
IPluginExecutionContext context = (IPluginExecutionContext)
serviceProvider.GetService(typeof(IPluginExecutionContext));
We
will be extracting data from an Account, and thus need a variable that
references this entity. At the time of declaring this variable, its
value is null:
Entity accountEntity = null;
Because
one can use a plugin in all sorts of scenarios, some preventative error
checking is prudent. To start with, we can ensure that the object that
was passed into the plugin is indeed a Dynamics CRM entity. The context
object defined earlier contains a set of input parameters containing the
data from the request message:
if (context.InputParameters.Contains("Target") && context.
InputParameters["Target"] is Entity)
{
}
If the plugin target is an entity, set the previously defined accountEntity variable&; to the entity passed into the plugin:
//retrieve entity from input params
accountEntity = (Entity)context.InputParameters["Target"];
We
could have tied this plugin to any Dynamics CRM entity and therefore
should check and make sure that the type of entity passed into the
plugin is valid:
//if the target account type isn't "account" exit
if (accountEntity.LogicalName != "account")
{
System.Diagnostics.EventLog.WriteEntry(
"Application",
"Target is not 'account' type",
System.Diagnostics.EventLogEntryType.Error);
return;
}
One
key thing to realise is that when the "Update" events occur in the
Dynamics CRM event pipeline, only the changed fields of an entity are
put in the context's property bag. In order to have access to the entire
payload of the account entity, we can use an Image. An Image is a
representation of an entity either before or after it was saved to
Dynamics CRM. There are four fields of the Account entity that we are
interested in and those can be retrieved from the PostEntityImages
collection that is part of the context. We use the name
"PostEventImage" here and will refer to it later when we register this
plugin with Dynamics CRM:
Entity acctImage = context.PostEntityImages["PostEventImage"];
string acctName = accountEntity["name"].ToString();
string acctNumber = accountEntity["accountnumber"].ToString();
string state = accountEntity["address1_stateorprovince"].ToString();
string phone = accountEntity["telephone1"].ToString();
Armed with the necessary data elements, we can now create the WCF service input object. The AccountChangeEvent objec&;t is defined as part of the Service Reference established previously:
AcctChangeSvc.AccountChangeEvent acct = new AcctChangeSvc.AccountChangeEvent();
acct.EventSource = "Dynamics CRM";
acct.AccountName = acctName;
acct.AccountNumber = acctNumber;
acct.PrimaryState = state;
acct.PrimaryPhoneNumber = phone;
We
are now ready to invoke the service from code. First, create a
reference to the binding type associated with our BizTalk-generated
service. In this example, use the BasicHttpBinding without any security settings turned on:
BasicHttpBinding binding = new BasicHttpBinding(BasicHttpSecurityMode.None);
Next, an endpoint address is required. Put in the full service URL associated with your BizTalk endpoint:
EndpointAddress addr = new EndpointAddress("http://localhost/AccountChangeService/AccountChangeService.svc");
This information is all that is needed to instantiate the service client that was defined in our Service Reference:
AcctChangeSvc.AccountChangeServiceClient client = new AcctChangeSvc.AccountChangeServiceClient(binding, addr);
Invoke the PublishAccountChange operation and upon success, write a message to the machine's Event Log:
client.PublishAccountChange(acct); System.Diagnostics.EventLog.WriteEntry("Application",
"Service called successfully",
System.Diagnostics.EventLogEntryType.Information);
The plugin is now ready for deployment and registration in the Dynamics CRM environment.
