The Purchase Order Processing module, often referred to as POP,
integrates the Inventory and Payables modules in Dynamics GP. In POP
you can enter purchase orders, receipts of inventory, and corresponding
vendor invoices. Purchase Order Processing also works together with
Sales Order Processing to link purchase orders to sales orders with back
ordered items.
Setup for Purchase Order Processing includes the following steps:
Purchase Order Processing Setup
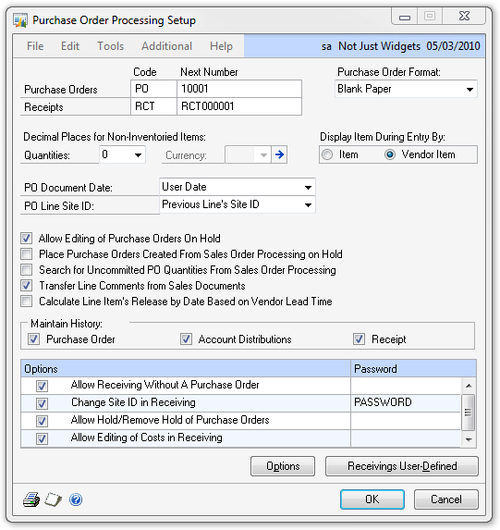
To start the setup of the POP module, navigate to Microsoft Dynamics GP | Tools | Setup | Purchasing | Purchase Order Processing. The following is a listing of the fields on the Purchase Order Processing Setup window:
Code and Next Number: It is recommended to leave the Code unchanged for all transactions. For the Next Number
settings, consider making these a bit shorter so they are more
user-friendly. Only one purchase order numbering scheme is available in
Dynamics GP. Receipts are used for both receipts of inventory and
matching vendor invoices in Dynamics GP and receipt numbers are
typically only used internally.
Purchase Order Format:
Two purchase order report formats are available in Dynamics GP. Users
can pick which report format to print during transaction entry, this
setting simply controls the default.
Decimal Places for Non-Inventory Items: If users are allowed to enter non-inventory items on POs, the Quantities and Currency
decimal places set here will control how those items show up. For
inventory items, the decimal places will be controlled by the item
setup. If Multicurrency is enabled, clicking the expansion button next to the Currency field will open the Purchasing Non-Inventoried Currency Decimals Setup window where you can set the number of Currency Decimals for each Currency ID.
Display Item During Entry By: If you have set up vendor item numbers during inventory item setup, you can choose Vendor Item here to have the vendor's part number display during PO entry. Otherwise, choose Item so that your item numbers are displayed.
PO Document Date: Choose between User Date (also called the GP date) and Previous Doc. Date to set what defaults as the purchase order date during transaction entry. Typically POs are not back dated, so User Date is more commonly picked for this option.
PO Line Site ID: If Previous Line's Site ID
is chosen, a user will always have to fill in a Site ID on the first
line item when creating a new PO. All subsequent lines will use the same
site as the previous line. Choosing Item's Default Site will fill in the Default Site ID selected on the Item Quantities Maintenance
window for each item. This may result in one PO with multiple sites,
which Dynamics GP allows, however, most companies do not choose to do
this.
Allow Editing of Purchase Orders On Hold: Select this to allow users to edit POs while they are on hold. This option will be available only when Allow Hold/Remove Hold of Purchase Orders is selected in the Options
list at the bottom of this window. Typically, there is no reason to
prevent editing POs on hold (a PO on hold cannot be printed or
released).
Place Purchase Orders Created From Sales Order Processing on Hold:
If this is selected, POs created from sales orders are automatically
placed on hold. This may be useful if someone first needs to check all
POs created from sales orders before releasing them.
Search for Uncommitted PO Quantities From Sales Order Processing:
When creating a PO from a sales order with back ordered items, if this
option is selected, the system will first search for any existing POs
for these items that are not already committed to other sales orders. If
this is not selected, a new PO will always be created from a sales
order.
Transfer Line Comments from Sales Document:
Selecting this option will copy any line item comments from sales
orders to the POs created from the SOP module. This setting should
depend on what is typically entered in the SOP line item comments on
orders.
Calculate Line Item's Release By Date Based on Vendor Lead Time: Selecting this will use the number of days entered for the Planning Lead Time of a vendor/item combination on the Item Vendors Maintenance window.
Maintain History: It is recommended to keep all history and leave all the choices selected.
Options: Each
one of the options below can have a password set up, so that only users
who know the password can perform the associated task. Note that the
passwords are not masked.
Allow Receiving Without a Purchase Order:
If this option is selected, a receipt transaction can be entered
without first having to enter a PO. Some companies choose to disallow
this to ensure better control of the purchasing process.
Change Site ID in Receiving:
Selecting this option will allow users to change the Site ID that items
are being received to during the entry of a receipt transaction. If
this option is not selected, the receipt will have to be entered for the
site specified on the purchase order.
Allow Hold/Remove Hold of Purchase Orders: Hold functionality will be available for POs if this option is checked. Use the Password to control which users can create or remove a hold.
Allow Editing of Costs in Receiving:
It is typically recommended to allow this so that users have the
ability to enter correct costs for inventory items being received, if
they are different from the costs on the purchase order.
The following illustrates a typical Purchase Order Processing Setup window:
Purchase Order Processing Options
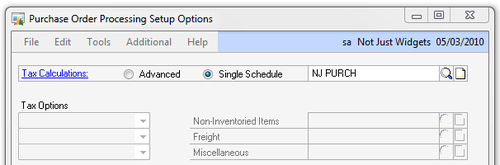
Clicking the Options button at the bottom of the Purchase Order Processing Setup window opens the Purchase Order Processing Setup Options window, where you can set up defaults for taxes and the Purchase Order Generator functionality.
While most companies do not use purchase taxes, if this is something you need to set up, choose Single Schedule and a Tax Schedule ID under Tax Calculations if all items, freight, and miscellaneous amounts on POs will be using the same tax schedule. Choosing Single Schedule will look like the example shown in the next screenshot, with the other options disabled:
If the Advanced option is chosen, you can specify different Tax Options and Schedules for Non-Inventoried Items, Freight, and Miscellaneous amounts.
Receivings User-Defined
During the entry of POP
receipts, a window will be available for users to track additional
details about the receipt, with up to 35 user-defined fields. Many
companies never use this, but for those that want to take advantage of
this functionality, labels for each field can be set up on the Receivings User-Defined Fields Setup window.
To set up these labels, click on the Receivings User-Defined button at the bottom of the Purchase Order Processing Setup window—five list fields with predefined values, 10 text fields, and 20 date fields are available.
E-mail Settings
If you are planning on e-mailing
purchase orders to vendors from Dynamics GP, you will need to make sure
e-mailing options for POs are enabled and set up. To do this, navigate
to Microsoft Dynamics GP | Tools | Setup | Purchasing | E-mail Settings.
You may have already completed this setup as part of the Payables
module setup.
Once
the setup of the Purchase Order Processing module is complete, you can
start entering purchase orders, inventory receipts, and invoices in
Dynamics GP.
