2. Application Object Tree
The AOT is the main entry point to MorphX and is the
repository explorer for all metadata. You can open the AOT by clicking
the AOT icon on the toolbar or by pressing Ctrl+D. The AOT icon looks
like this:

Navigating the AOT
As
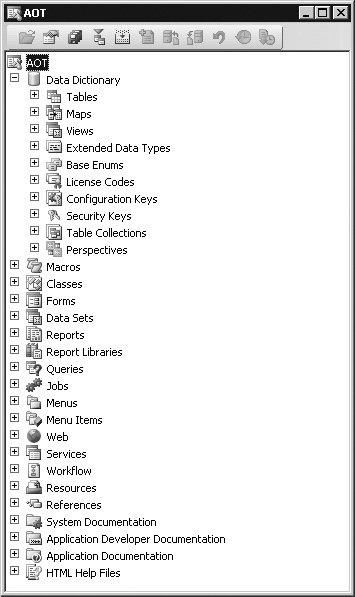
the name implies, the AOT is a tree view. The root of the AOT contains
the element categories, such as Classes, Tables, and Forms. Some
elements are grouped into subcategories to provide a better structure.
For example, Tables, Maps, Views, and Extended Data Types reside under
Data Dictionary, and all Web-related elements are found under Web. Figure 2 shows the AOT.
You can navigate the AOT
by using the arrow keys on the keyboard. Pressing the Right arrow key
expands a node if it has any children.
Elements are ordered
alphabetically. Because thousands of elements exist, understanding the
naming conventions and adhering to them is important to effectively
using the AOT.
All element names in the AOT follow this structure:
<Business area name> + <Business area description> + <Action performed or type of content>
In
this naming convention, similar elements are placed next to each other.
The business area name is also often referred to as the prefix. Prefixes are commonly used to indicate the team responsible for an element.
Table 2 contains a list of the most common prefixes and their descriptions.
Table 2. Common Prefixes
| Prefix | Description |
|---|
| Ax | Dynamics AX typed data source |
| Axd | Dynamics AX business document |
| BOM | Bill of material |
| COS | Cost accounting |
| Cust | Customer |
| HRM | Human resources management |
| Invent | Inventory management |
| JMG | Shop floor control |
| KM | Knowledge management |
| Ledger | General ledger |
| PBA | Product builder |
| Prod | Production |
| Proj | Project |
| Purch | Purchase |
| Req | Requirements |
| Sales | Sales |
| SMA | Service management |
| SMM | Sales and marketing management |
| Sys | Application frameworks and development tools |
| Tax | Tax engine |
| Vend | Vendor |
| Web | Web framework |
| WMS | Warehouse management |
Tip
When
creating new elements, make sure to follow the recommended naming
conventions. Any future development and maintenance will be much easier. |
Creating New Elements in the AOT
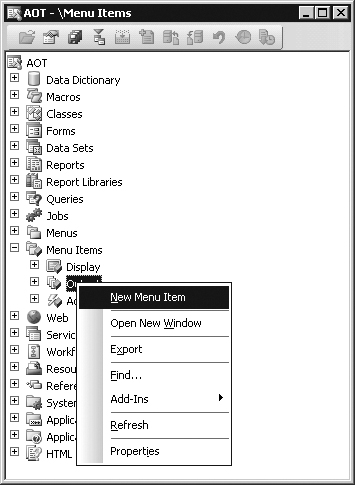
You can create new elements in the AOT by right-clicking the element category node and selecting New <Element Name>, as shown in Figure 3.
Objects
are given automatically generated names when they are created. However,
you should replace the default names with new names in accordance with
the naming conventions.
Modifying Elements in the AOT
Each node in the AOT has a set of properties and either subnodes or X++ code. You can use the property sheet to inspect or modify properties, and you can use the X++ code editor to inspect or modify X++ code.
The order of the subnodes
can play a role in the semantics of the element. For example, the tabs
on a form display in the order in which they are listed in the AOT. You
can change the order of nodes by selecting a node and pressing the Alt
key while pressing the Up or Down arrow key.
A red vertical line next to an element name marks it as modified and unsaved, or dirty, as shown in Figure 4.
A dirty element is saved in the following situations:
Refreshing Elements in the AOT
If several
developers modify elements simultaneously in the same installation of
Dynamics AX, each developer’s local elements could become out of sync
with the latest version. To ensure that the local versions of remotely
changed elements are updated, an autorefresh thread runs in the
background. This autorefresh functionality eventually updates all
changes, but you might want to explicitly force a refresh. You do this
by right-clicking the element you want to restore and then selecting
Restore. This action refreshes both the on-disk and the in-memory
versions of the element. The following is a less elegant way of ensuring
that the latest elements are used:
1. | Close the Dynamics AX client to clear in-memory elements.
|
2. | Close the Dynamics Server service on the Application Object Server (AOS) to clear in-memory elements.
|
3. | Delete the application object cache files (*.auc) from the Local Application Data folder (located in Documents and Settings\<User>\Local Settings\Application Data) to remove the on-disk elements.
|
Note
Before
Dynamics AX 4.0, the application object cache was stored in .aoc files.
To support Unicode, the file extension was changed to .auc in Dynamics
AX 4.0. |
Element Actions in the AOT
Each
node in the AOT contains a set of available actions. You can access
these actions from the context menu, which you can open by
right-clicking the node in question.
Here are two facts to remember about actions:
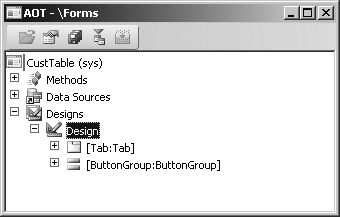
A frequently used action
is Open New Window, which is available for all nodes. It opens a new
AOT window with the current nodes as the root. We used this action to
create the screen capture of the CustTable element shown in Figure 3-4.
Once you open a new AOT window, you can drag elements into the nodes,
saving time and effort when you’re developing an application.
You can extend the list
of available actions on the context menu. You can create custom actions
for any element in the AOT by using the features provided by MorphX. In
fact, all actions listed on the Add-Ins submenu are implemented in
MorphX by using X++ and the MorphX tools.
You can enlist a class as a new add-in by following this procedure:
1. | Create a new menu item and give it a meaningful name, a label, and Help text.
|
2. | Set the menu item’s Object Type property to Class.
|
3. | Set the menu item’s Object property to the name of the class to be invoked by the add-in.
|
4. | Drag the menu item to the SysContextMenu menu.
|
5. | If you want the action available only for certain nodes, you need to modify the verifyItem method on the SysContextMenu class.
|
Element Layers in the AOT
When you modify an
element from a lower layer, a copy of the element is placed in the
current layer. All elements in the current layer appear in bold type (as
shown in Figure 5), which makes it easy to recognize changes.
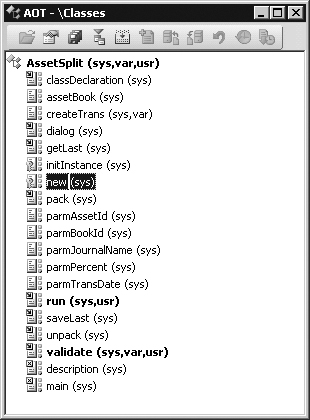
You
can use the Application Object Layer setting in the Options dialog box
to personalize the layer information shown in the AOT. Figure 3-5
shows a class with the option set to All Layers. As you can see, each
method is suffixed with information about the layers in which it is
defined, such as sys, var, and usr.
If an element exists in several layers, you can right-click it and
select Layers to access its versions from lower layers. We highly
recommend the All Layers setting during code upgrade because it provides
a visual representation of the layer dimension directly in the AOT.
Note
If
you modify an element that exists in a higher layer than your current
layer, all modifications are redirected to the upper layer where the
element is defined. |
