3. Choosing a Network Type
The next step in designing a network is to choose a network type. (See Table 3-3.)
Start by looking at where your computers are physically located. If you
can easily run cable between all computers, the choices are simple:
Gigabit Ethernet (GigE) or Fast Ethernet (100BaseT).
Choose GigE if your wiring supports it; otherwise, stick to Fast
Ethernet. If you’re installing new cabling, hire a professional cabling
expert. Spending money on good wiring now can save you a lot of problems in the future.
If the computers are widely scattered or mobile, consider including some wireless access points (APs). These are network devices that permit wireless clients access to a wired
network. Even Fast Ethernet is virtually as fast as the real-world
speeds of the fastest current wireless standard (802.11n), while being
far more reliable, more secure, and cheaper as well. For these reasons,
use wireless networks to supplement wired networks, not to replace them.
Warning:
SECURITY ALERT
All wireless technologies have the potential to introduce security
risks. When using wireless networking, always use appropriate security
measures, such as Wireless Protected Access (WPA), 802.11i (WPA2), or
802.1x.
Table 3. Common network types
| TECHNOLOGY | SPEED | SPEED (REAL WORLD) | CABLING | MAXIMUM DISTANCE | OTHER HARDWARE REQUIREMENTS |
|---|
| Fast Ethernet | 100 Mbps | 94 Mbps | Cat 5, Cat 5e, Cat 6 | 328 feet from hub or switch | Fast Ethernet hub or switch |
| Gigabit Ethernet | 1000 Mbps | 327 Mbps | Cat 5e or Cat 6 | 328 feet from hub or switch | Gigabit hub or switch |
| 802.11b (WiFi) | 11 Mbps | 4.5 Mbps | Wireless | 1800 feet (60–150 feet typical indoors) | 802.11b or 802.11g access point (AP), 32 users per AP |
| 802.11a | 54 Mbps | 19 Mbps | Wireless | 1650 feet (50–100 feet typical indoors) | 802.11a AP, 64 users per AP |
| 802.11g | 54 Mbps | 13 Mbps | Wireless | 1800 feet (60–150 feet typical indoors) | 802.11g AP, 32 users per AP |
| 802.11n | 540 Mbps | 130 Mbps | Wireless | 7200 feet (100–500 feet typical indoors) | 802.11n AP, 32 users per AP |
Note:
Wireless speeds vary
greatly depending on the distance from the access point, and the number
and type of walls, floors, and other interference between the access
point and the client device.
Tip:
BEST PRACTICES Avoid the consumer-focused HomePNA and HomePlug network types.
They’re more expensive, slower, less secure, and less reliable than
Ethernet or a properly configured 802.11a/b/g/n wireless network.
3.1. Choosing the Right Network Cable
Choosing the right cable for a wired Fast Ethernet (100 Mbps) network is easy—Cat 5 cable. However, there are exceptions to this rule that pertain to existing installations and new construction.
Cables in an existing
network might not be usable. 10-megabit Ethernet equipment might be
usable for small networks until it can be replaced, but expect to
replace it soon—you’ll find it slow. Coaxial (thinnet) Ethernet and Cat 3
Unshielded Twisted Pair (UTP) cables are unreliable and slow and should
be replaced.
New construction should run several strands of Cat
5e or, ideally, Cat 6. Although Cat 5 cable can be used with Gigabit
Ethernet, it is marginal at best. Cat 5e and Cat 6 cables are more
reliable and provide headroom for possible 10-Gigabit Ethernet standards.
Cables should converge at a reasonably clean, centrally located wiring
closet with adequate power, ventilation, and security for all servers
and network devices. (Be sure to leave room for future growth.)
Shielded Cat 5, Cat 5e, and Cat
6 cables are available for situations that potentially involve high
levels of electromagnetic interference (such as antennas). You should
use plenum-grade cable any time wiring is placed in a drop ceiling.
(Before running cable in a drop ceiling, talk to the building manager.)
3.2. Choosing a Wireless Standard: 802.11a/b/g/n
Currently, you can choose from four wireless standards: 802.11b, 802.11a, 802.11g, and 802.11n. Here’s what you need to know about each (also refer to Table 3-3):
802.11b
802.11b was the first widely deployed standard, though the speed was
limited (11 Mbps theoretical; 5 Mbps or even less in the real world).
802.11b supports a maximum of 32 users per AP, and a maximum of 3
simultaneous channels in use in the same location. Channels
separate wireless networks, with each channel providing 11 Mbps of
bandwidth. You should not buy new equipment that supports only 802.11b,
and if you currently have 802.11b equipment, you should upgrade it to
802.11n. There are serious security considerations with older wireless
hardware that preclude it from being deployed in a business environment.
802.11g 802.11g
is faster than 802.11b (54 Mbps theoretical; 13 Mbps real-world) and
backward-compatible with 802.11b. 802.11g supports a maximum of 32 users
per AP, and a maximum of 3 simultaneous channels in use in the same
location.
802.11a 802.11a
is faster than 802.11g (54 Mbps theoretical; 19 Mbps real-world) and is
more tolerant of microwave interference and network congestion because
it uses the 5 GHz frequency band. 802.11a supports a maximum of 64 users
per AP, and a maximum of 8 channels in use simultaneously in the same
location. 802.11a is not compatible with either 802.11b or 802.11g.
If
you decide to use 802.11a network devices, stick with devices from the
same vendor and consider a tri-mode 802.11a/b/g device that will allow
other devices, such as laptops with built-in 802.11b/g connectivity, to
work on the wireless network. (This strategy also permits the highest
network density, with 11 channels available simultaneously for wireless
networks.)
802.11n 802.11n
is faster than 802.11g (up to 540 Mbps theoretical; 100–130 Mbps
real-world) and backward-compatible with 802.11g and 802.11b. Most
802.11n equipment is in the same frequency band (2.4 GHz) as 802.11b/g,
but the standard supports dual-band equipment that can also use the
5-GHz range of 802.11a. This dual-band equipment provides the greatest
flexibility and compatibility and is especially good at avoiding
interference from other equipment. Choosing dual-band equipment from a
single OEM is the safest choice for compatibility at the highest speeds.
If you’re buying new wireless equipment, we strongly recommend 802.11n
and prefer dual-band 802.11n where possible.
4. Choosing Network Devices
After selecting a
network type and Internet connection method, create a network diagram to
visually show which network devices are needed. Then select the
necessary devices for the network, such as switches, wireless access
points, firewalls, and network adapters.
Tip:
BEST PRACTICES
Choose a single brand of network hardware if possible. This ensures
greater hardware compatibility, simplifies administration, and makes
obtaining vendor support easier.
4.1. Diagramming the Network
Creating a diagram of the network can quickly show which devices you need and where they should be located, as shown in Figure 3.
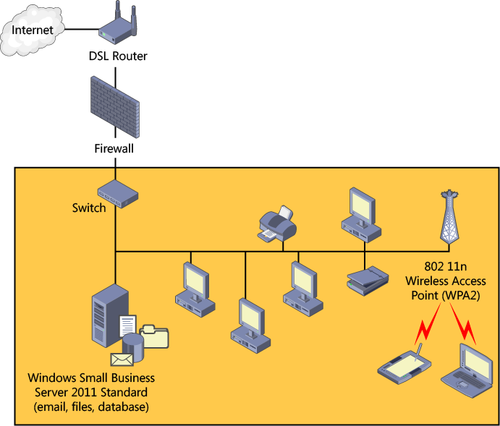
Use the following list as a guide when creating the network diagram:
Internet connection The Internet connection usually comes in the form of a telephone or coaxial cable that connects to a DSL
or cable router. It is traditionally represented by a cloud at the top
of the drawing and a line that connects to the router or firewall.
DSL or cable modem The Internet usually enters the organization in the form of a telephone or cable line that plugs into a DSL or cable modem.
Firewall
The DSL or cable modem is then plugged into the firewall, which should
be a router or firewall. Some modems are combined with built-in routers
that have basic firewall capabilities. Consumer routers or DSL modems
are not sufficient protection for a business network.
Perimeter network
This is an optional area of the network between the DSL or cable modem
and the firewall, where low-security devices such as wireless access
points can be placed.
Internal network The internal network includes the SBS computer, the client computers, and any network-connected devices, such as printers.
Note:
PLANNING
Wireless access points should be on the internal network and use
802.11i (WPA2) encryption. You can also place access points in the
perimeter network when you want to provide Internet access to the
general public (such as in a coffee shop, conference room, or lobby).
4.2. Choosing a Network Switch
Ethernet networks use the star network topology (also known as hub and spoke),
which means that all network devices must be plugged into a central hub
or switch. Choosing the right switch requires evaluating the following
factors:
Switch or hub Don’t buy a hub unless you have a specialized need and understand why you’re doing it. Get a switch instead. Switches
are inexpensive, provide additional performance, and facilitate mixing
10 Mbps, 100 Mbps, and 1 Gbps devices on the same network segment.
Number of ports Make sure that the switch provides more than enough ports
for all computers, access points, network printers, and Network
Attached Storage (NAS) devices on the network, along with spare ports
for expansion or to use in the event of a port failure.
Speed
Fast Ethernet (100/10 Mbps) switches offer basic performance for small
businesses, but GigE (1000/100/10 Mbps) switches are hardly different in
price and provide extra bandwidth for improved performance of file
servers and high-quality streaming video where the network cabling will
support it.
Management Managed
switches provide the ability to view the status of attached devices
from a remote connection, which can be useful for off-site technicians.
In general, save the cash and stick with an unmanaged switch unless the
cost difference is slight or the organization uses an off-site
consultant who wants the ability to remotely administer switches.
4.3. Choosing Wireless Access Points
Wireless access points permit clients to wirelessly connect to a wired network. Access
points are often integrated into routers, but they are also available
as stand-alone devices that must be plugged into a switch like any other
network device. Avoid wireless “gateway” or router products for
connecting to your internal network—they will complicate your network
management and TCP/IP configuration. They’re fine for externally
connected wireless access points. Some wireless routers can be
reconfigured to be simple access points.
Note:
Business-grade access
points are more expensive than consumer-oriented access points; however,
they are usually more reliable and full-featured.
When choosing an access point, consider the following features:
Routers with built-in
access points are often no more expensive than stand-alone access
points and are useful when creating a perimeter network. But be sure
they can be used as a pure access point—many can function only as a
router, which will complicate your network setup.
Access points should support 802.11i (WPA2).
WEP is simply not acceptable for any wireless device connected to your
internal network, and even WPA should not be considered sufficient
protection for an internally connected access point.
Access points should support 802.1x (RADIUS) authentication if you want to provide the highest level of security and ease-of-use to a wireless network.
Warning:
SECURITY ALERT
Two “features” that some suggest to improve wireless security are
disabling of SSID broadcasts and Media Access Control (MAC) address
filtering. Don’t bother. They are a significant and ongoing
administrative burden, and a hacker with a port scanner can easily
defeat them anyway.
Some access points have two or more antennas
that can be adjusted for better coverage; others support external
antennas that can be mounted on a wall for better placement.
Stand-alone wireless bridges (often referred to as wireless Ethernet bridges)
and some access points provide the ability to wirelessly bridge
(connect) two wired networks that can’t be connected via cables. There
are a number of different types of bridging modes, including Point-to-Point and AP Client. Point-to-Point uses two wireless
bridges to link two wired networks. AP Client uses an AP on the main
network (to which wireless clients can connect) and a wireless bridge in
AP Client mode on the remote network segment, acting as a wireless
client.
Clients
on the other side of a wireless bridge will experience slower
performance to the main network segment because of the shared wireless
link, so use wireless bridges with discretion, and always use bridges
and APs made by the same manufacturer.
Don’t
include “turbo” or other high-speed modes offered by some manufacturers
in your buying criteria. They provide little performance gain, if any,
in the real world and can have a deleterious effect on compatibility.
|
Wireless access points have a limited range, especially in the environment of a typical office. The indoor range
of 802.11b, 802.11g, and tri-mode 802.11a access points is usually
around 60–100 feet at the highest connection speed, and 25–75 feet for
first-generation, single-mode 802.11a access points.
That said, 2.4-GHz cordless phones, microwave ovens, and Bluetooth devices can cause serious interference
with 802.11b and 802.11g networks (but not with 802.11a networks) when
they are turned on. Fluorescent lights, metal walls, computer equipment,
furniture, and standing too close to the access point can also reduce the range of wireless networks.
Unfortunately, there is no
reliable way to quantify these variables—trial and error is the best way
to position access points. With 802.11n, and especially dual-band
802.11n, the effective distance is at least double that of 802.11g, but
this still requires full 802.11n deployment and optimal conditions. In
our initial tests of 802.11n, it does appear to provide a more stable
and reliable signal at a significantly greater distance than our
previous 802.11a/g equipment. There are some useful guidelines when
selecting access point locations:
Place the access
point and wireless network card antennas as high as possible to get them
above objects that might attenuate the signal. If
you place access points in the plenum (the space inside a drop ceiling
or raised floor), make sure you obtain access points or enclosures
certified for plenum installation. Place
the access point in the center of the desired coverage area to provide
the best coverage while also reducing the publicly exposed “surface
area” of the network. Only
use the minimum signal strength (power) required to provide coverage
for your office. Most WAPs have multiple levels of signal strength but
ship with a default of “maximum.” Use
multiple access points as necessary to cover multiple floors or large
offices, or to service a large number of clients simultaneously. Twenty
clients per 802.11g AP is a reasonable maximum, with an average of no
more than two to four simultaneously active users per AP yielding the
best network performance. Use wireless bridges to place another Ethernet network segment (or another wireless access
point) in a location unreachable by cables. Wired clients on this
segment communicate with other wired devices on this segment at the
speed of the wired network (1000/100/10 Mbps); however, communication
with the main network segment takes place at the speed of the wireless
network (10–100 Mbps real-world bandwidth). When selecting channels for access points, sniff
(search by using a wireless client) for the presence of other networks
and then choose an unused channel, preferably one that is four or more
channels separated from other channels in use. For example, channels 1,
6, and 11 can be used simultaneously without interference.
|
4.4. Choosing a Firewall Device or Router
SBS 2011 is designed to connect directly to a firewall
and does not provide any direct protection for the rest of the SBS
network. This is a major change from earlier versions of SBS that acted
as the gateway between the Internet
and the internal network when SBS was deployed with two network cards
(NICs). Windows Small Business Server 2011 Standard includes the new
Windows Firewall that is part of Windows Server 2008 R2 to protect the
server, but it should be protected by an additional, separate firewall
that will also act to protect the computers on the internal network.
You should look for the following features on your network firewall device:
Packet filtering Firewalls should support inbound packet filtering and Stateful Packet Inspection (SPI).
Protection from specific attacks Firewalls should support protection from the denial-of-service (DoS) attacks and other common attacks such as Ping of Death, SYN Flood, LAND Attack, and IP Spoofing.
Network Address Translation (NAT) NAT is the backbone of most firewall devices, providing basic security and Internet connectivity to internal clients.
IPv6 Support
As IPv6 becomes more pervasive, and as our pool of available IPv4
addresses approaches exhaustion, the need to directly support IPv6 for
our Internet connection becomes more compelling. Choosing a firewall
device that fully supports IPv6 now will save money and time later.
VPN pass-through
To permit properly authenticated Internet users to establish VPN
connections with a Windows Small Business Server computer behind a
firewall, the firewall must support VPN pass-through of the desired VPN
protocol (PPTP, L2TP, and/or IPSec).
VPN tunnels Some firewall devices provide direct support for establishing VPN connections. If you do choose to use a firewall
device to establish VPN connections with clients and servers in remote
offices, make sure the firewall supports the necessary number of
simultaneous VPN tunnels.
UPnP support Windows Small Business Server
can automatically configure firewalls that support Universal Plug and
Play (UPnP) to work with Windows Small Business Server services such as
Exchange Server and remote access (by opening the necessary ports on the
firewall). UPnP support can be found in most consumer firewall devices
as well as in some business firewalls.
Note:
Enabling UPnP on a
dedicated firewall device makes configuring the device to work with
Windows Small Business Server easy, but it does have security
implications. We suggest using UPnP to do the initial setup of the
firewall device, if the device supports it, but then disabling UPnP
completely.
Dual-WAN support Some firewalls come with support for two WAN connections to increase speed and reliability, which is a great solution for networks looking for a reliable Internet
connection. Other firewalls provide a serial port so that an external
dial-up modem can be used as a backup connection, but this connection is
much slower.
RADIUS support
RADIUS support on your firewall will enable additional functionality
and security, including easily integrating Two Factor Authentication (TFA) into your remote access configuration.
Content filtering Most firewalls make blocking certain websites
possible, such as websites containing specified keywords. Many
businesses use this feature to reduce the employees’ ability to visit
objectionable websites, although most content filters are largely
ineffective.
Built-in wireless access point
Firewalls with built-in access points and switched, GigE, wired ports
combine several functions and can be a cost-effective solution. However,
their primary function is to protect the network, and that should be
the first and most important evaluation criterion.
5. Choosing Server Hardware
If you have a server that
can meet the capacity needs of the network or can be upgraded to do so
while allowing for future growth, by all means use this server. But
realistically, because there is no in-place upgrade to Windows Small
Business Server 2011 Standard, you should plan on buying a new server as part of your migration plan.
When evaluating server hardware, see Table 4, which lists the effective minimum configurations necessary for adequate performance at different load levels.
Table 4. Minimum server configurations for different load levels
| COMPONENT | LIGHT LOAD | MEDIUM LOAD | HEAVY LOAD |
|---|
| CPU | Quad core Intel or AMD processor | Quad core or greater Xeon or Opteron processor | Dual Xeon or Opteron processors, with at least four cores each |
| Memory | 10–12 GB | 12–16 GB | 12–32 GB |
| Storage | Two or more hard drives in hardware mirror (RAID-1) with 200 GB available for Windows Small Business Server 2011 Standard | Four-drive, hardware-based RAID using SATA or SAS drives | Four-drive (or more), hardware-based SCSI or SAS RAID |
| LAN Network Adapter | 100/10 Mbps PCI card | 1000/100/10 Mbps PCI card | 1000/100/10 Mbps PCI-x or PCIe card |
| Backup | Two or more external USB hard drives | Two or more external eSATA or USB hard drives | Two or more external eSATA or USB hard drives |
|
The appropriate hardware for an
SBS 2011 server depends on the load you place it under. Think of load as
equal to the number of requests per unit of time multiplied by the
difficulty of fulfilling each request.
The easiest way to determine load is to sample the performance of the existing server
over a range of conditions. Of course, this is tricky when you’re
constructing a new network or restructuring an existing network.
Consider the following factors:
The usage pattern over time (number of requests per unit of time) A server
that handles an average load can easily become swamped at key times,
such as at the beginning and end of a workday, when many users
simultaneously log on or log off; during lunch, when users might browse
the Internet for personal use; or around deadlines, when many users make heavy use of file, email, or database services. The
kinds of user requests (the complexity of each request) This determines
which server subsystems are stressed most heavily. Database serving
stresses storage, memory, and possibly CPU; file serving stresses mostly
storage and I/O; remote access stresses memory and I/O primarily;
Exchange Server stresses storage, memory, and to some extent CPU.
|
6. Choosing Client Hardware and Software
When selecting client
computers for use on a network, choose systems that are fast enough to
perform adequately when running Windows7 Professional. (See Table 5
for recommended configurations.) Other operating systems—such as
Windows XP, Mac OS X, and Linux—can be made to work on an SBS 2011
network; however, they won’t provide full support for many features of
SBS.
Table 5. Recommended client computer configurations
| COMPONENT | MINIMUM CONFIGURATION | BETTER CONFIGURATION |
|---|
| Operating System | Windows XP Professional SP3 | Windows 7 Professional or Enterprise |
| CPU | Pentium 4, 2.0 GHz or faster | Dual-core processor, 2.0 GHz or faster |
| RAM | 256 MB | 2 GB |
| Hard drive | 30 GB | 100 GB |
| Network Adapter | Fast Ethernet or 802.11g | GigE, 802.11n |
| Display | 15-inch monitor running at 800 x 600 resolution | 17-inch monitor running at 1024 x 768 resolution |
Computers too slow to
adequately run a Windows XP operating system can be put to use as Remote
Desktop or Virtual Desktop Infrastructure (VDI) clients. In this configuration, users connect to a separate Windows Server 2008 R2 computer running the RD Session Host or RD
Virtualization Host role. This server can provide a full desktop
replacement (VDI) or a full desktop session (RD Session Host), or it can
be used to supplement the power of the client by running key
applications as RemoteApps and displaying them on the client.
This second server cannot be the same physical computer as the Windows Small Business Server computer unless virtualization is used to run multiple virtual machines
(VMs) on a single physical computer. With either RDS or VDI, all
processing is done on the server, and the display is sent back to the
client computer, which can run any supported RDS client operating
system.
This approach can make
more efficient use of resources and make central management easier. The
new RemoteApps simplifies deploying resource-intensive applications to
users without having to upgrade everyone’s computer, while the use of
VDI allows full-featured Windows 7 desktops to be deployed to less
powerful clients.
