4. Bike-Tuning Service Offers Example
In this section, you create an extension of the RunBase
class to send bike-tuning service offers to customers via e-mail. Each
bike-tuning offer could result in the creation of a service order
transaction. To follow this example, you must have created an extended
data type and a number sequence for bike-tuning service orders.
Note
To
send e-mail messages, you must first set up the e-mail parameters in
Dynamics AX. You access the e-mail parameters from
Administration\Setup\E-Mail Parameters. To run the example without
sending e-mail messages, omit the bits that use the SysMailer class. |
Creating the Labels
Start by creating the labels you need. Open the
Label Editor from Tools\Development Tools\ Label\Label Editor. The
label numbers that appear in the Label Editor depend on your existing
labels and choice of label file. This example refers to the labels as
@USR9, @USR10, and @USR11. Press Ctrl+N to create the labels shown in Table 1.
Table 1. Bike-Tuning Label Numbers and Text
| Label Number | Text |
|---|
| @USR9 | Bike-tuning offers. |
| @USR10 | Create bike-tuning offers. |
| @USR11 | Send bike-tuning offers to existing customers via e-mail. |
Keep in mind that you need to use label numbers in your code, so don’t forget the ones you’re given.
Creating the Table
To
store information about the generated service orders, a simple table
with only two fields must be created. If you’re not confident in your
ability to create new tables, the Microsoft Dynamics AX 2009
software-development kit (SDK) offers detailed information about
creating tables.
The table must be created with the following properties.
| Name | BikeServiceOrderTable |
| Label | @SYS79051 The label reads “Service Orders.” |
Add two fields to identify the service order and the customer. The fields must have the following properties.
| Name | CustAccount |
| ExtendedDataType | CustAccount |
| Name | BikeServiceOrderId |
| ExtendedDataType | BikeServiceOrderId |
Finally, add an index with the following properties to the table.
| Name | ServiceOrderIdx |
| AllowDuplicates | No |
| DataField | BikeServiceOrderId |
Creating the Class
Now you can begin to create the business transaction class itself. Create a new class that extends the RunBase class, as shown in this example.
public class BikeTuningOffers extends RunBase
{
}
|
Implement the two abstract pack and unpack methods of RunBase.
For now, you’ll make a very simple implementation to be able to compile
the class. You’ll make the final implementation with the correct class
members later. Insert to-do comments in the code, as shown in the following example, so that compile log messages remind you to revisit the methods.
public container pack()
{
;
    //TODO Make the final implementation.
    return conNull();
}

public boolean unpack(container _packedClass)
{
;
    //TODO Make the final implementation.
    return true;
}
|
To enable the example for execution, you must implement the run method. Because it’s too early to add the business operation, you implement an empty method, as shown here.
Implementing the Class Description
You must implement a static method that returns
a description of what the class does. This method sets the title of the
dialog box and can also be used for different kinds of user interface
presentations on the class. The description method must effectively be
executed on the tier from which it is called, so define it as client server. Use one of the labels created earlier, as shown in this example.
client server static ClassDescription description()
{
;
    return "@USR9";
}
|
Implementing Constructors
Next, you create a custom static constructor as shown here.
public static BikeTuningOffers construct()
{
    BikeTuningOffers    bikeTuningOffers;
    ;

    bikeTuningOffers = new BikeTuningOffers();

    return bikeTuningOffers;
}
|
To force users of the class to use your constructor rather than the default constructor (new),
make the default constructor protected. Right-click the class, point to
Override Method, click N5ew, and change the method as shown here.
protected void new()
{
;
    super();
}
|
To enable your job to run from a menu item, you
must create the static constructor that is called by the menu item that
you’ll eventually create. This is the method with the name main, and it should look like this.
public static void main(Args args)
{
    BikeTuningOffers    bikeTuningOffers;
    ;

    bikeTuningOffers = BikeTuningOffers::construct();

    if (bikeTuningOffers.prompt())
    {
        bikeTuningOffers.run();
    }
}
|
In the main method, you call the prompt method of the framework. This method opens the user dialog box. It returns true if the user clicks OK and the values entered are free of errors. The run method of the framework starts the actual job.
Implementing a User Dialog Box
The
user dialog box should allow the user to choose whether to create
service orders automatically for each bike-tuning offer sent to
customers via e-mail. To make this option available, you must have two
global member variables in the class declaration. One is the dialog box
field object shown in the dialog box, and the other is a variable used
to store the value entered in the dialog box field. The changed class
declaration looks like this.
public class BikeTuningOffers extends RunBase
{
    DialogField dialogCreateServiceOrders;

    NoYesId     createServiceOrders;
}
|
The RunBase
framework sets up the basic dialog box by using the dialog framework, so
you must add your dialog box field to the dialog box by overriding the dialog method. The following code sample displays what the system gives you when you override the dialog method.
protected Object dialog(DialogRunBase dialog, boolean forceOnClient)
{
    Object ret;

    ret = super(dialog, forceOnClient);

    return ret;
}
|
Rewrite this code as shown here so that it is more readable and follows the general pattern for the method.
protected Object dialog()
{
    DialogRunBase   dialog;
    ;

    dialog = super();

    return dialog;
}
|
Now add your field to the dialog box, as shown in the following code. Dialog box fields are objects of the DialogField class.
protected Object dialog()
{
    DialogRunBase   dialog;
    ;

    dialog = super();

    dialogCreateServiceOrders = dialog.addField(typeId(NoYesId), "@SYS79091",
"@SYS79091");

    return dialog;
}
|
To use the values entered in the dialog box,
you must retrieve them from the dialog box fields and store them in
member variables. When the user clicks OK or Cancel, the framework calls
the getFromDialog method to retrieve and save the values. Implement an override of this method as follows.
public boolean getFromDialog()
{
    boolean ret;
    ;
    ret = super();

    createServiceOrders = dialogCreateServiceOrders.value();

    return ret;
}
|
When the user clicks OK, the framework calls the validate
method. Although further validation isn’t necessary for this example,
the following code shows how to implement an override that prevents the
user from running the job without selecting the Create Service Orders
check box.
public boolean validate()
{
    boolean ret;
    ;
    ret = super();

    if (ret && createServiceOrders == NoYes::No)
    {
        ret = checkFailed("You cannot run the job without creating service orders.");
    }

    return ret;
}
|
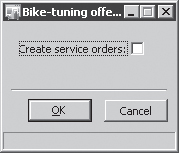
You can view the user dialog box, shown in Figure 1, by opening the class. Right-click the class in the AOT, and then click Open.
Implementing the run Method
You can now write the sendOffers method that contains your business operation as follows.
private void sendOffers()
{
    CustTable               custTable;
    BikeServiceOrderId      bikeServiceOrderId;
    BikeServiceOrderTable   bikeServiceOrderTable;
    SysMailer               sysMailer;
    ;

    sysMailer = new SysMailer();

    ttsBegin;

    while select custTable
    {
        if (createServiceOrders)
        {
            bikeServiceOrderId =
NumberSeq::newGetNum(SalesParameters::numRefBikeServiceOrderId()).num();
            bikeServiceOrderTable.BikeServiceOrderId    = bikeServiceOrderId;
            bikeServiceOrderTable.CustAccount           = custTable.AccountNum;
            bikeServiceOrderTable.insert();
        }

        sysMailer.quickSend(CompanyInfo::find().Email,
                            custTable.Email,
                            "Tune your bike",
                            strFmt("Hi %1,\n\nIt's time to tune your
                            bike....", custTable.name));
    }

    ttsCommit;
}
|
To call the sendOffers method, you must add it to the run method, which, as you might remember, is called from the value main if the user clicks OK in the dialog box and the values pass validation. The run method follows a specific pattern, as shown here.
public void run()
{
    #OCCRetryCount
    ;
    if (! this.validate())
        throw error("");

    try
    {
        ttsbegin;

        // Place the code that carries out the actual business transaction here.

        ttscommit;
    }
    catch (Exception::Deadlock)
    {
        retry;
    }
    catch (Exception::UpdateConflict)
    {
        if (appl.ttsLevel() == 0)
        {
            if (xSession::currentRetryCount() >= #RetryNum)
            {
                throw Exception::UpdateConflictNotRecovered;
            }
            else
            {
                retry;
            }
        }
        else
        {
            throw Exception::UpdateConflict;
        }
    }
}
|
This pattern ensures that the transaction is
carried out within the scope of a database transaction and that the
execution can recover from a deadlock or update conflict in the
database. The run method calls validation again because someone could call run without showing the dialog box. In run,
an error is thrown to completely stop the execution if validation
fails. (Using the class without showing the dialog box is discussed
later in this section.) When you add the call to the sendOffers method that holds your business operation, the run method looks like this.
public void run()
{
    #OCCRetryCount
    ;
    if (! this.validate())
        throw error("");

    try
    {
        ttsbegin;

        this.sendOffers();

        ttscommit;
    }
    catch (Exception::Deadlock)
    {
        retry;
    }
    catch (Exception::UpdateConflict)
    {
        if (appl.ttsLevel() == 0)
        {
            if (xSession::currentRetryCount() >= #RetryNum)
            {
                throw Exception::UpdateConflictNotRecovered;
            }
            else
            {
                retry;
            }
        }
        else
        {
            throw Exception::UpdateConflict;
        }
    }
}
|
Implementing the pack and unpack Methods
Now is a good time to revisit the pack and unpack methods. Start in the class declaration by setting up the member variables you want to store. In this example, you store the createServiceOrders
variable. State the version number of the current set of member
variables. The version number allows you to add new member variables
later and still retrieve the old settings from the last execution of the
operation. Also, you can specify the version number to be treated as
the first version of the member variable list in the #Version1
declaration. This allows you to treat another version as the first
version, which you might choose to do if you simply want to ignore a
range of older versions. The first version is typically version 1.
public class BikeTuningOffers extends RunBase
{
    DialogField dialogCreateServiceOrders;

    NoYesId     createServiceOrders;

    #define.CurrentVersion(1)
    #define.version1(1)
    #localmacro.CurrentList
        createServiceOrders
    #endmacro
}
|
When more variables are stored in the #CurrentList macro, separate each variable by a comma.
You must change the pack method to follow this specific pattern.
public container pack()
{
;
    return [#CurrentVersion, #CurrentList];
}
|
And you must change the unpack method to follow this pattern.
public boolean unpack(container _packedClass)
{
    Version version = runbase::getVersion(_packedClass);
    ;

    switch (version)
    {
        case #CurrentVersion:
            [version, #CurrentList] = _packedClass;
            break;

        default:
            return false;
    }

    return true;
}
|
You also need to make the following change to your implementation of the dialog method to show the old values in the dialog box fields.
protected Object dialog()
{
    DialogRunBase   dialog;
    ;

    dialog = super();

    dialogCreateServiceOrders = dialog.addFieldValue(typeId(NoYesId),
createServiceOrders, "@SYS79091", "@SYS79091");

    return dialog;
}
|
Notice that you call the addFieldValue method rather than the addField method. The addFieldValue method allows you to pass a default value to the dialog box field. The RunBase framework ensures that the variable is set to the value saved in the SysLastValue framework at this point in time.
Creating a Menu Item
To make the operation available from the area
page and the navigation pane, you must create a menu item for the
operation. The menu item must be attached to a configuration key and a
security key.
To create a new configuration key, open the AOT
and expand Data Dictionary, right-click Configuration Keys, and then
select New Configuration Key. Right-click the new configuration key and
select Properties to open the property sheet. Change the name to
BikeTuningOffers, and add the label number @USR9 to the Label
field. The label should read “Bike-tuning offers.” If you want to make
the configuration dependent on another configuration key, you should
fill in the ParentKey property. For this example, make the configuration key dependent on the Quotation configuration key by entering QuotationBasic in the ParentKey property field.
You should choose the security key property for
the menu item from the existing security keys. The chosen security key
must match the position of the menu item on the area page or in the
navigation pane. For example, if you want to put your menu item under
Accounts Receivable\Periodic, the security key must be CustPeriodic.
With the configuration and security keys in
place, you’re ready to create the menu item. In the AOT, expand Menu
Items, right-click Action, and then select New Menu Item. Right-click
the new menu item, and then select Properties. Fill out the properties
as described in the Table 2.
Table 2. Bike-Tuning Menu Item Properties
| Property | Value | Explanation |
|---|
| Name | BikeTuningOffers | Name of the menu item as it appears in the AOT. |
| Label | @USR10 | The label should read, “Create bike-tuning offers.” |
| HelpText | @USR11 | The label should read, “Send bike-tuning offers to existing customers via e-mail.” |
| ObjectType | Class | Type of object opened by the menu item. |
| Object | BikeTuningOffers | Name of the object opened by the object. |
| RunOn | Server | Execute the job on the server tier. |
| ConfigurationKey | BikeTuningOffers | The new configuration key that you just created. |
| SecurityKey | CustPeriodic | The security key chosen according to the position of the menu item on the area page or in the navigation pane. |
Tip
You can drag the class node in the AOT onto the Action node under Menu Items to create a new menu item with the same name as the class and the ObjectType and Object properties already defined. |
Now add the menu item to the Accounts
Receivable submenu. In the AOT, expand Menus, right-click Cust, point to
New, and then click Menu Item. Right-click the new menu item, and then
select the Properties tab. Change Name to BikeTuningOffers. Change MenuItemType to Action, and MenuItemName
to BikeTuningOffers. Finally, move the menu item to the Periodic folder
of the menu. Save the menu, and then restart the Dynamics AX client to
make the new menu item appear in the navigation pane and on the area
page.
