You just learned how to add and track contacts in
Microsoft Dynamics CRM one record at a time. However, you might already
have a lot of contacts in your Outlook file that you would like to
track, and you probably don’t want to link them one record at a time,
especially if you have hundreds of contacts. Fortunately, Microsoft
Dynamics CRM for Outlook includes an Add Contacts wizard that helps you quickly and easily add your existing Outlook contacts to Microsoft Dynamics CRM.
Before you use the Add Contacts wizard, you might want to create different folders for your contacts
to separate them into different groups, such as business contacts and
personal contacts. When you work through the wizard, you can select the
contact folders to use. If you don’t have any contact folders, the Add Contacts wizard will include all of your contacts in the process.
Alternatively, instead of creating new folders, you can assign your existing Outlook
contacts to different categories by using Outlook’s category
functionality. During the Add Contacts wizard import process, you can
choose the categories of contacts to add to Microsoft Dynamics CRM.
In this exercise, you will use the Add Contacts wizard to load existing Outlook contacts into Microsoft Dynamics CRM.
Note:
SET UP Start Outlook with Microsoft Dynamics CRM for Outlook installed, if necessary, before beginning this exercise.
On the ribbon, click the File tab and in the left pane, click CRM.
 Click the Import Contacts button, and click Add Contacts on the submenu.
Microsoft Dynamics CRM for Outlook launches the Add Contacts wizard.
Click Next.
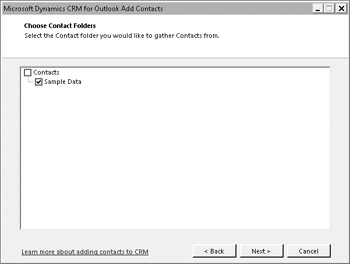
If
you have created multiple contact folders, the Choose Contact Folders
step appears. (If you don’t have multiple folders, the wizard skips this
step.)

Select the folder you want to use for this process and click Next.
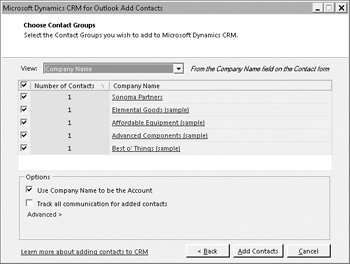
The wizard analyzes the contacts and displays the Choose Contact Groups dialog box.

On this screen, you
can choose which contacts to add to Microsoft Dynamics CRM. You can
group the contacts by company name, email domain, or category. If you
want to see the contacts in any of the groups, click the group name
hyperlinked in blue to display a new window that lists the contacts.
You
can choose the groups of records to import by selecting the check boxes
of the records that you want to add to Microsoft Dynamics CRM.
For this exercise, select a group of records to import.
Tip:
It is recommended that you only select one or two groups to test that the import works as you expect.
You might notice that the Number Of Contacts column includes color coding in the form of red, yellow, or green bars. These colors indicate the following:
Green 100 percent of the contacts already exist in Microsoft Dynamics CRM.
Yellow At least 50 percent of the contacts already exist in Microsoft Dynamics CRM.
Red At least one contact already exists in Microsoft Dynamics CRM.
In
addition to adding contacts to Microsoft Dynamics CRM, the Add Contacts
wizard can also import email messages and appointments associated with
the imported contacts. To enable this option, select the Track all communications for added contacts check box.
By
default, the wizard will automatically create new accounts in Microsoft
Dynamics CRM linked to the imported contacts. To disable this option,
clear the Use Company Name to be the Account check box.
Note:
Troubleshooting
If your system administrator has enabled the duplicate checking
settings for Microsoft Dynamics CRM, the Add Contacts wizard might not
create account and contact records during the import process. Check with
your system administrator to see if this applies to your system.
Alternatively, Microsoft Dynamics CRM might already include account records that match the contacts you’re importing.
If you run the Add Contacts wizard with the default settings, it will
import and create the contacts, but it won’t link your imported contacts
to the existing accounts automatically. Instead, you can choose to
manually match the contacts you’re importing to existing Microsoft Dynamics CRM accounts.
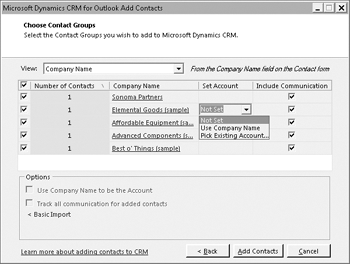
To do this, click the Advanced link. Two new columns appear. In the Set Account column, click in the box to display a new menu.

From this menu, click Pick Existing Account.
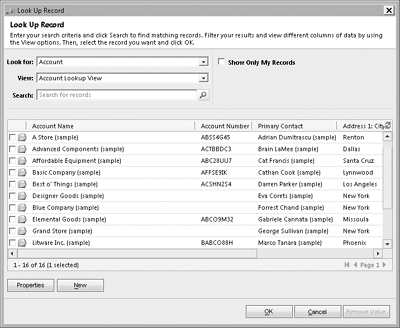
The account lookup record dialog box appears. Select the account you want to manually link the contact to.

For this exercise, select any account, and then click OK to return to the wizard.
Click Add Contacts.
The
Add Contacts wizard runs through the process and displays a final
confirmation screen, which includes a listing of any errors that might
have occurred during the import process.
Tip:
You can run the Add Contacts wizard as often as necessary, to import new contacts at a later time.