Jumping to the right location with Breadcrumbs
Dynamics GP 2010 has
embraced the concept of Breadcrumbs. Breadcrumbs provide a fantastic
opportunity to ease system navigation. By showing the path through the
system, new users gain an understanding of how to navigate within
Dynamics GP. Experienced users learn that it's a fast way to hop through
the system without accessing menus. In this recipe, we'll look at how
to use breadcrumbs to improve navigation through Dynamics GP.
Getting ready
In Dynamics GP, select Financial from the Navigation Pane. On the Financial Area Page select Transaction Entry in the Transactions area. This will open the Transaction Entry window for a general journal entry.
How to do it...
Let's now look at how breadcrumbs can improve navigation for a user by completing the following steps:
1. On the upper left of the screen is the breadcrumb trail. It shows Home | Financial | Financial:

2. This is the path through the system to this window. It indicates that from the Home page, the user has navigated to the Financial Area Page.
3. On the Navigation Pane to the left select Accounts. This opens the Accounts Navigation List and changes the breadcrumb to show Home | Financial | Accounts. Select Financial from inside the breadcrumb trail to go back one step and return to the Financial Area Page.
Managing personal reports with My Reports
My Reports is a section of
the Dynamics GP Home page designed to provide fast access to reporting
options in Dynamics GP. Similar to the Quick Links functionality, My
Reports provides single-click access to reports, replacing multiple
clicks and drill-downs with a direct connection.
In Dynamics GP, every
prebuilt report (also known as a Report Writer report) requires an
option. An option is simply a named group of settings for a particular
report. For example, a user may have a Receivables Aged Trial Balance
report with date and selection criteria designed for month-end
reporting. The report name is always Receivables Aged Trial Balance, but
the option name to describe those particular month-end settings might
be Month End.
The My Reports feature
provides one-click access to reports with saved options. In this recipe
we'll look at how to add a report to My Reports.
How to do it...
To add a report to My Reports, we will need to complete the following steps:
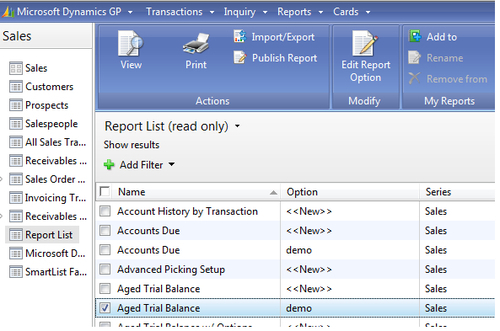
1. Select the Sales button from the Navigation Pane on the left. From the list on the left, select Report List.
2. In the center section, scroll down to the report named Aged Trial Balance with the Option as demo and select the checkbox to the left.
demo is a prebuilt, saved report option. Report options are saved report settings for items such as dates and restrictions.
3. Click on Add to to add this to the My Reports section of the Home page. Accept the default name for the report by clicking on OK:

4. Click on the Home button on the Navigation Pane to return to the Home page. The Aged Trial Balance-demo report now appears on the Home page under My Reports:

5. Click on the Aged Trial Balance-demo link under My Reports to run the report automatically.
There's more...
Other features and options are available to assist with managing reports in Dynamics GP.
Reports without options
Reports without options cannot be added to the My Reports
section of the Home page. Consequently, users need to create and save
report options to make those reports available to the Home page.
Better dates in report options
A technique for setting up report dates for automatic reporting, Controlling reporting dates with Beginning and Ending Periods.