In most modules, Microsoft
Dynamics GP provides the option to post transactions individually or to
collectively post a group of transactions in a batch. The common best
practice when implementing Dynamics GP is to use Batch Posting, not
individual transaction posting.
The reasoning behind
this preference is that batches and batch posting provide a number of
benefits over transactional posting. These benefits include the ability
to save transactions without posting them, improved error handling, and
the ability to post multiple transactions or multiple batches at once.
Additionally, batches can be used to control the date that transactions
are posted on making it easy to ensure that transactions are posted in
the right period.
In this recipe, we will look
at batch naming and posting techniques along with error handling options
designed to minimize posting errors.
Getting ready
To set up the process to post transactions by batch:
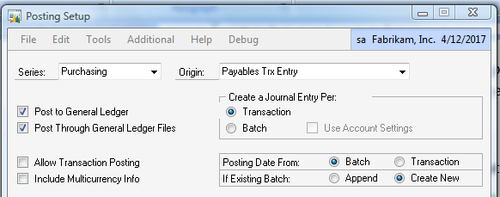
1. In Dynamics GP select Administration from the Navigation Pane. Select Posting under the Posting heading in the Setup section on the Administration Area Page.
2. Select the Series to change the settings for. For our example, select Purchasing.
3. Select a posting Origin. In this example, select Payables Trx Entry to control posting settings for accounts payable voucher entry:

4. Deselect the Allow Transaction Posting checkbox to force posting to the general ledger by batch.
5. Select the Transaction radio button under Create a Journal Entry Per to avoid rolling up transactions in the general ledger.
Sending
batches of subledger transactions to the general ledger as a single
transaction has its roots in ledger paper accounting. This practice
moved to software when disk space was at a premium. It is almost never
needed now and complicates tracing subledger transactions through the
general ledger.
6. Click on Save, then on OK to finish.
How to do it...
To set up a batch using best practices:
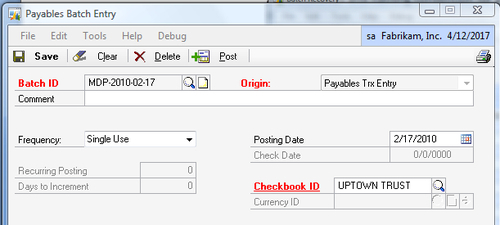
1. Select Purchasing from the Navigation Pane. Select Batches under the Transactions section on the Purchasing Area Page.
2. Name the batch with your initials followed by that day's date. My example batch is named MDP-2010-02-17:

3. Select Payables Trx Entry in the Origin field.
4. Set Frequency to Single Use
for our example. Recurring batches have a frequency other than single
use (monthly, weekly, and so on). They are designed to be posted
multiple times. For recurring batches, the following recommendations
apply:
Start
recurring batches with the letter 'z' to cluster them at the bottom of
lookup windows. It may make sense to date recurring batches with their
end date instead of creation date to make it easy to identify when this
batch will stop recurring.
Provide
a complete description and notes for recurring batches since the
rational for the recurring batch may fade from memory over time.
If there are multiple transactions in a recurring batch ensure that they are all designed to stop repeating at the same time.
5. Enter the Posting Date for the batch following these recommendations:
One period per batch:
Users shouldn't mix transactions from multiple periods in a single
batch. This makes it impossible to post the transactions in the proper
period since the entire batch will post in one period.
The
only exception to this is the general ledger (GL) batches. General
ledger batches always use the date on the transaction for posting. There
is no option to post GL batches by date.
Post using the batch date:
Posting using the batch date ensures that all of the transactions in
the batch post using the same date and the date is visible with a glance
at the batch. This contrasts with individual posting where the posting
data could be different on each transaction.
For transaction
posting the true posting date is hidden behind an expansion arrow on the
date field making it difficult to validate the posting date on multiple
transactions.
6. Click on the Transactions button to add transactions to a batch.
7. Once transactions are entered batches can be posted from the same window. When posting batches:
Non-recurring
batches should disappear when posted. In the event that this doesn't
happen users need to select the printer icon in the upper right to print
the batch edit list either to paper or to the screen. Printing the
batch edit list prior to posting is a best practice but this process can
be impractical for batches with a large number of transactions.
The
Transaction Edit List will show batch-level errors at the top and
transaction-level errors below any problem transactions. The most common
batch-level error is a closed fiscal period preventing batches from
posting. For transaction-level errors missing accounts or account
related problems are seen most often.
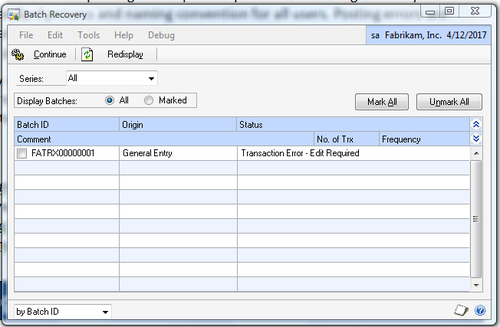
Batches that contain errors may fail posting and end up in Batch Recovery. The Batch Recovery window is found in the Administration Area Page under Routines.
Batch Recovery will either resolve minor errors and continue the
posting or return the batch to a state where a Transaction Edit List can
be printed and reviewed for corrections:

How it works…
Following these
batch-level posting techniques simplifies batch management by providing a
standard process and naming convention for all users. Posting errors
are reduced by managing posting dates at the batch level and ensuring
that batches only cover a single period.
Years
of experience have shown consultants and advanced users that
transactions posted in a batch have a better chance of recovery in the
event of a catastrophic posting error such as a network outage during
posting. This isn't acknowledged explicitly in any of the software
documentation but there is a wealth of painful stories illustrating that
transactions posted by batch recover from errors better than
individually posted transactions.