Moving Databases
Sometimes you need to move a database or database file. There are several ways to accomplish this task:
- Make a database backup and then restore it to a new location.
- Alter the database, specifying a new location for the database file.
- Detach the database and then reattach the database, specifying an alternate location.
Restoring a Database Backup to a New Location
The
database backup option is fairly straightforward. You make a backup of
the database and then write it to a file or files. The file is restored,
and any changes to the location of the database files are made at that
time.
You can easily detach a
database by right-clicking the database in the Object Explorer and
choosing Tasks and then Detach. When the database is detached, you can
move the file(s) to the desired location. You can then right-click on
the database’s node and select Attach. The Attach Databases screen that
appears allows you to select the .mdf
file and change the file location for any of the related database files.
The steps involved in detaching and attaching a database are discussed
in detail in the later section “Detaching and Attaching Databases.”
Using ALTER DATABASE
The ALTER DATABASE option for moving user database files was added in SQL Server 2005. This option involves the following steps:
1. | Take the database offline.
|
2. | Manually move the file(s) to the new location.
|
3. | Run the ALTER DATABASE command to set the FILENAME property to the new file location.
|
4. | Bring the database online.
|
The following example uses the ALTER DATABASE command to move the log file for the AdventureWorks2008 database to the root of the C: drive.
ALTER DATABASE AdventureWorks2008
 MODIFY FILE (NAME = AdventureWorks2008_Log,
  FILENAME = 'C:\AdventureWorks2008_log.ldf')
Caution
Use caution when specifying the FILENAME parameter to move a database log file. If the FILENAME setting specified in the ALTER DATABASE
command is incorrect and the file does not exist, the command still
completes successfully. When the database is brought back online, a
message stating that the file can’t be found appears, and a new log file
is created for you. This invalidates the old log file.
Detaching and Attaching Databases
A convenient way to move or
copy database files is to detach and attach databases. Detaching
database files removes the database from an instance of SQL Server but
leaves the database files intact. After the database is detached, the
files associated with the database (that is, .mdf, .ndf, and .ldf files) can be copied or moved to an alternate location. You can then reattach the relocated files by using the CREATE DATABASE command with the FOR ATTACH option.
Tip
The process of detaching and attaching a database is extremely fast. It is therefore a good alternative to BACKUP and RESTORE
when you’re copying a database to another location. The catch with
detaching a database is that all users must be disconnected from the
database, and the database is unavailable during the detach and copy of
the database files.
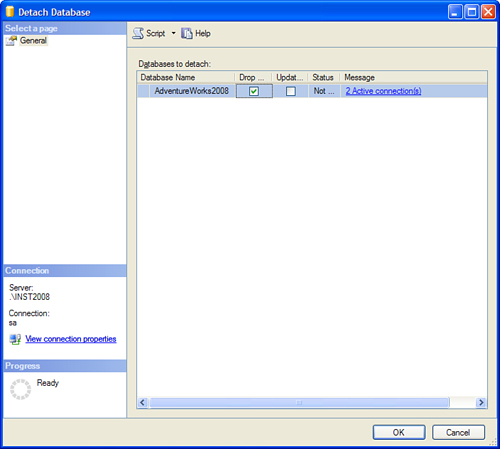
To detach a database, you right-click the database in Object Explorer and select Tasks and then Detach. Figure 3 shows an example of the Detach Database dialog box for detaching the AdventureWorks2008
database. You can specify several options, including a handy option
(called Drop Connections) to kill any user processes (SPIDs) that may
still be connected to the database when the detach operation is running.
If you do not select the Drop Connections option, and users are still
connected to the database, the detach operation fails.

Other options available
during the detach operation are also useful. The Update Statistics
option updates out-of-date statistics for all the database tables before
you detach the database. The statistics update can take some time on
larger databases, so this slows down the overall detach operation. The
other option, Keep Full Text Catalogs, is new to SQL Server 2008. It
allows you to detach any full-text catalogs associated with the
database. These detached full-text catalogs are then reattached along
with the database when the files are attached.
The attach operation is
simple to execute through SMSS. In Object Explorer, you simply
right-click the database’s node and select the Attach option. The Attach
Databases dialog box appears, allowing you to specify the database
file(s) you want to attach. You need to click the Add button to be able
to select a database file for restoration. When you select the main .mdf file associated with the database, the associated file information for the other related database files is populated as well.
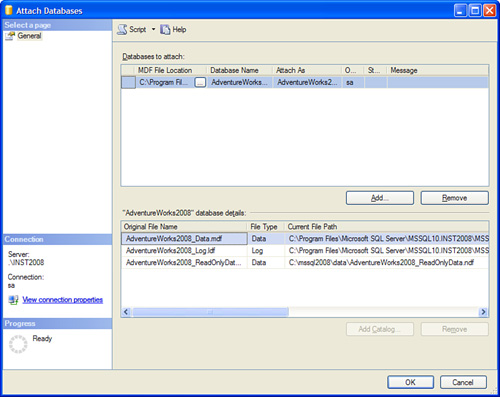
Figure 4 shows the Attach Databases dialog box for the AdventureWorks2008 database. The top portion of the dialog box lists the main (.mdf) database file selected for the AdventureWorks2008
database. The bottom portion lists the related files. You have an
option to attach the database with a different name by changing the
Attach As name located at the top of the screen. You can also edit the
database details at the bottom of the screen and enter the location of
the database files that will be attached. The Current File Path column
displays the original file locations determined from the .mdf file. If the files were moved to a new location, this is the place to change the current file path to the new location.

You can also accomplish the detach and attach operations by using T-SQL. You perform the detach operation with the sp_detach_db system stored procedure. You perform the attach operation with the CREATE DATABASE command, using the FOR ATTACH option. The following is an example of T-SQL commands for detaching and attaching the AdventureWorks2008 database:
--Detach the database
EXEC master.dbo.sp_detach_db
 @dbname = N'AdventureWorks2008', @keepfulltextindexfile=N'false'
GO
--Attach the database
CREATE DATABASE [AdventureWorks2008] ON
( FILENAME = 'C:\Program Files\Microsoft SQL
Server\MSSQL.1\MSSQL\Data\AdventureWorks2008_Data.mdf' ),
( FILENAME = 'C:\Program Files\Microsoft SQL
Server\MSSQL.1\MSSQL\Data\AdventureWorks2008_log.LDF' )
 FOR ATTACH
Note
You can use the sp_attach_db procedure to attach a database, but Microsoft recommends that you use the CREATE DATABASE ... FOR ATTACH command instead. The sp_attach_db procedure has been deprecated and is slated for removal in a future release of SQL Server.
SQL Server 2008 has the capability to attach a database without all the log files. You do this by using the ATTACH_REBUILD_LOG
clause when creating the database. When you use this clause, SQL Server
rebuilds the log files for you. This capability is useful on large
databases that may have large logs that are not needed in the
environment where the database files are attached. For example, a READ_ONLY database would not need the log files that may be associated with its production counterpart. The following example uses the ATTACH_REBUILD_LOG clause to create a copy of the AdventureWorks2008 database:
CREATE DATABASE [AdventureWorks2008Temp] ON
( FILENAME = 'C:\Temp\AdventureWorks2008_Data.mdf' )
 FOR ATTACH_REBUILD_LOG