User Profile Synchronization
synchronizes directory or business system information with the
SharePoint store. This is a two-way sync. However, you must decide
whether a specific user profile property will be exported or imported.
By default, user profile properties are configured to be imported.
Once this information is
imported, it can be utilized in audiences and the social experience, for
example, the Silverlight Organization browser found under My Profile.
SharePoint can sync with the following:
Active Directory Domain Services
Novell eDirectory version 8.7.3 (LDAP)
SunOne version 5.2
IBM Tivoli 5.2
Business Data Connectivity Service (BCS)
In this recipe, we will set up a connection and start synchronization.
Getting ready
You must have farm-level
administrative permissions to the Central Administration site. The User
Profile Synchronization service should be started.
How to do it...
1. Open the Central Administration screen and click Application Management.
2. The third section is Service Applications. Under this section, click Manage service applications.
3. Find User Profile Service Application and click on the name of the service. This will open the User Profile Management section.
4. Under the Synchronization section, click Configure Synchronization Connections.
5. Click Create New Connection.
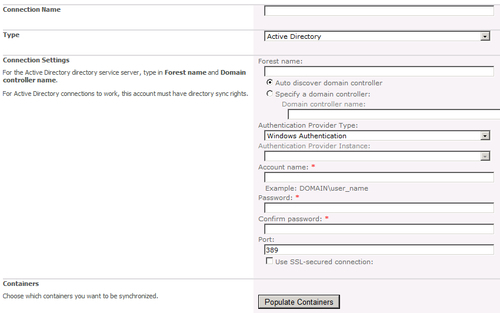
6. The following page is displayed:

Fill in the required information.
Connection Name: ADUsers.
Type: Active Directory.
Forest name: Enter the name of your forest (that is, domain.com).
Authentication Provider Type: Windows Authentication (by default).
Account name: This should be in the form of domain/administrator.
Password: Type in the password required to access the account.
Confirm password: Confirm the password you have typed in the Password field.
7. Click Populate Containers.
8. Click the OU container that contains the account you want to import. Do no click Select All.
10. Navigate back to User Profile Administration.
11. Under the Synchronization section, click Start Profile Synchronization.
12. If this is not the first time synchronization is being run, ensure that the Start Incremental Synchronization radio button is chosen on the synchronization page. Click OK.
How it works...
Synchronization is the
process of updating profile information in SharePoint from a directory
or business application. SharePoint 2010 has a functional process that
accomplishes this task.
Synchronization
functionality relies on timer jobs. The User Profile Service must be
started in order for the jobs to run properly.
The timer jobs let the User Profile Service interface with three databases:
Social DB
Profile DB
Sync DB
Information is updated based on the mapping direction (Import/Export) in the user profile.
The account name used in step 6 needs to have Replicating Directory Changes permission on the domain.
There's more...
To ensure that the User Profile Synchronization Service is running, follow these steps:
1. In Central Administration, click Manage Services on server under the section named Service Applications.
2. Navigate to the User Profile Synchronization Service as seen in the following screenshot:

More info
The User Profile Service cannot utilize managed accounts.