Dynamics AX can store images
to be used along with data. Images could be used for various purposes,
like a company logo that is displayed in every printed document,
employee photos, inventory images, and so on. One of the most convenient
ways to attach images to any record is to use the Document handling feature of Dynamics AX. This does not require any changes in the application. But Document handling is a very generic way of attaching files to any record and might not be suitable for specific circumstances.
Another way of attaching
images to records could be to utilize standard application objects,
though minor application changes are required. The company logo in the Company information form is one of the places where an image is stored in exactly this way.
In this recipe, we will
explore the latter option. As an example, we will add the ability to
store an image for each inventory item. Although inventory items already
have a similar option, which is a part of the Enterprise Portal
Framework, it is very inventory specific and unlike our example cannot
be used anywhere else.
How to do it...
1. Open the InventTable form in AOT and add a new MenuItemButton control to the bottom of its ButtonGroup with the following properties:
|
Property
|
Value
|
|---|
|
Name
|
CompanyImage
|
|
MenuItemType
|
Display
|
|
MenuItemName
|
CompanyImage
|
|
Text
|
Item image
|
|
DataSource
|
InventTable
|
2. Open Inventory management | Item Details and notice a new Item image button on the right:
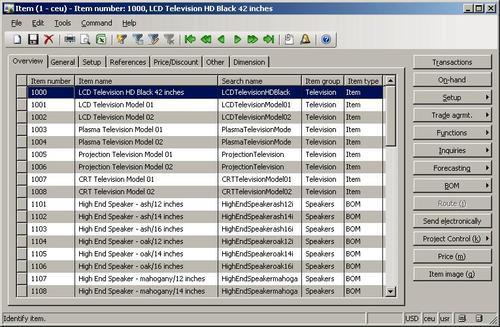
3. Click on the button and then use the Change button to upload a new image for the selected item:

4. The Remove button could be used to delete an existing image.
How it works...
There are only three standard Dynamics AX objects involved here:
1. The CompanyImage
table, which holds image data and the information about the record the
image is attached to. The separate table allows easily hooking image
functionality to any other existing table without modifying it or
decreasing its performance.
2. The CompanyImage form, which shows an image and allows modifying it.
3. The Display menu item CompanyImage, which opens the form.
We only need to add the menu item to any form, like InventTable in our example and set its DataSource property against which we want to store an image. The rest is done by the application.
There's more...
The following two
topics will explain how a stored image could be displayed as a new tab
page on the main form and how a stored image could be saved back to
file.
Displaying an image as a part of a form
Attaching an image to
a record sometimes is not enough. I noticed that sometimes users find
that clicking the button to see an image is not as convenient as having
it on the same form. So here we will extend our recipe by displaying the
stored image on a new tab page.
First, we need to add a new tab page to the end of the InventTable form's Tab control. This is where our image will be displayed. Set the tab page properties:
|
Property
|
Value
|
|---|
|
Name
|
Image
|
|
Caption
|
Image
|
Add a new Window type control to the tab page. This control will be used for displaying the image. Set its properties:
|
Property
|
Value
|
|---|
|
Name
|
ItemImage
|
|
AutoDeclaration
|
Yes
|
|
Height
|
Column height
|
|
Width
|
Column width
|
By setting Height and Width to Column height and Column width respectively, we ensure that the image control takes all possible space.
Add a new method to the InventTable form:
void loadImage()

{
Image img;
CompanyImage companyImage;
;
companyImage = CompanyImage::find(
InventTable.dataAreaId,
InventTable.TableId,
InventTable.RecId);
if (companyImage.Image)
imagesimagesdisplaying, as part of form{
img = new Image();
img.setData(companyImage.Image);
ItemImage.image(img);
}
else
{
ItemImage.image(null);
}
}
This method first finds a CompanyImage record, which is attached to the current record and then displays the binary data using the ItemImage control. If no image is attached the Window control is cleared to display empty space.
Override pageActivated() of the newly created tab page with:
public void pageActivated()

{;
super();
element.loadImage();
}
In here, we simply call the previously created method once the user selects the image tab page.
The form should look like following in AOT:
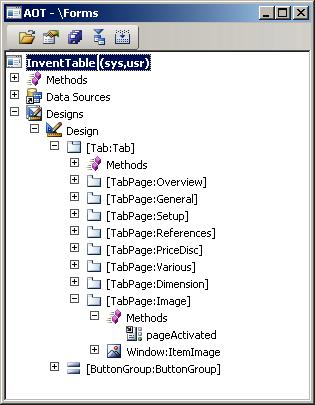
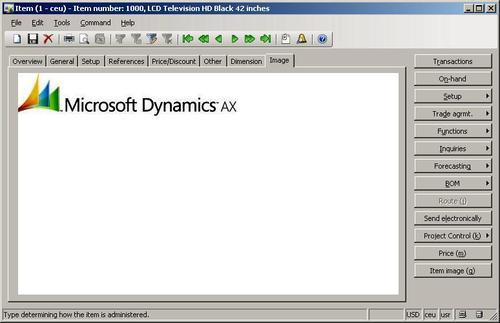
Now open Item Details from Inventory management and note the new tab page with the same image displayed:
Saving a stored image as a file
A couple of times in my
practice it so happened that people lost images loaded into the system.
Standard Dynamics AX does not provide a way of exporting loaded images.
The images could be saved as files by creating and running a small job,
which uses the Image class for image processing. In this topic, we will go a little beyond that and we will add a new button Save as to the Image form, which will allow us to save the loaded image as a file.
Let's add a new Button control to the CompanyImage form's ButtonGroup with the following properties:
|
Property
|
Value
|
|---|
|
Name
|
SaveAs
|
|
Text
|
Save as
|
Create a new method on the form:
void saveImage()

{
Image img;
Filename name;
str type;
#File
;
if (!imageContainer)
{
return;
}
img = new Image();
img.setData(imageContainer);
type = '.'+strlwr(enum2value(img.saveType()));
name = WinAPI::getSaveFileName(
element.hWnd(),
[WinAPI::fileType(type),#AllFilesName+type],
'',
'');
if (name)
{
img.saveImage(name);
imagesimagessaving, as file}
}
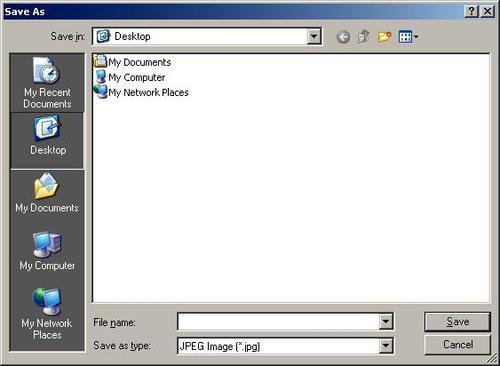
This method will present the user with Save As dialog allowing choosing of the desired file name for saving the current image. Note that imageContainer
is a form variable, which holds image data. If it is empty, it means
there is no image attached and we do not run any of the code. We also
check the loaded file type to make sure that our Save As dialog filters only files of that type.
Override the button's clicked() with the following code to make sure saveImage() is executed once the user clicks the button:
void clicked()

{;
super();
element.saveImage();
}
In AOT the form should look like this:
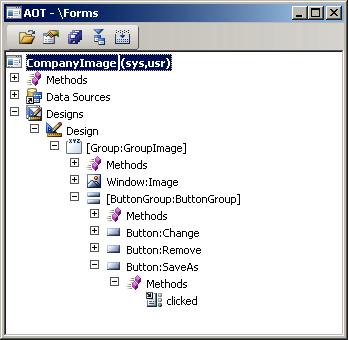
Now when you open the Item image form a new button Save as is available:

Use this button to save the item image as a file:
The CompanyImage form is used system wide, so note that this button is now available system wide too.