Database creation is a
relatively straightforward operation that you can perform by using T-SQL
statements or SSMS. Because the data and log files are created at the
time the database is created, the time it takes for the database to be
created depends on the size and number of files you specify when you
create the database. If there is not enough disk space to create any of
the files specified, SQL Server returns an error, and none of the files
are created.
Note
Enhancements
that were added in SQL Server 2005 and still exist in SQL Server 2008
have reduced the amount of time it takes to create a database. The
reduction in creation time is attributed to a change in the way the
database files are initialized. The initialization of the file with
binary zeros is now deferred until the file is accessed via SQL queries.
This results in much faster database creation and expansion. For
example, we created a database with a 1GB data file on a machine running
SQL Server 2008. The database was created in approximately 1 second.
The same database was then created in SQL Server 2000, running on the
same machine. The creation of the database on SQL Server 2000 took
approximately 36 seconds. This new feature will make a lot of folks who
create and support large databases very happy.
Using SSMS to Create a Database
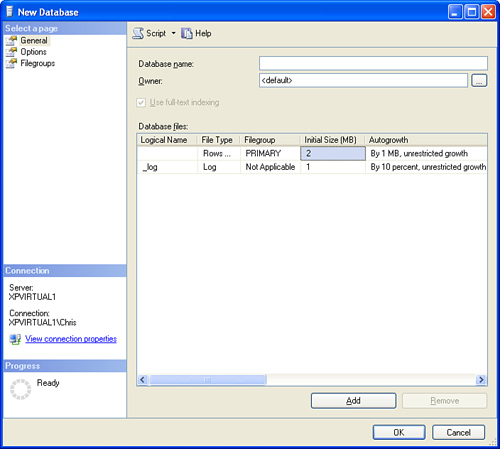
The Object Explorer in SSMS makes creating a database simple. You right-click the Databases node and select New Database. The New Database dialog appears, as shown in Figure 1.
The General page is selected by default. It allows you to select the
essential information needed to create a database, including the
database name, database owner, and location of the database files.

Some related information
is populated when you enter the database name. For example, the logical
name of the database files is populated using the database name. The
data file (which is identified with the file type Data) is named the same as the database. The log file (file type Log) has a database name with the suffix _log. The logical filename can be changed, but it must be unique within the database.
The location of the
database files is an important decision. The location for each file is
entered in the Path column in the Database Files grid. This column,
located on the right side of the Database Files grid, includes an
ellipsis that can help you navigate the directory structure on your
server. When you select the location of these files, you should keep in
mind the following:
Disk space—
Databases, by nature, grow over time. You need to make sure the
location where you place your database files has sufficient space for
growth.
Performance—
The location of your database files can affect performance. Generally,
the data and log files should be placed on separate disk drives (with
separate controllers) to maximize performance.
Organization—
Choosing a common location or directory for your database files can
help keep things organized. For example, you could choose to place your
data files in directories named \mssql\data\ and \mssql\log instead of using the long pathname that SQL Server uses by default.
There are several
restrictions related to the database files specified. Each filename must
be unique and cannot be used by another database. The files specified
for a database must be located on a local drive of the machine where SQL
Server is installed, a SAN drive, or an iSCSI-based network drive.
Finally, you need to make sure the path specified exists on the drive
prior to creating the database.
Note
The default path for the
database files is populated based on database settings values specified
in the Server Properties dialog. To open this dialog, you right-click
the server in the Object Explorer and choose Properties. When the Server
Properties dialog appears, you choose the Database Settings page, where
you see the database default locations. If the database default
locations for the log and data files are not specified, the paths to the
master database files are used. You can determine the paths to the master
database files by looking at the startup parameters for the SQL Server
instance. You can view these startup parameters within the SQL Server
Configuration Manager. After you open this application, you right-click
the SQL Server service and select Properties. On the Advanced tab of the
Properties dialog that appears, you find the setting named Startup
Parameters. The –d parameter identifies the location of the data file for the master database. The –l parameter identifies the location of the log file for the master database.
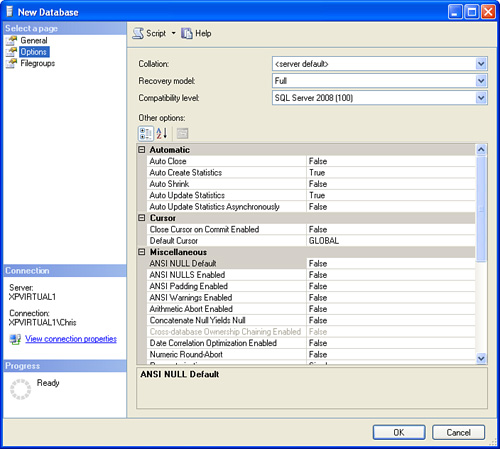
The remaining pages in the New
Database dialog allow you to set database options, utilize filegroups,
and set extended properties. Three settings at the top of the Options
page deserve special attention: Collation, Recovery Model, and
Compatibility Level. Figure 2 shows the Options page.

Collation
specifies how strings are sorted and compared. The selection of
collation is language dependent and addresses differences in the way
characters are ordered. The default collation for a database is based on
the server default, which is set during the installation of SQL Server.
The server default for many U.S.-based installations is SQL_Latin1_General_CP1_CI_AS. The collation name provides some insight into how the collation will work. For example, CI is an acronym for Case Insensitive, and AS indicates that the collation will be Accent Sensitive. The following SELECT statement can be used to list all the available collations and relates details about how the collation behaves:
SELECT * from ::fn_helpcollations()
The Recovery Model setting
is critical in determining how much data can be recovered in the event
of a media failure. The default is Full, which provides the greatest
level of recovery. With Full recovery, all changes to the database
(inserts, updates, and deletions) are written to the transaction log,
and so are any changes that may have occurred using BCP or BULK INSERT.
If a failure occurs on one of the database files, you can restore the
database by using the last full backup. All the changes captured in the
transaction log since the last full backup can be reapplied to the
database as well.
The Bulk-Logged recovery setting is similar to Full recovery but has some differences in the way that operations (BCP or BULK INSERT)
are logged. With Bulk-Logged recovery, you can still restore all the
transaction log backups to recover your database to a point in time.
Note
When
either Full recovery or Bulk-Logged settings is selected, it is
important to set up a job or maintenance plan that performs periodic
backups of the transaction log. A backup of the transaction log removes
data from the log and keeps the size of the transaction log manageable.
If regular backups of the transaction log are not made, the transaction
log will continue to grow as every change in the database is written to
it.
Simple recovery mode
offers the simplest backup/recovery model but the greatest possibility
of losing changes to the database. This is based on the fact that
changes recorded in the transaction log are automatically truncated when
the database is placed in Simple recovery mode. Recovery with Simple
mode is limited to using full or differential database backups that have
been taken. Simple recovery mode is a good option for read-only
databases and for development databases that can afford the loss of
changes since the last database backup.
The last setting on the
Options page that deserves special attention is Compatibility Level. The
Compatibility Level determines the level of backward compatibility the
database engine uses. For many newly created databases in SQL Server
2008, the default of SQL Server 2008 (100) will suffice. With this
setting, all the new features available with SQL Server 2008 are
utilized. In some situations, however, you might want a SQL Server 2008
database to behave as though it were a SQL Server 2005 database or SQL
Server 2000 database. You can accomplish this by setting Compatibility
Level to SQL Server 2005 (90) or SQL Server 2000 (80). Generally, you
select older compatibility levels to allow code that was developed for
prior versions of SQL Server to work as it did with those versions.
Note
The Compatibility Level
setting is intended to allow a database to behave as if it were running
in a previous version of SQL Server by providing similar query behavior
or by allowing deprecated features to still work as they did in the
previous version. However, setting the Compatibility Level to a prior
version does not prevent new SQL Server 2008 features from being
implemented in the database. The intent of this functionality is to
provide a means for moving a database and application developed for a
previous release of SQL Server to SQL Server 2008 and allow it to work
as it did while enabling you to start taking advantage of new features
and capabilities as you migrate the system to SQL Server 2008.
Using T-SQL to Create Databases
Instead of using SSMS, you can use T-SQL to create a database. The T-SQL command to do this is CREATE DATABASE. The CREATE DATABASE syntax is extensive and is best illustrated with an example. Listing 1 shows a sample script to create a database called mydb. This script was generated using the Script option available on the New Database screen.
Listing 1. Using T-SQL to Create a Database
CREATE DATABASE [mydb] ON  PRIMARY
( NAME = N'mydb', FILENAME = N'C:\mssql2008\data\mydb.mdf' ,
     SIZE = 2048KB , FILEGROWTH = 1024KB )
 LOG ON
( NAME = N'mydb_log', FILENAME = N'C:\mssql2008\log\mydb_log.ldf',
     SIZE = 1024KB , FILEGROWTH = 10%)
GO
|
The database created in Listing 23.1 is relatively simple. It is named mydb and contains one data file and one log file. The data file is created on the PRIMARY filegroup; it is named mydb.mdf and is created in the C:\mssql2008\data folder. The mydb.mdf
file is initially created with a size of 2048KB, or 2MB. If the
database utilizes the entire 2MB, the file can be expanded by the amount
specified in the FILEGROWTH parameter. In this case, the file can grow in 1MB increments.
The log file is defined using the LOG ON clause in the CREATE DATABASE command. The mydb database created in Listing 23.1 has a log file named mydb_log.ldf that is also created in the C:\mssql2008\data
folder. The initial size of the file is 1MB, and it can expand by 10%
of the current log file size. You need to use caution with large
databases when using a percentage to define FILEGROWTH. For example, you may have problems if you have a large database that has a 30GB log file and a FILEGROWTH
of 10%. If the database file is set to autogrow, and the 30GB log file
is full, it attempts to expand the log file by 3GB. An expansion of this
size could be detrimental to performance, and the disk drive where the
log file is located might not have that much disk space remaining.
You can specify many of the other options that define a database after the database is created by using the ALTER DATABASE statement. The T-SQL scripting option available on the CREATE DATABASE screen generates the basic CREATE DATABASE syntax shown in Listing 23.1, and then it generates a series of ALTER DATABASE commands that further define the database. These options are discussed in the next section.