The Inventory module (also called Inventory Control)
is a logical place to start setting up the distribution modules, as
they center around inventory items. One common misconception is that the
Inventory module is needed only if your company is selling "widgets"
and needs to track the number of widgets in stock. In reality, the
Dynamics GP Inventory module can also be used in many other situations.
The following are two examples of non-conventional inventory uses:
Selling services:
A company that sells services to customers can greatly speed up data
entry and accuracy, as well as facilitate meaningful reporting, by
setting up each service as an inventory item that does not track
quantities. If the services are priced differently for each customer,
different price levels can be set up and coded for the respective
customers. If different services are coded to their own GL sales
accounts, each item can be coded for the appropriate account. All of
this can ensure that users entering sales transactions can do so with
minimal effort and possibility of error.
Keeping track of internal use items:
A company that buys large quantities of internally used products may
want to know how many items are "in stock" at any time and to charge the
expense to the appropriate internal departments or projects as the
products are used. The items in this case may be stationery and office
supplies, or various equipment and materials used in the normal course
of business. Setting up the internally used items as inventory items
allows for standardization as well as easier integration with Purchase
Order Processing. It also allows for accurate tracking of expenses
incurred by departments and quick visibility into what is in stock.
The setup of the Dynamics GP Inventory module includes the following topics:
Inventory Control Setup
To start setting up the Inventory module, navigate to Microsoft Dynamics GP | Tools | Setup | Inventory | Inventory Control to open the Inventory Control Setup
window. On this window you can set up defaults for the next transaction
numbers, set up user categories, and choose a number of additional
global settings. The following is a listing of the fields in this
window:
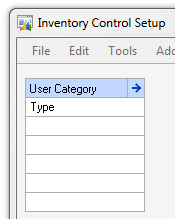
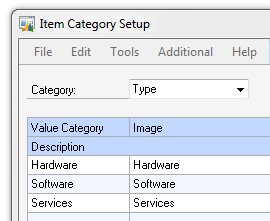
User Category:
Dynamics GP allows for six user-defined categories to be tracked for
inventory items to facilitate reporting and analysis. For example, Not
Just Widgets sells software, hardware, and services. They may want to
set up a category called Type that will hold the values Hardware, Software, or Services. Once you type a category name into one of the User Category fields, you can click the expansion button (blue arrow) next to User Category to open the Item Category Setup window, where you can fill in the values available for that category:
Next Document Numbers:
These are the defaults for the next available number for each
transaction type in the Inventory module. It is recommended to remove
some of the zeros to make transaction numbers easier to work with. Keep
in mind that these numbers will not automatically increase in size; if
the last transaction number was 9999, the next one will be 0000 and not 10000. In case you are wondering what a Production transaction is, according to the documentation this is for functionality not yet added to Dynamics GP.
Segment ID for Sites:
If you intend to use multiple inventory sites (or warehouses) and have
different GL accounts that will be used depending on which inventory
site is used on a transaction, this setting can help set up Dynamics GP
to automatically select the appropriate account number.
This can be useful in the following scenario:
Sales
from NJ should go to GL account 4000-01-000 and sales from NY go to GL
account 4000-05-000. In that case the Segment ID for Sites should be
Segment 2. When setting up the default Sales account, 4000-00-000 can be
used and Dynamics GP will automatically substitute 01 or 05 for the
second segment, depending on which site is chosen on every transaction.
It
may be tempting to leave this field blank until such a time as this
type of functionality may be needed. Unfortunately, without this fi lled
in, you will not be able to create inventory sites in Dynamics GP,
which are required to
enter transactions for inventory items. Once the fi rst site is created
this setting can no longer be changed.
Via Site ID:
Dynamics GP offers the ability to set up an "In-Transit" inventory
site, so that if there is a time delay during the transfer of items from
one site to another, inventory cannot be sold while it is in transit
and there is greater visibility of the items in transit. If you would
like to use this functionality, you will need to come back to this
window to fill in a Site ID after you have created the inventory site you want to use for this.
Default Decimal Places: These are defaults for the number of decimal places for Quantities and Currency
amounts for newly created inventory items. These can be changed for
each item created; however, it may be helpful to pick the most commonly
used values here. Because there is only one option for Currency decimal places on this window, if you have enabled Multicurrency, the Currency option will be disabled here and will instead be available when setting up individual items or item classes.
Allow:
Leaving these options checked allows users to override quantity
shortages when entering Inventory Adjustments, Variances, or Transfers.
Most of the time, if companies are tracking quantities and want to
ensure timely entry of inventory receipts, these should be unchecked.
However, there are often times when shortages need to be allowed. These
settings can be changed at any time.
Enable Multiple Bins:
Multiple bins are available in Dynamics GP to allow tracking quantities
with multiple locations within one site. If you need multiple bins, it
is best to perform the setup prior to entering inventory transactions.
Enable Picking Shortage Tasks: With this option selected and a GP User ID specified under Assign To,
when a transaction is entered that would cause an inventory shortage, a
task will automatically be created for the specified user to deal with
the shortage.
Autopost Stock Count Variances:
When a stock count is processed, a variance transaction will be created
for any differences in quantities. With this option selected, the
variance transaction will be posted automatically to the Inventory
subledger. This setting can also be selected for each individual stock
count, so it is not critical.
Use Existing Serial/Lot Numbers Only on Decrease and Transfer Transactions:
With this option selected, a user will not be able to select a
non-existing lot or serial number when entering a decrease adjustment or
transfer transaction. It is typically recommended to leave this marked
so that phantom serial and lot numbers are not created inadvertently.
Auto-assign Lot Numbers Based on:
The choice made here will determine which lot number is auto-assigned
when entering transactions such as sales orders or invoices. The choices
are oldest Receipt Date or Expiration Date. The lot number can always be overridden during transaction entry.
Display Cost for Decrease Adjustments:
Unchecking this option would show the cost for items as zero on any
decrease adjustments. This option is not as useful as it sounds because
as an item is selected during transaction entry it automatically shows
the cost, only when changing the quantity to a negative would the cost
clear to zero.
Use Expired Lots in: Decide whether lot numbers that have expired can be used on Inventory Adjustments and Transfers and/or Other Transactions and choose a Password
for one or both. Note that the passwords are not masked, so anyone who
should not be able to see or change them should not have access to this
window. If an option is allowed and no Password is selected, any user will be able to use an expired lot.
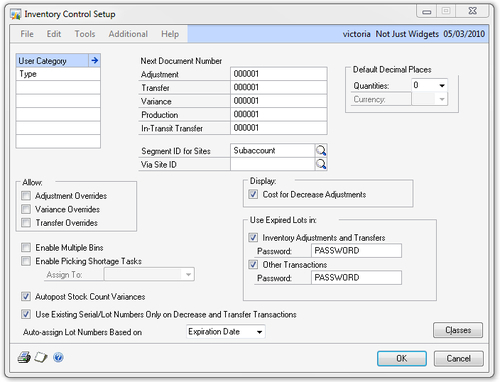
The following illustrates a sample Inventory Control Setup window:
Inventory sites
Sites, sometimes referred to as Locations,
are Dynamics GP terminology for warehouses or individual locations
where you may want to track inventory. You can set up as many sites as
you like; however, even if you are not storing any inventory or keeping
track of quantities, you must set up at least one inventory site.
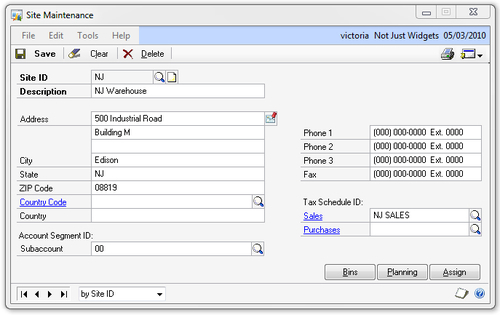
To open the Site Maintenance window, navigate to Cards | Inventory | Site. The only required fields for creating a new site are a Site ID (maximum of 10 characters) and a Description,
which is a more user-friendly name for Dynamics GP users to identify
sites from a list. If you are using the Segment ID for Sites
functionality described in the previous section, you should also fill in
the Account Segment ID field at the bottom left.
The following is a typical Site Maintenance window:
Dynamics GP allows flexible
setup of item and site combinations. For example, there may be certain
products that are only sold from one warehouse. In that case, you can
restrict those items to one site during setup, thus limiting the chances
of users miskeying the Site ID during transaction entry. In practice,
many companies simply assign all items to all sites. Once inventory
items have been created, you can return to the Site Maintenance window to mass assign all or a range of items to a site by using the Assign button at the bottom.
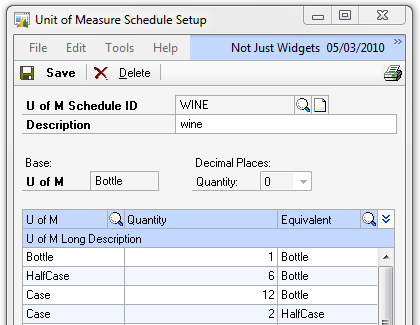
Unit of Measure Schedules
Unit of Measure Schedules
in Dynamics GP allow you to set up items that can be purchased or sold
in different quantities. For example, you may buy wine in cases, but
sell it in half cases or individual bottles; in this scenario, the unit
of measure schedule may look like the following:
Each unit of measure (often abbreviated U of M)
for an item can have a separate price, and an item can be set up with
default units of measure for purchasing and sales transactions to speed
up data entry.
To create a unit of measure schedule perform the following steps:
1. Navigate to Microsoft Dynamics GP | Tools | Setup | Inventory | Unit of Measure Schedule to open the Unit of Measure Schedule Setup window.
2. Enter a U of M Schedule ID—this can be up to 10 characters and cannot be changed afterwards.
3. Enter a Description that will help users select the proper U of M schedule; this is a required field.
4. Select a Decimal Places Quantity for the items that will use this U of M schedule. If you are changing the number of decimal places, do so before entering the Base U of M, otherwise you will have to delete and start over.
5. Decide on a Base U of M. This will be the lowest unit that Dynamics GP can show and will be the unit of measure shown on most reports and inquiries.
6. The Base U of M will automatically be populated on the first line of the U of M scrolling list. Enter additional U of M values, Quantities, and Equivalents as needed. You can add to this list later as needed.
7. Optionally, you can add U of M Long Descriptions these are not used by Dynamics GP but could be added to modified or custom invoices or purchase orders.
The Copy button at the bottom of the Unit of Measure Schedule Setup window can be used to create copies of existing U of M schedules. To use it, enter a new U of M Schedule ID, click Copy, and select the U of M schedule to copy from.
There is no limit on how many
unit of measure schedules you can have—some companies have one for each
item, others use one for all their inventory items. To be able to use
inventory items, at least one U of M schedule must exist.
