Inventory Item Setup
The last step in setting
up the Inventory module is to create items. Even though you may decide
to import your inventory items, it is still important to understand what
is involved is setting them up manually. There are quite a number of
steps to creating items in Dynamics GP:
Item Maintenance
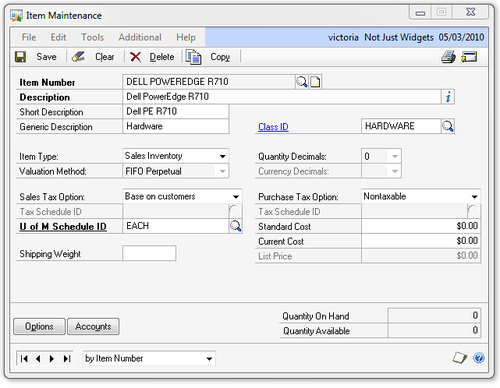
To start setting up a new item in Dynamics GP, open the Item Maintenance window by navigating to Cards | Inventory | Item. Most of the settings for an item are defaulted from the item class, the new ones are described here:
Item Number: This is also referred to as the Item ID and will be the main identifier used in Dynamics GP to find the item. The Item Number can be up to 30 characters.
Description: The
full name of the item (up to 100 characters), this defaults on sales
and purchasing transactions unless additional setup for vendor or
customer item descriptions is performed.
Short Description:
This will be the default description that shows up for the item on
Dynamics GP lookups, so enter something that will help users identify
this item in a list of others. The length is limited to 15 characters.
Shipping Weight:
This is informational only and is not used by any Dynamics GP
functionality; however, it is often used for calculations on modified or
custom reports.
Standard Cost:
This is used by some of the pricing methods to calculate item prices.
The standard cost is also used for the Cost of Goods calculation with
periodic valuation methods. Most companies do not use this.
Current Cost:
For perpetual valuation methods, the current cost is updated with every
increase transaction for an item. For the Average Perpetual valuation
method, this will show the current average cost.
List Price: The
list price can be used in the calculation for some pricing methods. If
Multicurrency is set up, this field will be disabled and a list price
can be entered for each currency on the Item Currency Maintenance window.
Quantity On Hand and Quantity Available: These are informational only and cannot be changed.
The following screenshot shows a typical Item Maintenance window:
Item Internet Information
Clicking the Internet Information icon to the right of the Description field opens the Internet Information
window. As this window is generic to company, customers, vendors,
items, salespeople, and employees, there may be fields on here that do
not pertain to inventory items. Three of these fields often used by
companies for inventory items are:
Website: This can hold the URL of the item on a vendor's or manufacturer's website.
Image: You can store the location of the item's picture here.
Additional Information: Can be used as an additional place to store notes about the item. This can hold up to 32,000 characters.
Item Maintenance Options
Clicking the Options button at the bottom of the Item Maintenance window will open the Item Maintenance Options window. This window also has some settings that will be copied from the item class. In addition, you can select Substitute Items to be suggested if this item is out of stock, Warranty Days, and an ABC Code. If this item is a Kit or Kit Component, a checkmark will appear next to the appropriate values in the Item list at the bottom.
Item Account Maintenance
The Item Account Maintenance window opens when you click the Accounts button at the bottom of the Item Maintenance Options
window. It is important to make sure that any accounts that need to be
different for an item are filled in here. If a change to the accounts
needs to be made globally, it can be entered in the Item Class Accounts Setup window and rolled down to all items in the class.
If you are making a change
to a class and rolling it down to all items in that class, any item
that is opened on a screen at the time you are making the change may not
be updated properly.
Item Currency
On the Item Maintenance window, click the GoTo button in the upper right corner and select Item Currency or navigate to Cards | Inventory | Item Currency. This will open the Item Currency Maintenance window, where you can specify the number of Currency Decimals and a List Price for each Currency ID.
Until you set up the number of currency decimal places for a currency,
you will not be able to enter the item on a transaction with that
currency.
Once entered, the Currency Decimals
will be grayed out; however, it's possible to change this setting with a
utility within Dynamics GP if you have no open transactions or
quantities for an item. As typical items will often have open
transactions or stock quantities, the number of currency decimal places
should be considered carefully. Selecting more decimal places will allow
you more granularity for costs and prices for low cost items. However,
the total number of decimal places selected will appear on all windows
and reports for that item, making it potentially more difficult to work
with. Additionally, if your items have different numbers of decimal
places for the costs and prices, out-of-the-box reports may be a lot
less presentable and may require modifications.
Price List
A Price List
in Dynamics GP allows you to set up all the default prices for each
unit of measure, price level, and quantity break. To open the Item Price List Maintenance window, click the GoTo button in the upper right corner of the Item Maintenance window and choose Price List or navigate to Cards | Inventory | Price List.
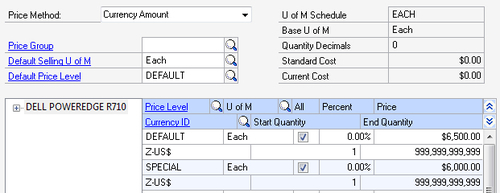
Choose a Price Method—note that only one is available per item. Price Group is optional and can be filled in at any time. It is recommended that you specify a Default Selling U of M so that users do not have to enter this manually every time they select this item on a sales transaction. The Default Price Level
will be used if a customer is not set up with a price level. This can
be useful if most customers have the same prices, but some receive
special pricing. In that case you only have to set up a price level for
customers with the special pricing and others will automatically default
to the Default Price Level.
The following is an example of a Currency Amount Price Method with different prices based on price level:
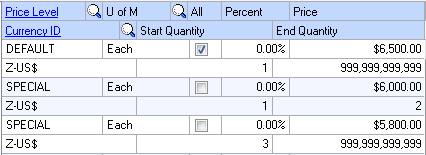
The following
screenshot shows an example of a quantity discount, where buying three
or more items will result in a lower price, but only for the SPECIAL price level:
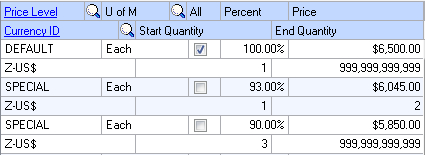
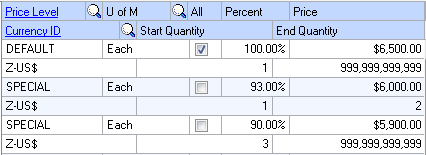
And a final example using % of List Price as the price method, where the list price of $6,500 has been entered on the Item Currency Maintenance window:
There are many scenarios that
can be set up with price lists. For situations that cannot be covered by
this, there is additional functionality available in Dynamics GP called
Extended Pricing. You may want to investigate it if you have complex
pricing requirements. Extended pricing is covered in Chapter 11 of the Inventory Control manual. (This manual can be accessed by clicking the Help button in the top right corner of the Dynamics GP main window, selecting Printable Manuals and expanding the Inventory section.)
Price List Options
Clicking the Options button at the top of the Item Price List Maintenance window will open the Item Price List Options Maintenance
window. For items with one or more quantity decimal places you can
choose whether or not to allow selling fractional quantities under Selling Option. For price methods other than Currency Amount, you can also set up Round Policy, Round Option, and Round Amount to control the pricing.
To illustrate, let's say
that using the % of List Price example shown previously, you want all
the prices to be rounded to the nearest $100. Here is what the setup
would look like:
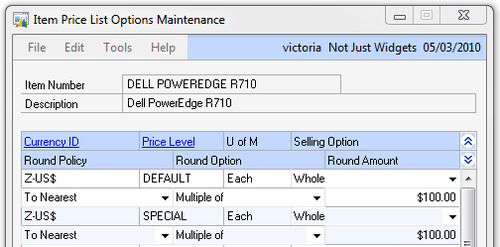
After saving these changes, the resulting price list would look like the following:
Once you have set up a price list, you can use the Copy button at the top of the Item Price List Maintenance window to copy the price list to another item.
Purchasing Options
Setting up purchasing options for an item helps speed up data entry for Purchase Order Processing transactions. To open the Item Purchasing Options Maintenance window, click the GoTo button in the upper right corner of the Item Maintenance window and choose Purchasing, or navigate to Cards | Inventory | Item Purchasing Options.
The Base U of M will be filled in automatically, but you can choose something different for the Default Purchasing U of M, depending on how you typically purchase this item. Here is an example:
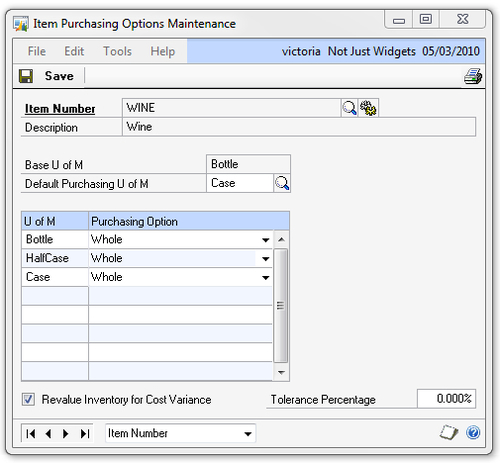
You can also specify whether Whole or Fractional values are allowed for each possible U of M, whether to Revalue Inventory for Cost Variance and, if so, with what Tolerance Percentage.
The gears icon to the right of the Item Number opens the Manufacturer's Item Number Maintenance
window, where you can enter the manufacturer's item numbers for your
inventory items. Many companies do not use this, but it's a useful
option to have in case it is needed.
Item vendors
To facilitate the
automatic creation of purchase orders from sales orders and keep track
of vendor part numbers, lead times, and costs, you can set up one or
more vendor for each inventory item.
Navigate to Cards | Inventory | Vendors or click the GoTo button in the upper right corner of the Item Maintenance window and choose Vendors. On the Item Vendors Maintenance window you can enter a Vendor ID, Vendor Item, and Description for each item. Click Save and repeat the process for as many vendors as you buy the item from.
If the unit of measure you typically purchase the item in is different depending on vendor, you can change that in the Default Purchasing U of M section in the bottom right corner; otherwise it will default to what has been set up on the Item Purchasing Options Maintenance window. The Originating Invoice Cost
will automatically be updated every time you post an invoice for this
item from the selected vendor, and this will be the cost defaulted on
future purchase orders for this item/vendor combination. If you
pre-populate this cost prior to entering purchase orders, that cost will
default on the first PO you create.
If you want to have your
purchase orders automatically calculate release dates based on a
vendor's lead time for this item, you can enter the Planning Lead Time in days (up to 9,999 days will be allowed).
Most of the other fields on
this window are not used in the modules we are covering in this book and
can be used as informational fields for reporting or lookups.
Assigning items to sites
To be able to purchase or sell
an inventory item, you must first assign it to at least one inventory
site. This is why even if you only have one inventory location, you must
create at least one Site ID in Dynamics GP. If you have multiple sites
set up, you can selectively decide what items can be located at each
site.
To assign sites for one item at a time, navigate to Cards | Inventory | Quantities/Sites or click the GoTo button in the upper right corner of the Item Maintenance window and choose Quantities/Sites.
Working with this window is a little counter-intuitive, as everything
appears grayed out at first glance. To assign an item to a site, click
the radio button next to Site ID under the Sites section. This will enable the Site ID lookup and let you pick from your existing sites:

Once you select a site, click the Save button and the item/site combination will be saved. You can repeat this process for as many sites as you want. Changing the Site Lookup selection to Assigned and clicking the looking glass icon will show you sites that have been assigned to this item.
There are two other useful features on the Item Quantities Maintenance window:
Specifying a Default Site ID can be helpful during purchase order entry if an item is typically ordered to the same site.
When a Site ID is selected, the Primary Vendor ID
field becomes available. If a Vendor ID is entered here, that vendor
will be defaulted in when a purchase order for this item is generated
from a sales order. This may be helpful when there are multiple vendors
set up for an item, but most purchase orders are placed with one
particular vendor.
Using the Item Quantities Maintenance
window is good for assigning sites selectively or when adding just one
item. However, more often this will need to be done globally for either
all or a large group of items. To accomplish this, navigate to Cards | Inventory | Sites or click on the Sites hyperlink on the Item Quantities Maintenance window. On the Site Maintenance window, select a Site ID and click the Assign button at the bottom.
On the Item Site Assignments
window, the default options will select all your items, or you can
filter them by choosing any or all of the available four options. For
example, the settings shown in the following screenshot will select all
items in the HARDWARE class:
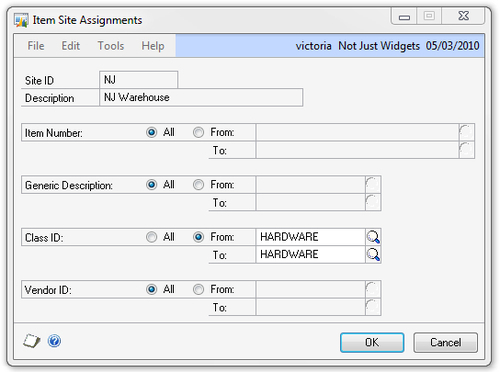
Clicking the OK button will complete the process of assigning the items you have selected to this site.
Kits
To use Kits,
you will need to predefine them. The setup of a kit item is the same as
any other item type, with one additional step needed. Navigate to Cards | Inventory | Kits or click the GoTo button in the upper right corner of the Item Maintenance window and choose Kits.
Note that you will not be
able to track serial or lot numbers for kits, but if the kit components
contain items that track serial or lot numbers, they will still be
tracked for the individual items sold within a kit.
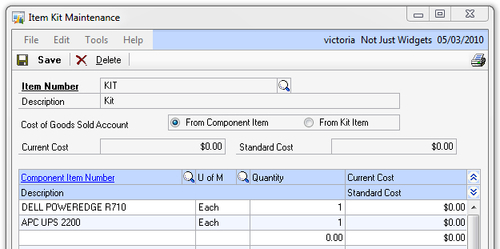
On the Item Kit Maintenance window, determine whether the Cost of Goods Sold Account for the kit should be used From Component Item (so if the components have different accounts, this will create multiple COGS distributions) or From Kit Item. In the scrolling list, fill in all the Component Item Numbers, U of M, and Quantities
that will make up the kit. If the items have already been received into
inventory, the costs will populate, otherwise they will be zero. The
following screenshot shows an example of a kit with two components:
Copying items
A very useful and often overlooked feature on the Item Maintenance window is the ability to copy all the settings from an existing item to a new one. To use this feature follow these steps:
1. Type in a new Item Number.
2. Click the Copy button at the top of the window.
3. Select the Item Number that you would like to copy from on the Item Copy window.
4. Choose the attributes to copy—by default everything is selected. You may not want to copy Vendor Assignments or List Prices unless they are very similar with only a few changes needed.
6. This will create an exact duplicate of your existing item with the new Item Number entered in step 1. Remember to change the Description and Short Description fields, as they will also be copied.
Now that you have
completed the setup of the Inventory module, you can enter or import
items and start entering inventory transactions.