Using Office Communication Server (OCS) with
Microsoft Dynamics CRM allows users to view the presence of other users
in the organization for ease of communication.
This integration also
enables users to interact with each other from the Presence icon. Users
can view someone else’s calendar and free/busy times and can send email
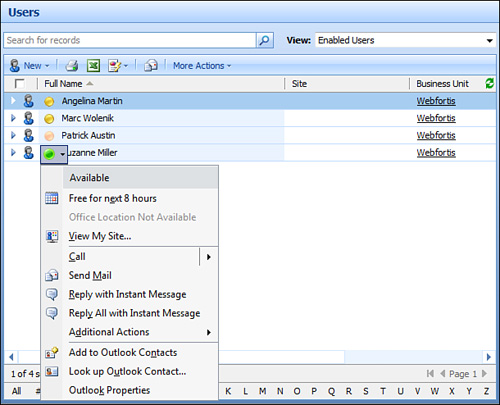
or instant messages with one click. Figure 1 illustrates a person “in office.”
The installation steps are as follows:
1. | Log on the server where you want to install OCS Standard edition as a domain admin.
|
2. | Locate the set for Microsoft Office Communications Server 2007.
|
3. | Click Deploy Standard Edition Server.
|
4. | At Deploy Server, click Run.
|
5. | Select the location to install on the Location for Server Files screen.
|
6. | On
the Main Service Account for Standard Edition Server screen, enter the
username and password for the service account that will run the service.
|
7. | Click Next.
|
8. | On
the Component Service Account for this Standard Edition Server screen,
enter the server name and the service account that will run the
audio/video conferencing server and the web conferencing server.
|
9. | Click Next.
|
10. | On
the Web Farm FQDNs screen, specify the internal URL that will be used
by users to download client for web conferencing content, distribution
group expansion, and the address book.
|
11. | Click Next.
|
12. | On the Location for Database Files screen, specify the location for the database transaction log files.
|
13. | Click Next.
|
14. | Review the summary and click Next to begin installation.
|
The configuration steps are as follows:
1. | Log on to the server running OCS.
|
2. | Locate the installer for Microsoft Office Communications Server and start the setup to launch the Deployment Tool.
|
3. | In the Deployment Tool, select Deploy Standard Edition Server.
|
4. | Click Run.
|
5. | Select the server from the list on the Server or Pool to Configure screen.
|
6. | Click Next.
|
7. | Verify the SIP domain on the SIP Domains screen.
|
8. | Click Next.
|
9. | On
the Client Logon Settings screen, ensure the DNS SRV records are
configured properly so that the clients in your organization will
automatically sign in.
|
10. | Click Next.
|
11. | Select the check box for the domains that will be supported by the server for automatic sign in.
|
12. | Click Next.
|
13. | On the Ready to Configure Server or Pool screen, review the settings that you specified.
|
14. | Click Next to finish the setup.
|
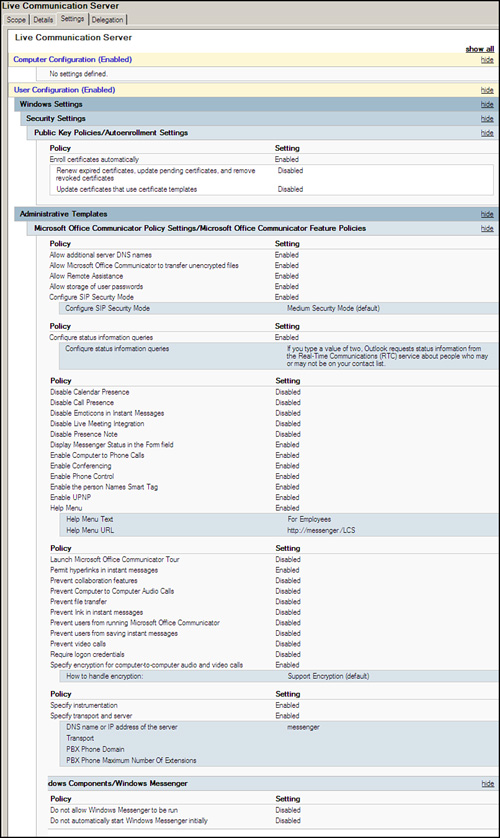
To have fine-grain control on the group policy, you have the options shown in Figure 2.
You can find the Group Policy template (conf.adm) at http://www.microsoft.com/downloads/details.aspx?FamilyID=92759d4b-7112-4b6c-ad4a-bbf3802a5c9b&displaylang=en.
If you are still using
the previous version of Microsoft Communication Server, Office
Communicator, you can still have access to this feature. To enable this
feature on Microsoft Live Communication Server 2005, you need to push
the following group policy:
;;;;;;;;;;;;;;;;;;;;;;;;;;;;;;;
CLASS USER ;;;;;;;;;;;;;;;;;;;;
;;;;;;;;;;;;;;;;;;;;;;;;;;;;;;;
CATEGORY !!RTCPOLICY_TOP_CAT
CATEGORY !!RTCPOLICY_MESSENGERONLY_CAT
KEYNAME "Software\Policies\Microsoft\Office\11.0\Outlook\IM"

 POLICY !!PolicyEnabled
 EXPLAIN !!ExplainText_Enabled
  VALUENAME "Enabled"
  VALUEON   NUMERIC  1
  VALUEOFF  NUMERIC  0
 END POLICY

 POLICY !!PolicyEnablePresence
 EXPLAIN !!ExplainText_EnablePresence
  VALUENAME "EnablePresence"
  VALUEON   NUMERIC  1
  VALUEOFF  NUMERIC  0
 END POLICY

END CATEGORY ; RTCPOLICY_MESSENGERONLY_CAT

CATEGORY !!RTCPOLICY_MESSENGERONLY_CAT
KEYNAME "Software\Policies\Microsoft\Office\11.0\Common\PersonaMenu"

 POLICY !!PolicyQueryServiceForStatus
 EXPLAIN !!ExplainText_QueryServiceForStatus
  PART !!PolicyQueryServiceForStatus DROPDOWNLIST NOSORT
  VALUENAME "QueryServiceForStatus"
  ITEMLIST
  NAME !!QueryServiceForStatus0    VALUE NUMERIC  0
  NAME !!QueryServiceForStatus1    VALUE NUMERIC  1
  NAME !!QueryServiceForStatus2    VALUE NUMERIC  2 DEFAULT
  END ITEMLIST
  END PART
 END POLICY

END CATEGORY ; RTCPOLICY_MESSENGERONLY_CAT
END CATEGORY; RTCPOLICY_TOP_CAT


[strings]
RTCPOLICY_TOP_CAT="Microsoft Office Communicator Policy Settings"
RTCPOLICY_MESSENGERONLY_CAT="Microsoft Office Communicator Feature Policies"
PolicyEnabled="Enable the person Names Smart Tag"
ExplainText_Enabled="Enable the pawn guys to be displayed on the clients com-
puter.\n\nIf you enable this policy setting, users can See the pawn guy next to peo-
ple's names.\n\nIf you disable or do not configure this policy setting, users cannot
See the pawn guy next to people's names.\n\n"

PolicyEnablePresence="Display Messenger Status in the Form field"
ExplainText_EnablePresence="This displays the status of the users on the icon it-
self.\n\nIf you enable this policy setting, users can See the status of other us-
ers.\n\nIf you disable or do not configure this policy setting, users cannot see the
status of other users on the pawn.\n\n"

PolicyQueryServiceForStatus="Confiqure status information queries"
ExplainText_QueryServiceForStatus="A registry value is available to configure how
Outlook queries for a contact's presence information. You can configure this regis-
try value to determine how Outlook retrieves the online status for contacts who are
not on your Windows Messenger contact list. \n\n 0 - If you type a value of zero,
you receive status information only about people who are on your contact list. In
this scenario, Outlook does not request status information about people who are not
on your contact list. \n\n 1 - If you type a value of one, Outlook requests status
information from the Microsoft Exchange Instant Messaging (IM) service about people
who may or may not be on your contact list. \n\n 2 - If you type a value of two,
Outlook requests status information from the Real-Time Communications (RTC) service
about people who may or may not be on your contact list. \n\n Note You cannot con-
figure this registry value to cause Outlook to request status information from the
Exchange Instant Messaging service and the Real-Time Communications IM service at
the same time. Additionally, the .NET Messenger Service together with a Microsoft
.NET Passport account does not allow status information queries for people who are
not on your "buddy" list."

QueryServiceForStatus0 = "If you type a value of zero, you receive status informa-
tion only about people who are on your contact list. In this scenario, Outlook does
not request status information about people who are not on your contact list."
QueryServiceForStatus1 = "If you type a value of one, Outlook requests status infor-
mation from the Microsoft Exchange Instant Messaging (IM) service about people who
may or may not be on your contact list."
QueryServiceForStatus2 = "If you type a value of two, Outlook requests status infor-
mation from the Real-Time Communications (RTC) service about people who may or may
not be on your contact list. "
Live
Communication Server and OCS are tightly integrated with Windows
Messenger. This group policy can also enable you to integrate with your
phone system through the IM client directly. You can download this group
policy file from Microsoft’s website.
