To maintain a secure computing environment, it is
critical to keep systems up to date with security patches. Since 1998,
Microsoft has provided Windows Update as a Web-based source of
information and downloads. With Windows XP and Windows 2000 service pack
3, Microsoft added Automatic Updates, whereby a system automatically
connects to Windows Update and downloads any new, applicable patches or
“hot-fixes.” Although the Windows Update servers and Automatic Updates
client achieve the goal of keeping systems current, many administrators
are uncomfortable with either computers or users deciding which patches
should be installed, because a patch might interfere with the normal
functioning of a business-critical application.
The latest improvements to
these technologies deliver Software Update Services (SUS). SUS is a
client-server application that enables a server on your intranet to act
as a point of administration for updates. You can approve updates for
SUS clients, which then download and install the approved updates
automatically without requiring local administrator account interaction.
In this lesson you will
learn to install and administer SUS on a Windows Server 2003 computer.
The following lesson will guide you through issues related to client
configuration.
Understanding SUS
Since 1998, Microsoft
Windows operating systems have supported Windows Update, a globally
distributed source of updates. Windows Update servers interact with
client-side software to identify critical updates, security rollups, and
enhancements that are appropriate to the client platform, and then to
download approved patches.
Administrators
wanted a more centralized solution that would assure more direct
control over updates that are installed on their clients. Software
Update Services is a response to that need. SUS includes several major
components:
Software Update Services, running on an Internet Information Services (IIS) server
The server-side component is responsible for synchronizing information
about available updates and, typically, downloading updates from the
Microsoft Internet-based Windows Update servers or from other intranet
servers running SUS.
The SUS administration Web site
All SUS administration is Web-based. After installing and configuring
SUS, administration typically consists of ensuring that the SUS server
is synchronizing successfully, and approving updates for distribution to
network clients.
Automatic Updates
The Automatic Updates client is responsible for downloading updates
from either Windows Update or an SUS server, and installing those
updates based on a schedule or an administrator’s initiation.
Group Policy settings
Automatic Updates clients can be configured to synchronize from an SUS
server rather than the Windows Update servers by modifying the clients’
registries or, more efficiently, by configuring Windows Update policies
in a Group Policy Object (GPO).
Installing SUS on a Windows Server 2003 Computer
SUS has both client and
server components. The server component runs on a Windows 2000 Server
(Service Pack 2 or later) or a Windows Server 2003 computer.
SUS is not included with the Windows Server 2003 media, but it is a free download from the Microsoft SUS Web site at http://go.microsoft.com/fwlink/?LinkID=6930.
Note
The
SUS download is not available in every localized language. However,
this download determines the installation and administrative interface
for the server component only. Patches for all locales can be made available through SUS. |
After
downloading the latest version of SUS, double-click the file and the
installation routine will start. After you agree to the license
agreement, choose Custom setup and the Setup Wizard will prompt you for
the following information:
Choose File Locations
Each Windows Update patch consists of two components: the patch file
itself and metadata that specifies the platforms and languages to which
the patch applies. SUS always downloads metadata, which you will use to
approve updates and which clients on your intranet will retrieve from
SUS. You can choose whether to download the files themselves and, if so,
where to save the updates.
Tip
If
you elect to maintain the update files on Microsoft Windows Update
servers, Automatic Updates clients will connect to your SUS server to
obtain the list of approved updates and will then connect to Microsoft
Windows Update servers to download the files. You can thereby maintain
control of client updating and take advantage of the globally dispersed
hosting provided by Microsoft. |
If
you choose the Save The Updates To This Local Folder option, the Setup
Wizard defaults to the drive with the most free space, and will create a
folder called SUS on that drive. You can save the files to any NT file
system (NTFS) partition; Microsoft recommends a minimum of 6 gigabytes
(GB) of free space.
Note
The SUS partition and the system partition must be formatted as NTFS. |
Language Settings
Although the SUS administrative interface is provided in English and a
few additional languages, patches are released for all supported
locales. This option specifies the localized versions of Windows servers
or clients that you support in your environment.
Handling New Versions Of Previously Approved Updates
Occasionally, an update itself is updated. You can direct SUS to
approve automatically updates that are new versions of patches that you
have already approved, or you can continue to approve each update
manually.
Ready To Install Before installation begins, the Setup Wizard will remind you of the URL clients should point to, http://SUS_servername. Note this path because you will use it to configure network clients.
Installing Microsoft Software Update Services The Setup Wizard installs SUS.
Completing the Microsoft Software Update Services Setup Wizard The final page of the Setup Wizard indicates the URL for the SUS administration site, http://SUS_servername/SUSAdmin.
Note this path as well, because you will administer SUS from that Web
location. When you click Finish, your Web browser will start and you
will be taken automatically to the SUS administration page.
Software Update Services installs the following three components on the server:
The Software Update Synchronization Service, which downloads content to the SUS server
An IIS Web site that services update requests from Automatic Updates clients
An SUS administration Web page, from which you can synchronize the SUS server and approve updates
|
When run on a
Windows 2000 server, the SUS Setup Wizard launches the IIS Lockdown
Wizard to secure IIS 5.0. Windows Server 2003 is locked down by default,
so IIS Lockdown is not necessary.
If you have Web
applications running on an IIS server, those applications may not
function properly after SUS has been installed. You can re-enable
Internet Server Application Programming Interface (ISAPI) filters and
open other components that are secured by IIS Lockdown. However, due to
the sensitive nature of operating system updates, you should consider
running SUS on a dedicated server without other IIS applications.
|
Configuring and Administering SUS
You will
perform three administrative tasks related to SUS: configuring SUS
settings, synchronizing content and approving content. These tasks are
performed using the SUS Administration Web site, shown in Figure 1, which can be accessed by navigating to http://SUS_servername/SUSAdmin
with Internet Explorer 5.5 or later, or by opening Microsoft Software
Update Services from the Administrative Tools programs group. The
administration of SUS is entirely Web-based.

Note
You
may need to add Server01 to the Local Intranet trusted site list to
access the site. Open Internet Explorer and choose Internet Options from
the Tools menu. Click the Security tab. Select Trusted Sites and click
Sites. Add Server01 and Server01.contoso.com to the trusted site list. |
Note
You
must be a local administrator on the SUS server to administer and
configure Software Update Services. This is another consideration as you
review dedicating the SUS server. With a dedicated SUS server, you can
delegate administration of SUS without inadvertently delegating
authority over other server roles or applications. |
Configuring Software Update Services
Although
some of the configuration of SUS can be specified during a custom
installation, all SUS settings are accessible from the SUS
Administration Web page. From the Software Update Services
administration page, click Set Options in the left navigation bar. The
Set Options page is shown in Figure 2.
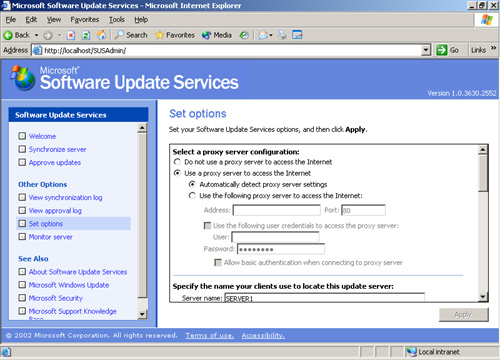
The configuration settings are as follows:
Proxy server configuration If the server running SUS connects to Windows Update using a proxy server, you must configure proxy settings.
Tip
Although
the SUS server can be configured to access Windows Update through a
proxy server that requires authentication, the Automatic Updates client
cannot access Windows Update if the proxy server requires
authentication. If your proxy server requires authentication, you can
configure SUS to authenticate, and you must store all update
content—files as well as metadata—locally. |
DNS name of the SUS server In the Server Name box, type the fully qualified domain name (FQDN) of the SUS server, for example, sus1.contoso.com.
Content source
The first SUS servDer you install will synchronize its content from
Microsoft Windows Update. Additional SUS servers can synchronize from
Windows Update, from a “parent” SUS server, or from a manually created
content distribution point. See the sidebar, “SUS Topology” for more
information.
New versions of approved updates
The Set Options page allows you to modify how SUS handles new versions
of previously approved updates. This option is discussed earlier in the
lesson.
File storage You can modify the storage of metadata and update files. This option is also discussed earlier in the lesson.
Tip
If
you change the storage location from a Windows Update server to a local
server folder, you should immediately perform a synchronization to
download the necessary packages to the selected location. |
Languages
This setting determines the locale specific updates that are
synchronized. Select only languages for locales that you support in your
environment.
Tip
If
you remove a locale, the packages that have been downloaded are not
deleted; however, clients will no longer receive those packages. If you add a locale, perform a manual synchronization to download appropriate packages for the new locale. |
|
Software
Update Services is all about enabling you to control the approval and
distribution of updates from Microsoft Windows Update. In a small
organization, SUS can be as simple as one server, synchronizing from
Windows Update and providing a list of approved updates to clients.
In a larger
organization, SUS topologies can be developed to make SUS more scalable
and efficient. Although the 70-290 certification exam expects you only
to administer existing topologies, it is helpful to understand some of
the design possibilities:
Multiple server topology
Each SUS server synchronizes content from Windows Update, and manages
its own list of approved updates. This would be a variation of a
single-server model, and each SUS server administrator would have
control over that server’s list of approved updates. Such a
configuration would also allow an organization to maintain a variety of
patch and update configurations (one per SUS server). Clients can be
directed to obtain updates from an SUS server with the appropriate list
of approved updates. Strict parent/child topology
A “parent” SUS server synchronizes content from Windows Update and
stores updates in a local folder. The SUS administrator then approves
updates. Other SUS servers in the enterprise synchronize from the
parent, and are configured, on the Set Options page, to Synchronize List
Of Approved Items Updated From This Location (Replace Mode). This
setting causes the child SUS servers to synchronize both the update
files and the list of approved updates. Network clients can then be
configured to retrieve updates from the SUS server in or closest to
their site. In this configuration (Synchronize List Of Approved Items),
administrators of child SUS servers cannot approve or disapprove updates; that task is managed on the parent SUS server only. Loose parent/child topology
A “parent” SUS server synchronizes content from Windows Update and
stores updates in a local folder. Other SUS servers in the enterprise
synchronize from the parent. Unlike the strict configuration, these
additional SUS servers do not synchronize the list of approved updates,
so administrators of those servers can approve or disapprove updates
independently. Although this topology increases administrative overhead,
it is helpful when an organization wants to minimize Internet exposure
(only the parent SUS server needs to connect to the Internet), and
requires (as in the multiple-server model) distributed power of update
approval or a variety of client patch and update configurations. Test/production topology This
model allows an organization to create a testing or staging of updates.
The parent SUS server downloads updates from Windows Update and an
administrator approves updates to be tested. One or more clients
retrieve updates from the parent SUS server and act as test platforms.
Once updates have been approved, tested, and verified, the contents of
the parent SUS server are copied to a manually created content
distribution point on a second IIS server. Production SUS servers
synchronize both the updates and the list of approved updates from the
manual content distribution point. The steps for configuring such a
manual distribution point are detailed in the Software Update Service
Deployment White Paper, available from the Microsoft SUS Web site.
|
Synchronizing SUS
On the SUS Administration Web page, click Synchronize Server. On the Synchronize Server page, as shown in Figure 3,
you can start a manual synchronization or configure automatic,
scheduled synchronization. Click Synchronize Now and, when
synchronization is complete, you will be informed of its success or
failure, and, if the synchronization was successful, you will be taken
to the Approve Updates page.
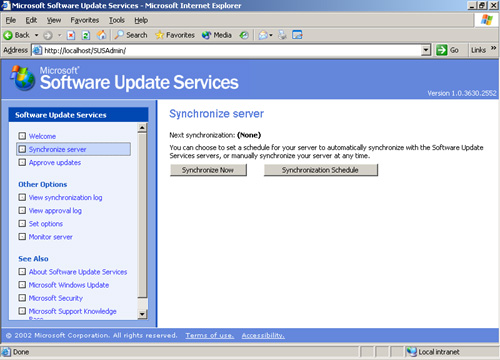
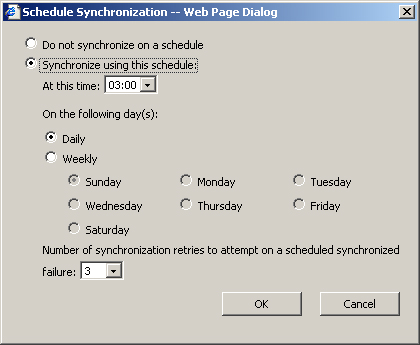
To schedule synchronization, click Synchronization Schedule. You can configure the time of day for synchronization, as shown in Figure 4,
and whether synchronization occurs daily or weekly on a specified day.
When a scheduled synchronization fails, SUS will try again for the
Number Of Synchronization Retries To Attempt setting. Retries occur at
30-minute intervals.
Approving Updates
To
approve updates for distribution to client computers, click Approve
Updates in the left navigation bar. The Approve Updates page, as shown
in Figure 5,
appears. Select the updates that you wish to approve, then click
Approve. If you are unsure about the applicability of a particular
update, click the Details link in the update summary. The Details page
that opens will include a link to the actual *.cab
file that is used to install the package, and a link to the Read More
page about the update, which will open the Microsoft Knowledge Base
article related to the update.
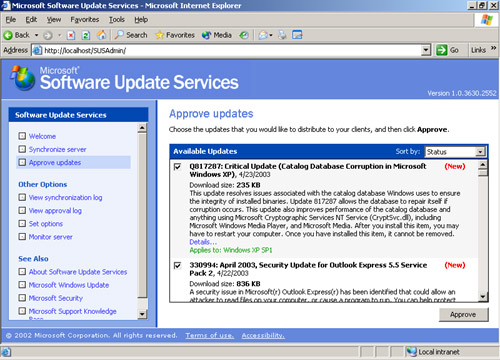
Tip
The
first synchronization will download dozens of updates. It may be
tedious to scroll and click each check box for approval. Instead, after
clicking the first check box, press TAB twice to navigate to the next
check box, and press the spacebar to select (or clear) the item. |
