The Automatic Updates Client
The client component of
SUS is Windows Automatic Updates, which is supported on Windows 2000,
Windows XP, and Windows Server 2003. The Automatic Updates client is
included with Windows Server 2003, Windows 2000 Service Pack 3, and
Windows XP Service Pack 1.
For clients running
earlier releases of the supported platforms, you can download Automatic
Updates as a stand-alone client from the Microsoft SUS Web site, at http://go.microsoft.com/fwlink/?LinkID=6930.
The client, provided as an .msi file, can be installed on a stand-alone
computer or by means of Group Policy (assign the package in the
Computer Configuration\Software Settings policy), SMS, or even a logon
script. If a localized version of the client is not available, install
the English version on any locale.
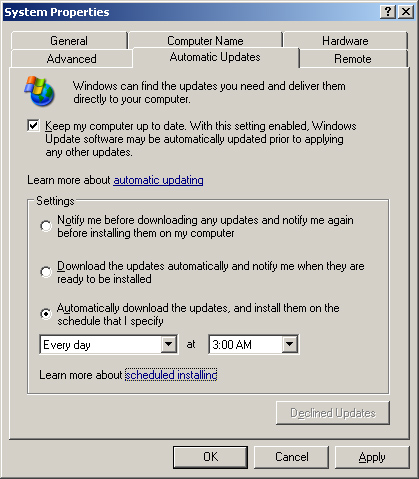
The Automatic Updates
client of Windows Server 2003 is configured to connect automatically to
the Microsoft Windows Update server and download updates, then prompt
the user to install them. This behavior can be modified by accessing the
Automatic Updates tab in the System Properties dialog box, accessible
by clicking System in Control Panel, in Windows XP and Windows
Server2003. In Windows 2000 click Automatic Updates in Control Panel.
The Automatic Updates tab is shown in Figure 6. Automatic Updates can also be configured using GPOs or registry values.
Download Behavior
Automatic Updates supports two download behaviors:
Automatic Updates are downloaded without notification to the user.
Notification
If Automatic Updates is configured to notify the user before
downloading updates, it registers the notification of an available
update in the system event log and to a logged-on administrator of the
computer. If an administrator is not logged on, Automatic Updates waits
for a user with administrator credentials before offering notification
by means of a balloon in the notification area of the system tray.
Once update
downloading has begun, Automatic Updates uses the Background Intelligent
Transfer Service (BITS) to perform the file transfer using idle network
bandwidth. BITS ensures that network performance is not hindered due to
file transfer. All patches are checked by the SUS server to determine
if they have been correctly signed by Microsoft. Similarly, the
Automatic Updates client confirms the Microsoft signature and also
examines the cyclical redundancy check (CRC) on each package before
installing it.
Installation Behavior
Automatic Updates provides two options for installation:
Notification
Automatic Updates registers an event in the system log indicating that
updates are ready for installation. Notification will wait until a local
administrator is logged on before taking further action. When an
administrative user is logged on, a balloon notification appears in the
system tray. The administrator clicks the balloon or the notification
icon, and then may select from available updates before clicking
Install. If an update requires restarting the computer, Automatic
Updates cannot detect additional updates that might be applicable until
after the restart.
Automatic (Scheduled)
When updates have been downloaded successfully, an event is logged to
the system event log. If an administrator is logged on, a notification
icon appears, and the administrator can manually launch installation at
any time until the scheduled installation time.
At
the scheduled installation time, an administrator who is logged on will
be notified with a countdown message prior to installation, and will
have the option to cancel installation, in which case the installation
is delayed until the next scheduled time. If a non-administrator is
logged on, a warning dialog appears, but the user cannot delay
installation. If no user is logged on, installation occurs
automatically. If an update requires restart, a five-minute countdown
notification appears informing users of the impending restart. Only an
administrative user can cancel the restart.
Tip
If
a computer is not turned on at the scheduled Automatic Updates
installation time, installation will wait to the next scheduled time. If
the computer is never on at the scheduled time, installation will not
occur. Ensure that systems remain turned on to be certain that Automatic
Updates install successfully. |
Configuring Automatic Updates Through Group Policy
The Automatic
Updates client will, by default, connect to the Microsoft Windows Update
server. Once you have installed SUS in your organization, you can
direct Automatic Updates to connect to specific intranet servers by
configuring the registry of clients manually or by using Windows Update
group policies.
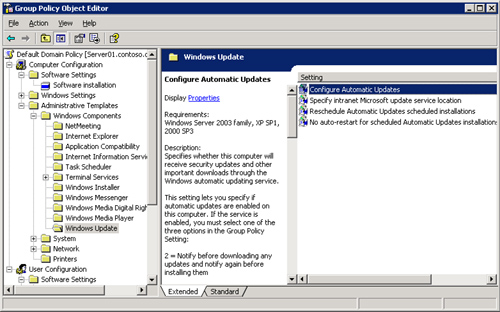
To configure
Automatic Updates using GPOs, open a GPO and navigate to the Computer
Configuration\Administrative Templates\Windows Components\Windows Update
node. The Windows Update policies are shown in Figure 7.
Note
If
you edit policy on a Windows 2000 Active Directory server, the policies
may not appear. Automatic Updates policies are described by the %Windir%\Inf\Wuau.inf
administrative template, which is installed by default when Automatic
Updates is installed. If Automatic Updates has not been installed on the
domain controller to which you are connected (typically, the PDC
Emulator), you must right-click the Administrative Templates node and
choose Add/Remove Templates, click Add, then locate the Wuau.inf
template, perhaps by copying it from a system that does have Automatic
Updates installed. |
The
following policies are available, each playing an important role in
configuring effective update distribution in your enterprise:
Configure Automatic Updates
The Configure Automatic Updates Behavior determines the behavior of the
Automatic Updates client. There are three options: Notify For Download
And Notify For Install, Auto Download And Notify For Install, and Auto
Download And Schedule The Install. These options are combinations of the
installation and download behaviors discussed earlier in the lesson.
Reschedule Automatic Updates Scheduled Installations
If installations are scheduled, and the client computer is turned off
at the scheduled time, the default behavior is to wait for the next
scheduled time. The Reschedule Automatic Updates Scheduled Installations
policy, if set to a value between 1 and 60, causes Automatic Updates to
reschedule installation for the specified number of minutes after
system startup.
No Auto-Restart For Scheduled Automatic Updates Installations
This policy causes Automatic Updates to forego a restart required by an
installed update when a user is logged on to the system. Instead, the
user is notified that a restart is required for installation to
complete, and can restart the computer at his or her discretion.
Remember that Automatic Updates cannot detect new updates until restart
has occurred.
Specify Intranet Microsoft Update Service Location
This policy allows you to redirect Automatic Updates to a server
running SUS. By default, the client will log its interactions on the SUS
server to which it connects. However, this policy allows you to point
clients to another server running IIS for statistics logging. This dual
policy provides the opportunity for clients to obtain updates from a
local SUS server, but for all clients to log SUS statistics in a single
location for easier retrieval and analysis of the log data, which is
stored as part of the IIS log. IIS logs typically reside in %Windir%\System32\Logfiles\W3svc1.
Automatic Updates clients poll their SUS server every 22 hours, minus a random offset.
Any delay in patching
should be treated as unacceptable when security vulnerabilities are
being actively exploited. In such situations, install the patch manually
so that systems do not have to wait to poll, download, and install
patches.
After approved updates
have been downloaded from the SUS server, they will be installed as
configured—manually or automatically—at the scheduled time. If an
approved update is later unapproved, that update is not uninstalled; but
it will not be installed by additional clients. An installed update can be uninstalled manually, using the Add Or Remove Programs application in Control Panel.
SUS Troubleshooting
Although SUS works well, there are occasions that warrant monitoring and troubleshooting.
Monitoring SUS
The Monitor Server page of
the SUS Administration Web site displays statistics that reflect the
number of updates available for each platform, and the date and time of
the most recent update. The information is summarized from the Windows
Update metadata that is downloaded during each synchronization. Metadata
information is written to disk and stored in memory to improve
performance as systems request platform appropriate updates.
You can also monitor SUS and Automatic Updates using the following logs:
Synchronization Log
You can retrieve information about current or past synchronizations,
and the specific packages that were downloaded by clicking View
Synchronization Log in the left navigation bar. You can also use any
text editor to open the (Extensible Markup Language) XML-based database
(History-Sync.xml) directly from the SUS Web site’s
\AutoUpdate\Administration directory in IIS.
Approval Log
For information about packages that have been approved, click View
Approval Log in the left navigation bar. Alternatively, you can open
History-Approve.xml from the SUS Web site’s \AutoUpdate\Administration
directory in IIS.
Windows Update Log The Automatic Updates client logs activity in the %Windir\Windows Update.log file on the client’s local hard disk.
Wutrack.bin. The client’s interaction with SUS is logged to the specified statistics server’s IIS logs, typically stored in the folder: %Windir%\System32\Logfiles \W3svc1. These logs, which are verbose and cryptic, are designed to be analyzed by programs, not by humans.
Exam Tip
Although
you should know what logs are available, and where they are located,
you are not required for the 70-290 exam to be able to interpret cryptic
messages or log entries. The SUS Deployment White Paper includes
appendices with detailed information about event descriptions and log
syntax. |
SUS System Events
The
synchronization service generates event log messages for each
synchronization performed by the server, and when updates are approved.
These messages can be viewed in the System log using Event Viewer. The
events relate to the following scenarios:
Unable to connect Automatic Updates could not connect to the update service (Windows Update or the computer’s assigned SUS server).
Install ready—no recurring schedule
Updates listed in the event were downloaded and are pending
installation. An administrator must click the notification icon and
click Install.
Install ready—recurring schedule Updates listed in the event are downloaded and will be installed at the date and time specified in the event.
Installation success Updates listed in the event were installed successfully.
Installation failure Updates listed in the event failed to install properly.
Restart required—no recurring schedule
An update requires a restart. If installation behavior is set for
notification, restart must be performed manually. Windows cannot search
for new updates until the restart has occurred.
Restart required—recurring schedule
When Automatic Updates is configured to automatically install updates,
an event is registered if an update requires restart. Restart will occur
within five minutes. Windows cannot search for new updates until after
the restart has occurred.
Troubleshooting SUS
Software Update Services on a Windows Server 2003 computer may require the following troubleshooting steps:
Reloading the memory cache
If no new updates appear since the last time you synchronized the
server, it is possible that no new updates are available. However, it is
also possible that memory caches are not loading new updates properly.
From the SUS administration site, click Monitor Server and then click
Refresh.
Restarting the synchronization service
If you receive a message that the synchronization service is not
running properly, or if you cannot modify settings in the Set Options
page of the administration Web site, open the Microsoft Management
Console (MMC) Services snap-in, right-click Software Update Services
Synchronization Service and choose Restart.
Restarting IIS
If you cannot connect to the administration site, or if clients cannot
connect to the SUS serve, restart the World Wide Web Publishing Service
in the same manner.
If Automatic Updates
clients do not appear to be receiving updates properly, open the
registry of a client and ensure that the following values appear in
HKEY_LOCAL_MACHINE\Software\Policies\Microsoft\Windows\WindowsUpdate:
WUServer Should have the URL of the SUS server, for example, http://SUS_Servername
WUStatusServer Should have the URL of the same SUS server or another IIS server on which synchronization statistics are logged
And, in the AU subkey:
SUS Backup and Recovery
As with any other server role or application, you must plan for recovery in the event of a server failure.
Backing Up SUS
To back up SUS, you must back up the folder that contains SUS content, the SUS Administration Web site, and the IIS metabase.
Exam Tip
The
process described to back up the IIS metabase is useful not only for
backing up SUS, but for any other Web site or application running on
Windows Server 2003 and IIS 6.0. |
First, back up
the metabase—an XML database containing the configuration of IIS. Using
the MMC IIS snap-in, select the server to back up and, from the Action
menu, select All Tasks, then Backup/Restore Configuration. Click Create
Backup and enter a name for the backup. When you click OK, the metabase
is backed up.
Then back up the following using Ntbackup or another backup utility:
The default Web site, which is located unless otherwise configured in C:\Inetpub \Wwwroot.
The
SUS Administration Web site. SUSAdmin is, by default, a subfolder of
C:\Inetpub\Wwwroot. In that event, it will be backed up when you back up
the default Web site.
The AutoUpdate virtual directory, also by default a subfolder of C:\Inetpub \Wwwroot.
The
SUS content location you specified in SUS setup or the SUS options. You
can confirm the SUS content location in IIS manager by clicking Default
Web Site and examining the path to the Content virtual root in the
details pane.
The metabase backup directory, %Windir%\System32\Inetsrv\Metaback, which contains the copy of the metabase made earlier.
This process of
backing up the metabase, and then backing up the components of SUS,
should be repeated regularly because updates will be added and approved
with some frequency.
SUS Server Recovery
To restore a failed SUS
server, perform the steps described below. If a certain step is
unnecessary, you may skip it, but perform the remaining steps in
sequence.
1. | Disconnect the server from the network to prevent it from being infected with viruses.
|
2. | Install Windows Server 2003, being sure to give the server the same name it had previously.
|
3. | Install IIS with the same components it had previously.
|
4. | Install
the latest service pack and security fixes. If the server must be
connected to the network to achieve this step, take all possible
precautions to prevent unnecessary exposure.
|
5. | Install SUS into the same folder it was previously installed.
|
6. | Run
Ntbackup to restore the most recent backup of SUS. This will include
the SUS content folder, the Default Web Site, including the SUSAdmin and
AutoUpdate virtual directories, and the IIS metabase backup.
|
7. | Open
the MMC IIS snap-in and select the server to restore. From the Action
menu, select All Tasks, then Backup/Restore Configuration and select the
backup that was just restored. Click Restore.
|
8. | Confirm
the success of your recovery by opening the SUS Administration Web site
and clicking Set Options. Check that the previous settings are in
place, and that the previously approved updates are still approved.
|
Note
The
preceding steps apply to Windows Server 2003 only. If you are
recovering a Windows 2000-based SUS server, refer to SUS documentation
for appropriate steps. |
