Microsoft Dynamics CRM is tightly coupled with
Outlook to bring a single screen as the dashboard for the user. Outlook
is the standard work desk for a lot of companies.
Optimization techniques include the following:
Set the crawl items from 1,000 to 25.
Because
it is the work desk, most users typically have very large mailboxes.
For large email mailboxes, it is recommended to deploy the following
Registry settings:
[HKEY_CURRENT_USER\Software\Microsoft\MSCRMClient]
"TagMinItemsForCrawl"=dword:00000000
"TagAllowedItemsForCrawl"=dword:00000025
This
setting requires a restart and will only crawl (or inspect) the first
25 items in a user’s mailbox. This settings increases the user
performance drastically, because every time the asynchronous “tagging
engine” wakes up, it looks for only the last 25 emails that came into
Outlook, instead of scanning every email located in the Inbox and Sent
Items folders. However, the downside to this setting is that it will not
automatically go through older emails and change the icon
appropriately; this might be a little misleading and confusing for some
users.
Ensure adequate memory on the client exists.
This
is typically overlooked, but minimum memory on a client is 1GB (using
the online version). We recommend 2GB for the client and 4GB if using
the offline version. (The offline version has a subset copy of the
Dynamics CRM database synchronized with the server.)
Ensure service packs are installed for both Windows and for Microsoft Dynamics CRM.
Microsoft
Dynamics CRM has many service packs depending on a variety of
conditions. If your organization has deployed any of the service packs,
be sure that both the server and client service packs are deployed.
To force a client
deployment, system administrators can configure the updates as mandatory
in the CRM Client AutoUpdate, as follows:
1. | The first time you run AutoUpdate, go to \InetPub\wwwroot and create a new folder named crmpatches.
Note
If this is a load-balanced environment, create this folder on each subsequent web server in the same location.
|
2. | Ensure that all clients have the following Registry settings:
Location: HKEY_LOCAL_MACHINE\Software\Microsoft\MSCRMClient
Key: AutoUpdateDownloadUrl (string)
http://[servername]/crmpatches/ (remember the closing /)
|
3. | Download the hotfix to your server (each CRM web server) and extract the contents to the \InetPub\wwwroot\crmpatches folder.
|
4. | Extract
the contents of the client patch on your server. Locate the PatchId
value, which is required for the XML file configuration.
- a. Open a command prompt, and type [DownloadedLocation]\[CRMPatchFileName].exe /x.
- b. Enter the location (\InetPub\wwwroot\crmpatches) when prompted.
- c. Open config.xml and copy the ParchId to configure the next steps.
|
5. | Create/modify your configuration XML file:
<ClientPatches>
     <Create>
          <ClientPatchInfo>
               <PatchId>[Enter PatchId Guid]</PatchId>
               <Title>[Patch Specific Title]</Title>
               <Description>[Patch Description]</Description>
               <IsMandatory>true</IsMandatory>
               <IsEnabled>true</IsEnabled>
               <ClientType>OutlookDesktop,OutlookLaptop</ClientType>
               <LinkId>[CRMPatchFileName].exe</LinkId>
          </ClientPatchInfo>
     </Create>
</ClientPatches>
Note
You can add multiple <ClientPatchInfo> to post multiple hotfixes at one time.
The title and description are for display only.
The IsMandatory option dictates whether a user is required to install the hotfix in order to continue using CRM.
The ClientType can be either OutlookDesktop or OutlookLaptop or OutlookDesktop,OutlookLaptop depending on which clients require the updates.
|
6. | In a command prompt, locate ClientPatchConfigurator.exe, usually located in [ServerInstallDir]\Tools.
|
7. | Run microsoft.crm.tools.clientpatchconfigurator.exe [configfile].xml.
|
When this is properly configured, users will receive the update screen shown in Figure 1.
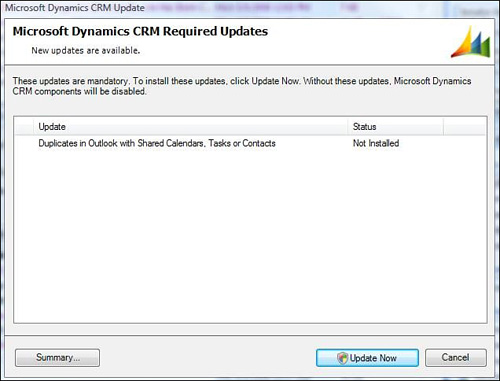
Depending on the IsMandatory switch used, the user can either install or elect to not install.
By navigating to your CRM options, you can set which records you want to synchronize. Figure 2 shows the standard synchronization options.
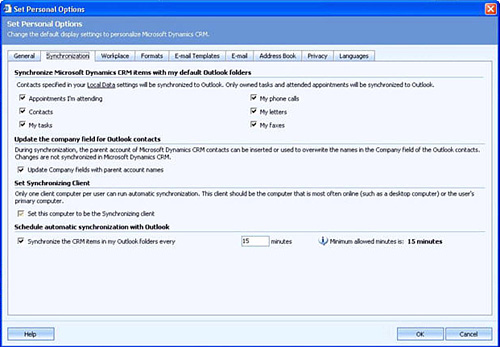
Ensure that you only have
the records synchronized to your local computer that you own. In
addition, this can be changed to other criteria that may decrease the
amount of data that needs to be synchronized from/to the server.
