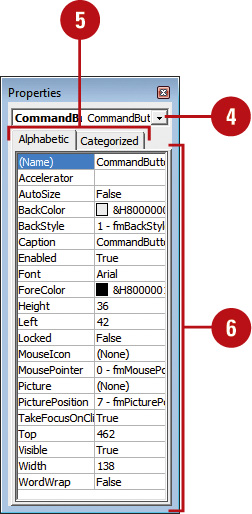
Every ActiveX control has properties,
or settings, that determine its appearance and function. When you work
with a control, you can open a property sheet that displays all the
settings for that control in alphabetic or category order. The ActiveX
controls appear in the Properties window in two columns: the left column
displays the name of the control, and the right column displays the
current value or setting for the control. When you select either column,
a list arrow appears in the right column, allowing you to select the
setting you want. After you set properties, you can add VBA code to a
module to make it perform.
Set ActiveX Control Properties
 Select the control whose properties you want to modify. Select the control whose properties you want to modify.
 Click the Developer tab. Click the Developer tab.
 Click the Properties button to display the Properties window only, or the View Code button to open the Visual Basic Editor. Click the Properties button to display the Properties window only, or the View Code button to open the Visual Basic Editor.
If necessary in the Visual Basic Editor, click the Properties Window button to show it.
 To switch controls, click the Controls list arrow (at the top), and then select the one you want. To switch controls, click the Controls list arrow (at the top), and then select the one you want.
 Click the Alphabetic or Categorized tab to display the control properties so you can find the ones you want. Click the Alphabetic or Categorized tab to display the control properties so you can find the ones you want.
 Click the property box for the property you want to modify, and then do one of the following. Click the property box for the property you want to modify, and then do one of the following.
- Type the value or information you want to use.
- If the property box contains a list arrow, click the arrow and then click a value in the list.
- If
a property box contains a dialog button (...), click it to open a
dialog box to select options or insert an object, such as a picture.
 When you’re done, click the Close button on the Properties window. When you’re done, click the Close button on the Properties window.


|