After you install the migration tools, it is then
time to perform the migration. Before beginning any migration of any
role of service, you need to make sure you back up your source and
destination servers. Regardless of the feature or role you will be
migrating to, Windows Server 2008 R2 will follow three general steps
after you install Windows Server 2008 R2 on the new target server.
First, you will export the settings from the source server to temporary
storage. Then, you will import the settings to the target server from
the temporary storage. Last, you will transfer any data and shares from
the source server to the target server.
1. Migrate Active Directory and DNS
You might be wondering
why DNS is included in this section; the main reason is that DNS is the
name resolution backbone for any Active Directory environment. DNS
provides the needed discovery resources for servers, replication, roles,
and many other functions inside Active Directory. Before you migrate
your Active Directory and DNS structure, be sure to prepare your
environment. Make sure your source and destination servers are properly
prepared. Preparing the source server is straightforward and can be
summed up in one word: document.
You will want to make sure you take note of the server name, DNS
settings, OU information, server roles, Flexible Single Master
Operations Roles, and so on. These provide you with the data to help
verify that the migration was successful. You also need to consider what
role the source server will play after the migration. When the
migration completes, the source server will become a member server.
Preparing the destination
server takes a little more work. After you install the Windows Server
2008 R2 server, you will need to perform a few steps prior to beginning
the migration. One thing you should be aware of is when you install the
server, the server name and IP address you assign are temporary and will
be replaced later during the migration. The reason behind the
replacement of the names is to ensure your client systems will still
have the ability to connect to DNS without you needing to reconfigure
all the client systems.
When you're ready, you need to
join the Windows Server 2008 R2 destination server to the source
server's domain by installing the role or running dcpromo.
Remember prior to joining the domain to properly prepare your AD
environment by running Forestprep and Adprep. The main reason is to make sure the replication of the
directory takes place. This is a big part of the migration, and second
part is to migrate DNS and IP settings so the destination server will
service the clients on your network.
|
When you perform this
migration, there will be several times during the process that the
server you are migrating from and the server you are migrating to will
have their key services turned off, and there will be times the servers
will be rebooted. You need to plan for this migration during off-peak
hours when your network will be least impacted by the downtime of this
migration.
|
Verify
what DNS partitions are running on the source and destination servers
by running the following command. The destination server should only be
enlisted in the same partitions as the source server:
dnscmd /EnlistDirectoryPartition
If you need to enlist any
custom partitions from the source server to the destination server, you
may need to run this command on the destination server:
dnscmd /EnlistDirectoryPartition <FQDN of partition>
Stop
the DNS service on the source server by running the following command.
(Or you can stop the service in the services administrative tool.) You
need to stop the service to make sure the data is properly migrated.
net stop "DNS Server"
You then need to export two registry keys on the source server containing the necessary DNS entries to be migrated:
HKEY_LOCAL_MACHINE\SYSTEM\CurrentControlSet\Services\DNS\Parameters
HKEY_LOCAL_MACHINE\SOFTWARE\Microsoft\Windows NT\CurrentVersion\DNS Server
You can either export the keys in regedit, or you can run the following two commands, which will export the keys to windows\system32\dns on your system drive:
regedit /E:A %Windir%\System32\DNS\Dns-Service.REG HKEY_LOCAL_MACHINE\System\CurrentControlSet\Services\DNS
regedit /E:A %Windir%\System32\DNS\Dns-Software.REG "HKEY_LOCAL_MACHINE\SOFTWARE\Microsoft\Windows NT\CurrentVersion\DNS Server"
Create
a folder called DNS_migrate_system32DNS on a network share or other
removable drive; this will be copied to the destination server.
Copy all the contents, excluding the samples directory, in the windows\system32\dns directory on the source server, to the DNS_migrate_system32DNS
folder you created in the previous step. You may need to copy
additional DNS directories if DNS used custom directories. You can check
to see whether you have custom paths by looking at this registry key:
HKEY_LOCAL_MACHINE\SYSTEM\CurrentControlSet\Services\DNS\Parameters\DatabaseDirectory
Start
the DNS service on the source server by running the following command
(or do so in the services administrative tool). You need to start the
service to provide service on your network until the migration is
complete.
net start "DNS Server"
Stop the DNS service on the destination server by running the following command (or using the services administrative tool):
net stop "DNS Server"
Copy all the contents from the directory to the windows\system32\dns directory on the destination server. Copy and replace any files if prompted.
From the DNS directory on the destination server, run both the .reg files created in step 3 to import the registry entries.
Start the DNS service on the destination server by running the following command (or using the services administrative tool):
net start "DNS Server"
After
you have started the DNS service, then you need to verify the migration
with a command provide by Microsoft called the Convergence Verification
Script (CVS). You can download CVS from http://go.microsoft.com/fwlink/?LinkId=135502. After you have downloaded and extracted the command, run the following command. This command will verify the migration:
DNSConvergeCheck.cmd <source DNS server> <destination DNS server> <FQDN of domain>
The
last steps involve you then replacing the IP address and name of the
destination server with the IP address and name of the source server. It
is important to note that when you rename the computers, this will
require a reboot for both the source and destination server. To do this,
follow these steps:
Change the source server IP address to another unused IP address on your network.
Change the destination server's IP address to the original address of the source server.
Rename
the source server's computer name to an unused name on network. To do
this, open the System control panel, choose the Computer Name tab, and
rename the system.
Change
the destination server's computer name to the original computer name of
the source server. To do this, open the System control panel, choose
the Computer Name tab, and rename the system.
2. Migrate DHCP Services
Migrating your DHCP
services utilizes one of the Windows Server Migration Tools. This makes
this migration more straightforward. Again, before you begin this
process, make sure you make the proper backups of your systems. To start
this process, you need to do a few things to prepare the destination
server and source server:
To prepare
the destination server, you need to install the DHCP role on the server
(although you can also have the migration process install the role as
well), make sure you have a enough hard drive space on the server to
hold the DHCP databases, and make sure the destination server is a
member of the same domain as the source server.
To
prepare the source server, you need to stop the DHCP service and locate
the DHCP databases. By default the databases for DHCP are located in
the windows\system32\dhcp directory. If you are not sure, you can this command to find out the location of the databases:
netsh dhcp server show dbproperties
After you have prepared the source and destination servers, then you can begin the migration:
On
the destination server, stop the DHCP service. You can do this by going
to the services administrative tool and stopping the DHCP server
service.
Create
and share a directory on the source server that you will use for the
export and import process. Make sure the administrator ID you are
currently logged on with has write permission to the directory. To make
the process easier, you should map the drive to the shared directory.
On
the source server, start the Windows Server Migration Tools. To do
that, go to the Start menu, select Administrator Tools, select Windows
Server Migration Tools, and click the Windows Server Migration Tools
PowerShell shortcut. You could also open a PowerShell session and type
the following command:
add-pssnapin Microsoft.Windows.ServerManager.Migration
On the source server in the PowerShell window, type the following command to export your DHCP services and configurations:
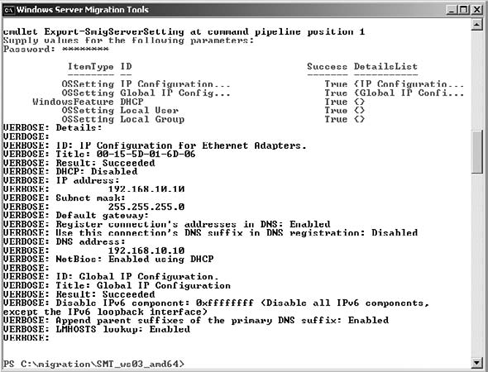
Export-SmigServerSetting –featureID DHCP –path <storepath )> –Verbose
You will also be required to set a password for the export file during this step. When the process is complete, you will see an srvmig.mig file in the directory you created in step 2.
After this command is run, your screen should look like Figure 1.
After you verified that the srvmig.mig file is in the directory, you need to unauthorize the DCHP server on the source server. Run the following command:
Netsh DHCP delete server <Server FQDN> <Server IPAddress>
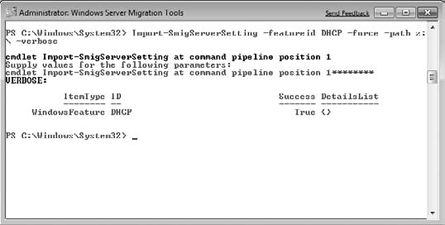
Import
the settings onto the destination server; this is done by running the
following command. After this command is run, your screen should look
like Figure 2.
import-SmigServerSetting –featureID DHCP –path <storepath )> –Verbose
Start
the DHCP service. If you get an error message, make sure the DHCP
service is set to Automatic in the Services control panel.
Start-Service DHCPServer
The last step is to authorize the DHCP server, and you can do that in the DCHP administrator tool or by running this command:
netsh DHCP add server <Server FQDN> <Server IPAddress>
3. Utilize the Server Migration Tools
The Windows Server Migration Tools can help you accomplish the task of
server migration fairly simply; however, make sure you plan the
migration process properly. To that end, Microsoft provides several key
resources and documents online at the Windows Server 2008 R2 migration
website located here:
http://technet.microsoft.com/en-us/library/dd365353.aspx
This site provides key resources for other role migrations, with many planning documents and worksheets.
When you are using the Windows
Server Migration Tools, there are really three commands you need to
become familiar with to utilize the tool effectively:
Get-SmigServerFeature
This command will display all the roles or features that can be
migrated from the source server using the server migration tools. This
tool will also display the feature ID names of the services, which are
used in the import and export commands. To learn more about this command
from the Windows Server Migration Tools, run this command:
help Get-SmigServerFeature -detailed
Export-SmigServerSetting
This is the root of the command you run on the source server to export
whatever feature you have selected to migrate. This command will create
the export file srvmig.mig.
To learn more about this command, from the Windows Server Migration Tools, run this command:
help Export-SmigServerSetting -detailed
Import-SmigServerSetting
This is the root of the command you run on the destination server to
import the feature you have selected to migrate. To learn more about
this command, run this command from the Windows Server Migration Tools:
help Import-SmigServerSetting -detailed
