After taking the time to become familiar with upgrade
paths and types available to you and making a decision to upgrade to
SharePoint 2010, you are ready to prepare for the upgrade. The amount of
preparation that you perform will have a great impact on the success of
the upgrade. In the following sections, you will learn what you need to
do to prepare for an upgrade to SharePoint 2010 to minimize or
eliminate any potential issues during the upgrade process. To help you
prepare for the installation, you should understand the following
topics.
Best practices for upgrading to SharePoint 2010
How to run and test a full backup of your SQL Server information
How run the pre-upgrade checker tool
1. Ten Best Practices for Upgrading to SharePoint 2010
If you are performing an
upgrade from SharePoint Server 2007 to SharePoint 2010, Microsoft has
identified 10 best practices that you should follow to help streamline
the upgrade and minimize any problems during the upgrade.
Install Service Pack 2 on your current SharePoint Server 2007 servers before
upgrading. This applies to all upgrade types. If you add the October
2009 SharePoint Server 2007 cumulative update as well, it enhances the
pre-upgrade checker tool used during the upgrade process.
Ensure
that the existing SharePoint Server 2007 environment is functioning
properly and remove all unnecessary or unused components from your
existing implementation.
Migrate existing SharePoint Server 2007 servers to 64-bit before performing an in-place upgrade to SharePoint 2010.
Run the pre-upgrade checker to help identify potential upgrade problems.
Perform a trial upgrade on a test farm that mirrors your production farm. This will provide you with the following benefits.
You will become familiar with upgrade user interface.
You can determine which upgrade approach will work best for your environment.
You can test the new look and feel of the upgraded farm.
You can determine customizations that you must complete.
You can determine the amount of time necessary to perform the upgrade.
You will know what you need to plan for during the upgrade, such as resource availability.
Plan
for the hardware capacity you will require for SharePoint 2010,
including enough disk space, processor capacity, and memory.
Perform
a full backup of your entire farm and all supporting components, such
as Internet Information Services (IIS) and 12 hive.
If
performing a database attach upgrade, set existing databases to
read-only. This is optional, but it allows your users to continue to
access your SharePoint content without being able to modify it.
Avoid
adding servers to the new farm during the upgrade. If additional
servers are required, add them before you perform the upgrade or after
the upgrade, but not during the upgrade.
After the upgrade finishes, review the upgrade logs and the Upgrade Status page to discover any upgrade issues.
2. Backing Up and Testing Your SharePoint Farm
A critical aspect of performing any type of upgrade
is to be able to roll back to the current environment if there are
problems with the upgrade. With most of your SharePoint content stored
in SQL Server, it is imperative that your SharePoint databases are
backed up prior to performing an upgrade. By doing so, in the event the
upgrade fails and you need to roll back to your current environment, you
will have a copy of the information as it was prior to beginning the
upgrade.
2.1. Backing Up Your Current SharePoint Farm
Backups of SharePoint data
are often performed by your SQL Server database administrator (DBA).
However, some SharePoint administrators are also the SQL DBAs for their
SharePoint implementation. It is important that you know what should be
backed up prior to performing an upgrade. The following databases should
be backed up (if they exist).
Farm configuration database
Central Administration database
Search database
WSS help search database
Shared Service Provider (SSP) database
SSP search database
Single sign-on (SSO) database
My Sites database
All content databases
Note:
BEST PRACTICE
You should also back up all SharePoint customizations including site
definitions, Web Parts, new features, and all other files that you would
need in case you have to roll back to the previous version’s
environment.
2.2. Testing Your SharePoint Farm Backups
Backing up your SharePoint farm content is just one step in preparing for your SharePoint farm upgrade.
However, what if the upgrade fails and you need to roll back to your
previous SharePoint environment—but the backup media is corrupt? Or the
restore operations of the backups are successful, but you are unable to
access your sites because DNS entries or Alternate Access Mappings are
missing? What if the host headers you added to your Web applications are
lost during the upgrade and you haven’t backed up the IIS 6.0 metabase?
The best way to ensure that
you have successfully backed up everything that you need to roll back to
your previous SharePoint is to test the rollback process. You should
perform this test prior to starting the upgrade so you can discover any
problems before they occur in your production environment.
It is highly recommended that
you duplicate your production environment in a nonproduction environment
that includes a Web server computer and SQL Server. Use this
environment to restore your backups, and after the backups are restored
successfully, install all of your farm customizations (such as site
definitions, Web Parts, and new features), and then verify that the
restored farm is fully functional. After a successful restore and a
complete test in a nonproduction environment, you will have proven that
if the upgrade process fails, you will be able to roll back to your
current environment with no loss of data or functionality.
3. Running the Pre-Upgrade Checker Tool
If you have made the
decision to perform an in-place upgrade instead of a migration upgrade
to SharePoint 2010, you want to take every precaution to ensure that the
servers on which you will be performing the upgrades meet the
requirements of SharePoint 2010. The steps you take to ensure your
servers are ready for an upgrade will eliminate or reduce the likelihood
that the upgrade will fail and require a rollback.
The best way to check your existing SharePoint servers is to run the pre-upgrade
checker tool provided by Microsoft. This tool is free, and it will
report on the status of your environment and SharePoint sites before you
upgrade to SharePoint 2010. You can acquire this tool by installing
Service Pack 2 of SharePoint Server 2007. Alternatively, an updated
version of the pre-upgrade checker is also available when you install
the October 2009 cumulative update for SharePoint Server 2007.
Note:
The pre-upgrade checker tool
does not prepare the environment for an upgrade; it is used to help the
administrator prepare for the upgrade by informing them of what to be
aware of before performing an upgrade to SharePoint 2010.
The pre-upgrade checker tool extends the functionality of the Stsadm.exe command line tool by performing
a check on your existing SharePoint implementation to determine if it
is appropriately configured and to report other information that will
help you prepare for the SharePoint 2010 upgrade. During the evaluation
of your current SharePoint farm, the pre-upgrade checker evaluates and
returns the following information.
A list of all servers
and components in the farm, and whether the servers meet the
requirements for upgrading, which include 64-bit hardware and the
Windows Server 2008 operating system
The alternate access mapping URLs currently being used in the farm
A list of all site definitions, site templates, features, and language packs that are installed in the farm
Whether all customizations in the farm are supported (such as database schema modifications)
Whether there are any database or site orphans in the farm
Whether
there are missing or invalid configuration settings in the farm (such
as a missing Web.config file, invalid host names, or invalid service
accounts)
Whether
the SQL databases meet the requirements for an upgrade—for example,
checking for databases set to read/write and any databases and site
collections currently stored in Windows Internal Database larger than 4
gigabytes (GB)
To run the pre-upgrade
checker tool, open a command prompt as an administrator, change to the
%CommonProgramFiles%\Microsoft Shared\Web Server Extensions\12\BIN
directory, and type the following command.
stsadm -o preupgradecheck
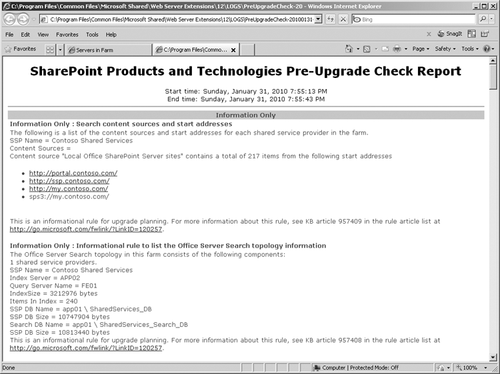
In addition to the results within the command prompt window, another window is displayed, as shown in Figure 1, that contains a report from the command within a Web browser window.
If you have not installed
Service Pack 2 or the October cumulative update on every server in the
farm, you may receive errors concerning the SPTimerV3 service, and you
also may see logon errors when you try to restart the service manually.
If this occurs and you have successfully installed Service Pack 2, you
will need to run the update KB971620 to fix the product license state
from the evaluation/trial to fully licensed implementation. After you
install this update, you should run the pre-upgrade checker tool again.
Note:
It isn’t uncommon to run the
pre-upgrade checker multiple times. For example, if you ran it to
perform the initial evaluation of your server farm but cannot perform
the upgrade for a few weeks, you should rerun the tool again just prior
to the actual upgrade to check for any last-minute issues that may have
appeared since the first time you ran the tool.
The pre-upgrade
checker tool checks both the local server and your farm-level settings.
The information returned by this tool can be used to determine how you
will proceed. The results of the pre-upgrade checker will allow you make
the following determinations.
The type of upgrade to perform, in-place or database attached upgrade
The upgrade site collections that contain customized sites
Customizations that may have to be reapplied or redone after the upgrade completes
After you run the pre-upgrade
checker, the report it generates will automatically be displayed in
your default browser. If you want to view this report at a later time,
you can do so by opening it from its location, which is as follows.
%CommonProgramFiles%\Microsoft Shared\Web Server Extensions\12\LOGS
The reports are named using the format PreUpgradeCheck_YYYYMMDD-HHMMSS-SSS-random_number.htm, with the following file naming conventions.
YYYYMMDD is the date. YYYY = 4-digit year; MM = 2-digit month; DD = 2-digit day.
HHMMSS-SSS is the time. HH = 24-hour clock; MM = minutes; SS = seconds; SSS = milliseconds.
random_number is used to differentiate among simultaneous runs of the tool.
Note:
In addition to the .htm
version of the report, there also are .txt and .xml versions of the
report located in the same directory, as shown in Figure 2.

These reports are useful in
helping you determine if there will be any issues during the upgrade to
SharePoint 2010. The logs contain the following information.
The checks that were performed
The issues discovered by the checks
Suggestions on how to resolve the issues or a link to a Knowledge Base article to help resolve the issues
