Administrative Groups
An administrative group is a
collection of Exchange Server 2003 objects that are grouped together
for the purpose of managing and delegating permissions. An
administrative group can contain servers, routing groups, policies, and
public folder hierarchies. If, for example, your organization has two
administrators, and each one manages a group of Exchange Server 2003
servers, then you can create two administrative groups. You can then
delegate permissions to each administrator.
You can create
administrative groups to support the various administrative models
(centralized, decentralized, or mixed). Note that an administrative
group is not a group of administrators. Rather, it is a group of objects
to administer. These objects include the following:
Adding an Exchange Administrative Group
When you set up an Exchange
Server 2003 organization, you automatically create the First
Administrative Group container, and the Exchange Server 2003 server is
added to this group. If you then add a new computer running Exchange
Server 2003 to your Exchange organization, the computer is added to this
administrative group.
If,
however, you create additional administrative groups before adding
further servers, then Setup prompts you to select the administrative
group to which any additional server should be added. You use the
Administrative Groups container to create an administrative group in a
practice later in this lesson.
The Exchange Administration Delegation Wizard
Exchange
administrative permissions enable administrators to perform tasks in
Exchange Server 2003. You use the Exchange Administration Delegation
Wizard to select users or groups and grant them administrative
permission to objects in your Exchange organization. This makes
administration more secure because you can specify who can gain access
to which Exchange objects.
You can start the
Exchange Administration Delegation Wizard from the Organization object
or from an administrative group object. If you start the wizard from the
Organization object, then the permissions you assign propagate down the
hierarchy to all the objects in the organization. If, on the other
hand, you start the wizard from an administrative group object, then the
permissions you assign propagate to all the objects in that
administrative group. However, in the latter case, read-only permissions
are also granted from the administrative group object, up
the hierarchy. This enables an administrator to view the hierarchy. To
use the Exchange Administration Delegation Wizard, you must have
Exchange Full Administrator permissions at the organization level.
Tip
The read-only permission does not appear in Exchange System Manager. You can view it by using the Adsiedit.exe utility. |
Roles and Associated Permissions
The Exchange Administration Delegation Wizard supports the following roles:
Exchange Full Administrator
Exchange Full Administrators can administer Exchange system
information. They can add, delete, and rename objects, and modify
permissions. You should delegate this role to administrators who need to
configure and control access to your Exchange e-mail system.
Exchange Administrator Exchange
Administrators can fully administer Exchange system information but
cannot modify permissions. You should delegate this role to users or
groups who are responsible for day-to-day administration tasks such as
adding, deleting, and renaming objects.
Exchange View Only Administrator
An Exchange View Only Administrator can view Exchange configuration
information. You should delegate this role to administrators who do not
need to modify Exchange objects.
Tip
It
is common (if somewhat sloppy) usage to refer to Exchange Full
Administrators as Exchange administrators. If an exam question states
that someone is an Exchange administrator, it will mean just that. The
person will not have an Exchange Full Administrator role. |
In addition to the
roles supported by the Exchange Administration Delegation Wizard, other
Windows Server 2003 group memberships are required to manage Exchange.
If, for example, you want to assign write permission to an administrator
for objects in an organization or administrative group, then that
administrator must be a local administrator on each Exchange Server 2003
server that he or she needs to manage.
When you create an
Exchange Server 2003 organization, the Exchange Domain Servers group and
the Exchange Enterprise Servers group are created automatically. These
two groups are assinged permissions that allow Exchange servers to gain
access to Exchange configuration and recipient information in Active
Directory. These are system groups for use by Exchange only, and you
should not use them to give administrative privileges to users or
groups.
Advanced Security Permissions
A child object in
Exchange Server 2003 inherits permissions from its parent object by
default. Advanced security permissions enable you to provide additional
administrative control by enabling you to modify or prevent inherited
permissions. When, for example, you create a new routing group, that
group inherits the permissions from the administrative group in which it
was created. If you want different permissions applied to the new
routing group object, then you can access the object’s Properties box
and use the Advanced option on the Security tab to block permission
inheritance.
You can also
prevent inherited permissions from propagating to child objects by
modifying the access control settings. You can specify, for each access
control setting, whether the permissions should apply only to the
object, or to the object and to its child objects.
If
you remove inherited permissions and specify that permissions must be
applied to the parent object only, the child objects are left with no
permissions (an implicit Deny permission). Removing permissions prevents
access to Exchange objects in Exchange System Manager. However, you can
restore the permissions by using the Adsiedit.exe utility.
The Adsiedit.exe Utility
You can use the
Active Directory Services Interface (ADSI) Edit Microsoft Management
Console (MMC) snap-in, otherwise known as the Adsiedit.exe utility, to
grant advanced security permissions that cannot be granted by using
Exchange System Manager or Active Directory Users And Computers. For
example, the utility enables you to grant permissions on the
Administrative Groups container that are propagated to the new child
administrative groups.
Practice: Creating and Using an Administrative Group
In this practice, you
create an additional administrative group and delegate control of that
group to a user named Don Hall.
Exercise 1: Create an Administrative Group
In this exercise, you create an administrative group. This group is required to complete subsequent exercises in this practice.
To create an administrative group, perform the following steps:
1. | Open Exchange System Manager.
|
2. | Right-click Administrative Groups, click New, and then click Administrative Group.
|
3. | In the Properties dialog box, type NewAdmin, and then click OK.
|
4. | In the console tree, expand Administrative Groups, right-click NewAdmin, click New, and then click System Policy Container.
|
5. | Expand NewAdmin and verify that a System Policies container exists.
|
6. | Right-click the System Policies container under NewAdmin, click New, and then select Mailbox Store Policy.
|
7. | Enable all four Property pages in the New Policy dialog box, and then click OK.
|
8. | Enter a name for the policy, for example, NewMail.
|
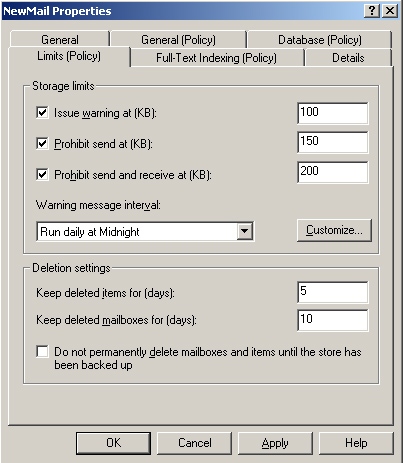
9. | Configure the Properties box tabs as required. Figure 1 shows a possible, if rather strict, configuration of the Limits (Policy) tab.

|
10. | Click OK when you have configured the Mailbox policy.
|
11. | Use the same technique to create a Public Store policy and a Server policy.
|
Tip
This
procedure created new policies from scratch. If policies already exist,
for example in the First Administrative Group’s System Policies
container, you can paste them into the new System Policies container and
edit them as required. |
Exercise 2: Delegate Control of an Administrative Group
In this exercise, you
delegate control of the NewAdmin administrative group to Don Hall. You
grant Don the Exchange Administrator role, but not the Exchange Full
Administrator role, for that administrative group. If the NewAdmin
administrative group does not exist, then you need to create it by
completing the previous exercise. You cannot delegate control if you
have only one administrative group.
To delegate control of an administrative group, perform the following steps:
1. | Open Exchange System Manager and expand Administrative Groups.
|
2. | In the console tree, right-click NewAdmin, and then click Delegate Control.
|
3. | The Exchange Administration Delegation Wizard opens. On the Welcome page, click Next.
|
4. | On the Users Or Groups page, click Add.
|
5. | In the Delegate Control dialog box, click Browse.
|
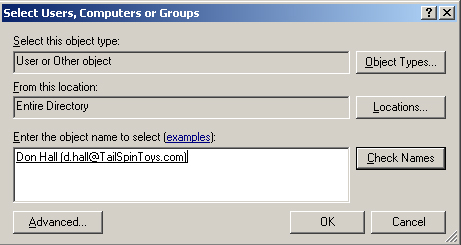
6. | In the Select Users, Computers Or Groups dialog box, typeDonHall. Click Check Names to verify that Don Hall’s account exists, as shown in Figure 2, and then click OK.

|
7. | In the Delegate Control dialog box, in the Role box, click Exchange Administrator, and then click OK.
|
8. | On the Users Or Groups page, click Next.
|
9. | Click Finish.
|
10. | In the Exchange System Manager dialog box, read the warning, and then click OK.
Tip Remember
this warning. An Exchange administrator must also be a member of the
local machine administrator group on any Exchange Server 2003 server
that he or she administers. Watch out for the omission of this step in
procedures described in exam Scenarios. |
|
11. | Open Active Directory Users And Computers on Server01.
|
12. | Expand the domain name and click Users. In the details pane, right-click Don Hall, and then click Properties.
|
13. | In the Don Hall Properties dialog box, click Member Of.
|
14. | On the Member Of tab, click Add.
|
15. | In the Select Groups dialog box, type Administrators. Click Check Names to confirm the group exists, and then click OK.
|
16. | In the Don Hall Properties dialog box, click OK.
|
Note
Because
of the restrictions of your two-computer test network, Don Hall has
been added to the Administrators group on a domain controller. You would
not do this on a production network. Exchange administrators should
instead be added to the Administrators groups on the Exchange servers
that are in the administration group that they administer. In a
production network, you would not normally install Exchange on a domain
controller. |
Exercise 3: Configure Advanced Security Permissions
In this exercise, you
enable the Security tab for all Exchange objects and then configure
advanced security permissions for the user Kim Akers. If a user account
does not already exist for Kim Akers, then you need to create one before
starting this practice.
Note
The
ADSI support tool is not installed by default. To complete this
practice, you need to install the Windows Server 2003 support tools. The
installation file is in Support/Tools on the Windows Server 2003
installation CD. |
To configure advanced security permissions, perform the following steps:
1. | On Server01, from the Start menu, click Run, type regedit, and then click OK.
|
2. | Navigate to HKEY_CURRENT_USER\Software\Microsoft\Exchange.
|
3. | Expand Exchange, right-click EXAdmin, click New, and then click DWORD Value.
|
4. | Change New Value #1 to ShowSecurityPage, and then press Enter.
|
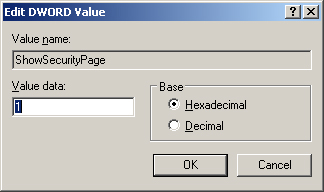
5. | Double-click ShowSecurityPage. In the Edit DWORD Value dialog box, in the Value Data box, type 1, as shown in Figure 3 and then click OK.

|
6. | Close the Registry Editor.
|
7. | From the Start menu, click Run, type mmc, and then click OK.
|
8. | In the MMC console, click File, and then click Add/Remove Snap-In.
|
9. | In the Add/Remove Snap-In dialog box, click Add.
|
10. | In the Add Standalone Snap-In dialog box, click ADSI Edit, click Add, and then click Close.
|
11. | In the Add/Remove Snap-In dialog box, click OK.
|
12. | Right-click ADSI Edit, and then click Connect To.
|
13. | In the Connection Settings dialog box, in the Select A Well Known Naming Context box, select Configuration, and then click OK.
|
14. | Navigate
to ADSI
Edit\Configuration\CN=Configuration,DC=Tailspintoys,DC=Com\CN=Services\CN=Microsoft
Exchange\CN=Tailspintoys. Right-click CN=Administrative Groups, and
then click Properties.
|
15. | On the Security tab, click Add.
|
16. | In the Select Users, Computers, Or Groups dialog box, type Kim Akers and then click OK.
|
17. | In the CN=Administrative Groups Properties dialog box, click Advanced.
|
18. | In
the Advanced Security Settings For Administrative Groups dialog box, in
the Permission Entries list, click the entry for Kim Akers, and then
click Edit.
|
19. | In
the Permission Entry For Administrative Groups dialog box, in the Apply
Onto drop-down list, click This Object And All Child Objects. The
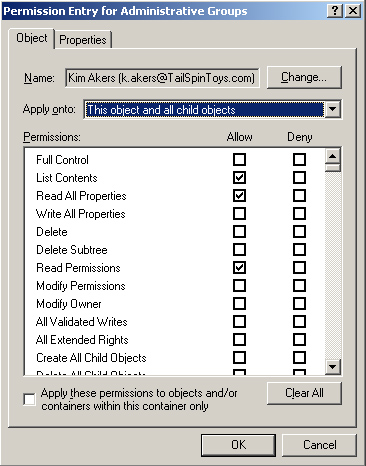
dialog box is shown in Figure 4. Click OK.

|
20. | In
the Advanced Security Settings For Administrative Groups dialog box,
clear the Allow Inheritable Permissions From The Parent To Propagate To
This Object And All Child Objects. Include These With All Entries
Explicitly Defined Here check box, and then click OK.
|
21. | In the CN=Administrative Groups Properties dialog box, click OK.
|
22. | To
verify that permissions are configured correctly, right-click any
administrative group in Exchange System Manager, select Properties, and
access the Security tab. Verify that Kim Akers has permissions on the
administrative group. |