Message Filtering
Unsolicited
commercial e-mail, or junk e-mail, wastes users’ time, uses memory
resources, and consumes network bandwidth. Although you probably cannot
entirely eliminate junk e-mail, you can use message filtering
to reduce the amount that your users receive. The purpose of message
filtering is to eliminate junk e-mail without restricting legitimate
e-mail.
Note
Junk
e-mail is sometimes known as spam. Technically, spam is any type of
unsolicited advertisement. Spam can appear as e-mail, as pop-up boxes on
Web sites, and even as surface mail. Junk e-mail is spam, but not all
spam is junk e-mail. |
Message filtering
examines e-mail headers and message bodies and matches them against
established junk e-mail rules. Outlook 2003 and Outlook Web Access (OWA)
include a set of built-in message filters, collectively referred to as
the Junk E-Mail feature, to identify unsolicited commercial e-mail. The
Junk E-Mail feature enables users to configure Trusted Senders, Trusted
Recipients, and Junk Senders lists. If, for example, a sender is listed
on the Junk Senders list, the message is moved into the Junk E-Mail
folder or deleted. In Outlook 2003, the Junk E-Mail feature is enabled
by default, and Microsoft provides updates for the built-in message
filters. Outlook and OWA also enable you to block external content, such
as malicious code, in HTML messages.
Exchange
Server 2003 filtering examines e-mail headers and checks them against
established filter rules. To use the Exchange filtering features, you
must first configure the properties of the global Message Delivery
object to create global filters. Then you need to configure SMTP virtual
servers to use these global filters.
Block Lists
A block list is a list of
domain names and Internet Protocol (IP) addresses that are known junk
e-mail sources. You can develop a block list for your company by
routinely updating your Global Accept and Deny List configuration, or
you can subscribe to a Realtime Blackhole List or Relay Blocking List
(RBL) maintained by a third-party company, such as Mail Abuse Prevention
System (MAPS).
Block lists
cannot completely prevent unsolicited e-mail because senders use a
variety of tactics, such as spoofing (or forging) subject headers or
using third-party servers to send the mail. Block lists can also block
legitimate e-mail because some domains may be incorrectly listed in the
block list, possibly because junk e-mail senders use them as relays.Connection Filtering
Connection filtering
enables you to check the IP address of the connecting SMTP server
against an RBL. If a match is found, Exchange Server 2003 rejects every
intended message recipient except for any defined as an exception.
Exchange Server 2003 connection filtering also enables you to configure
multiple connection filter rules and specify the order in which they are
applied. Creating multiple rules permits you to use the same IP address
with different sets of rules—for example, when you subscribe to two
different RBL providers. You can also configure exceptions to allow
e-mail messages to be delivered to specific recipients, or from a
specific sender, regardless of block list entries.
When you configure
connection filtering, you establish a rule that SMTP uses to perform a
DNS lookup on an RBL. When an e-mail message is sent to your
organization, Exchange contacts the RBL provider. The provider then
checks for the existence of a host record in DNS and issues one of two
responses:
127.0.0.X status code
This indicates that the IP address was found on the block list, and it
also lists the type of offense, such as known source of unsolicited
e-mail or known relay server.
Host not found This indicates that the IP address was not found on the block list.
Evaluating E-Mail
If
Exchange Server receives an unauthenticated e-mail message from an
external source, it evaluates the source IP address against the Accept
and Deny lists and rejects the message if a match is found on the Deny
list. If the IP address is not on the Accept or Deny list, Exchange
Server evaluates the message against an RBL. If a match is found on the
RBL, then Exchange Server stops the message at the protocol level.
Otherwise, Exchange
Server evaluates messages against any third-party, anti-junk e-mail
products or plug-ins configured at the transport layer. The third-party
product analyzes the message and assigns it a Spam Confidence Level (SCL)
value that indicates the degree to which the message can be considered
unsolicited commercial e-mail. The SCL value is from 1 through 10—the
lower the value, the higher the probability that the message is junk
mail.
Outlook moves the
e-mail message into the information store and, based on the SCL value
and Outlook’s user settings, it either delivers the message to a folder
or deletes it. If you set Outlook’s filter to Low, it sends any message
ranked below 4 to the Junk E-Mail folder. If you set the filter to High,
Outlook sends any message ranked below 7 to the Junk E-Mail folder.
Guidelines for Securing Mailboxes
When developing a strategy for securing Exchange Server 2003 mailboxes, you should consider the following guidelines:
Prevent users outside your Exchange organization from receiving out-of-office e-mail messages
You can configure the default SMTP policy, or create SMTP policies on a
domain-by-domain basis, that do not reply to out-of-office messages or
forward such messages to the Internet.
Prevent users from receiving e-mail from unidentified domains or from predetermined domains You can configure virtual servers to deny messages from unidentified domains or from any domain that you select.
Limit access to e-mail content by digitally signing and encrypting e-mail messages You can ensure that only the intended recipient views the message content by using digital signatures and encryption.
Prohibit unauthorized users from using distribution lists You can configure distribution lists to accept e-mail from authenticated users only.
Filter unsolicited e-mail You
can create a message filter and then apply that filter to each
applicable virtual server. You can filter a message by sender,
recipient, or domain.
Prevent junk e-mail
You can search incoming and outgoing e-mail for specific words,
phrases, and senders. You can configure OWA and Outlook 2003 to
determine how junk e-mail should be handled.
Recipient and Sender Filtering
You can block unwanted
e-mail based on IP addresses, sender e-mail address, recipient e-mail
addresses, or e-mail domain. You block e-mail by configuring Accept and
Deny lists, which can be configured through the global Message Delivery
Object and then applied to individual virtual servers.
Recipient Filtering
You can use
recipient filtering to reduce junk e-mail. You can filter e-mail that is
addressed to users who are not found in Active Directory or to whom the
sender does not have permissions to send e-mail. Exchange Server 2003
rejects any incoming e-mail that matches the defined criteria at the
protocol level and returns a 550 error. You can also use recipient
filtering to filter messages that are sent to well-defined recipients,
such as root@domain and inet@domain. This practice is indicative of unsolicited commercial e-mail.
Note
Recipient
filtering rules apply only to anonymous connections. Authenticated
users and other Exchange servers bypass these rules. |
Sender Filtering
Sender filtering reduces
junk e-mail by enabling you to create filters based on the sender of the
message. You can, for example, filter messages that are sent by
specific users or messages that are sent without sender addresses. You
can archive filtered messages, or you can drop the connection if the
sender’s address matches the filter criterion.
Practice: Configuring the Junk E-Mail Feature in Outlook 2003 and Enabling Connection Filtering
In this practice, you
configure the level of junk e-mail protection that you require in
Outlook 2003 and enable and configure connection filtering on your
front-end server.
Exercise 1: Configure the Junk E-Mail Feature in Outlook 2003
To configure the Junk E-Mail feature in Outlook 2003, perform the following steps:
1. | Start Outlook.
|
2. | On the Tools menu, click Options.
|
3. | On the Preferences tab, click Junk E-Mail.
|
4. | Configure the required level of protection (No Protection, Low, High, or Safe Lists Only).
|
5. | If you want to delete junk e-mail instead of moving it to a folder, you can select the relevant check box.
|
6. | Add
entries to the Trusted Senders, Trusted Recipients, and Junk Senders
lists by selecting the relevant tabs. You can also import lists from,
and export them to, a text file.
|
7. | Click OK.
|
Exercise 2: Enable Connection Filtering
In this
exercise, you configure Exchange Server 2003 to enable connection
filtering on Server02 and then block mail from a malicious user and a
junk mail sender. Note that fictitious names are used for the block list
provider, the malicious user, and the junk mail sender.
To enable connection filtering, perform the following steps:
1. | Open Exchange System Manager and click Global Settings.
|
2. | In the details pane, right-click Message Delivery, and then click Properties.
|
3. | Select the Connection Filtering tab.
|
4. | Click Add.
|
5. | In the Connection Filtering Rule dialog box, in the Display Name box, type Blocklist Provider. In the DNS Suffix Of Provider box, type contosoblocklists.com, and then click OK.
|
6. | Click OK to close the Message Delivery Properties dialog box.
|
7. | Read the message in the Exchange System Manager dialog box, and then click OK.
|
8. | In Exchange System Manager, navigate to Administrative Groups\First Administrative Group\Servers\Server02\Protocols\SMTP.
|
9. | Right-click Default SMTP Virtual Server, and then click Properties.
|
10. | Click Advanced on the General tab of the Default SMTP Virtual Server Properties dialog box.
|
11. | In the Advanced dialog box, click Edit.
|
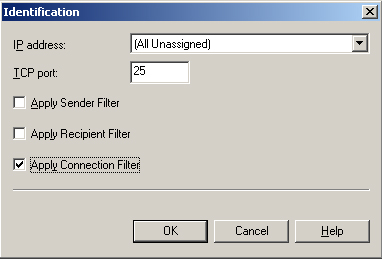
12. | In the Identification dialog box, select the Apply Connection Filter check box as shown in Figure 1, and then click OK.

|
13. | In the Advanced dialog box, verify that Filter Enabled is set to Yes, and then click OK.
|
14. | Click OK to close the Default SMTP Virtual Server Properties dialog box.
|
Exercise 3: Block an E-Mail Address and a Domain
To block a specific e-mail address and the domain of a known junk mail sender, perform the following steps:
1. | Open Exchange System Manager.
|
2. | In the console tree, click Global Settings.
|
3. | In the details pane, right-click Message Delivery, and then click Properties.
|
4. | Access the Sender Filtering tab in the Message Delivery Properties dialog box.
|
5. | Click Add.
|
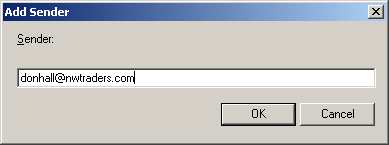
6. | In the Add Sender dialog box, type [email protected], as shown in Figure 2, and then click OK.

|
7. | In
the Message Delivery Properties dialog box, ensure that the Drop
Connection If Address Matches Filter check box is selected, and then
click OK.
|
8. | In the Warning dialog box, click OK to acknowledge that this filter must be enabled on the virtual server.
|
9. | In Exchange System Manager, navigate to Administrative Groups\First Administrative Group\Serves\Server02\Protocols\SMTP.
|
10. | Right-click Default SMTP Virtual Server, and then click Properties.
|
11. | Select the Access tab in the Default SMTP Virtual Server Properties dialog box.
|
12. | Click Connection.
|
13. | In the Connection dialog box, ensure that All Except The List Below is selected, and then click Add.
|
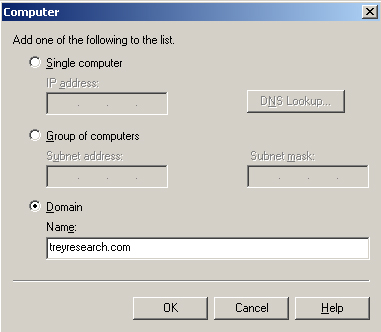
14. | In the Computer dialog box, click Domain, click OK when warned that this is a resource intensive configuration, type treyresearch.com, as shown in Figure 3, and then click OK.

|
15. | In the Connection dialog box, click OK.
|
16. | Select the General tab in the Default SMTP Virtual Server Properties dialog box, and then click Advanced.
|
17. | Click Edit.
|
18. | In the Identification dialog box, select the Apply Sender Filter check box, and then click OK.
|
19. | Click OK to close the Advanced dialog box.
|
20. | Click OK to close the Default SMTP Virtual Server Properties dialog box.
|