OCSP is divided into several different components, including the OCSP client, responder, and revocation providers.
1. OCSP Client
The OCSP client
is integrated within Windows Vista and Windows Server 2008. This allows
these two operating systems to interact with an OCSP implementation by
default without any further implementation. However, earlier operating
systems by Microsoft do not include support for OCSP; thus, you must
look for a third-party software provider program.
2. Online Responder
The online responder
consists of the service that holds the web proxy cache for the online
responder, the revocation configuration to determine how the responder
responds to requests, the ability to issue digitally signed keys, and
audits.
3. Revocation Providers
The separate revocation provider
components function along with the online responder by caching
revocation information for the online responder. Then, whenever the
online responder receives a request, it may request a revocation
provider to cross-check the requested certificate serial number.
In Exercise 1,
you will learn to install the Microsoft Online Responder service, an
essential role for Windows Server 2008 enterprises. Using this service
you can expedite the requests that servers will receive.
|
To complete this exercise, you
must be logged in as at least a member of the local Administrators
group. Furthermore, it is assumed you do not have AD CS installed at the
time of this exercise.
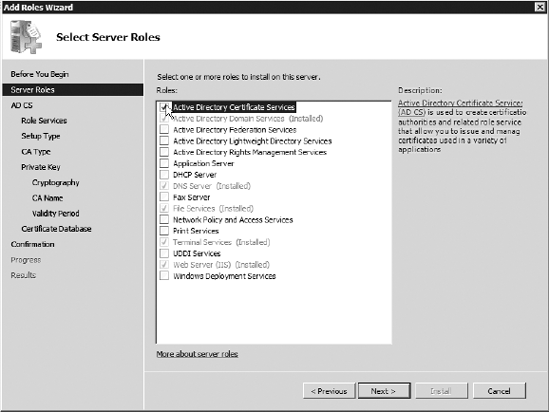
Open Server Manager by clicking the button next to your Start menu. Select Active Directory Certificates Services, as shown here, and click Next twice.
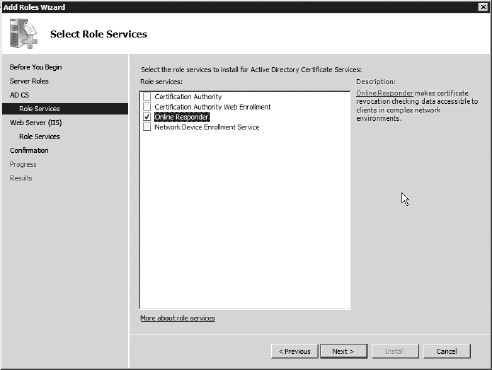
Select Online Responder, as shown here, and deselect Certification Authority if it is autoselected.
On the Select Role Services screen, leave the default settings, and click Next twice. You should see the install screen, as shown here.
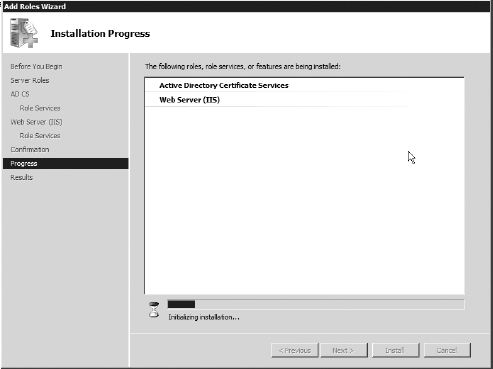
Once this is complete, you
will have installed the Online Responder service onto your computer.
However, there will be no currently installed certificate authorities.
|
In Exercise 2, you will configure the online certification authorities for the OCSP.
|
To complete this exercise, it's advisable to be logged in as the enterprise administrator, and you should have completed Exercise 1.
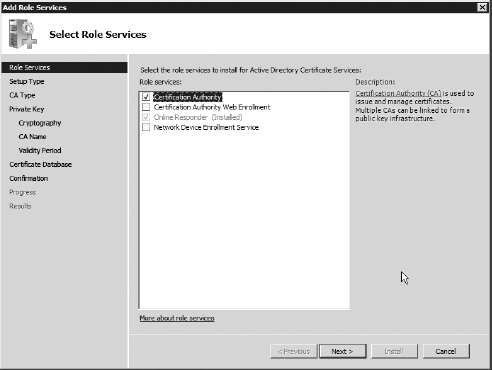
Under Server Manager, select Roles, and navigate to Active Directory. Select Add Role Services. Select Certification Authority, as shown here.
Select the Enterprise radio button, as shown here.
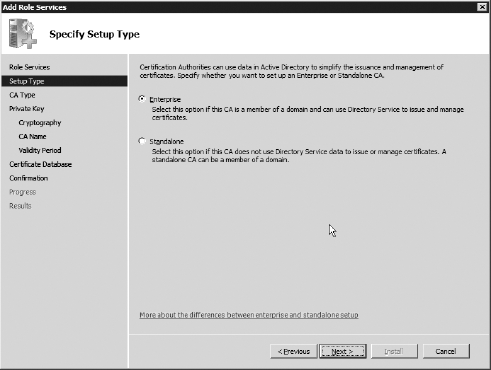
Select the Root CA radio button. Click Next. Select the Create a New Private Key radio button, and click Next. Leave the default options, as shown here, and click Next.
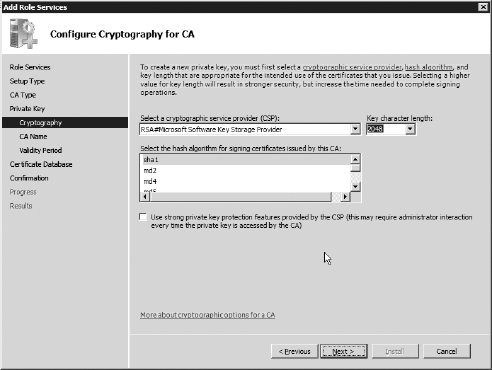
Click Next on the Configure CA Name screen. Leave the default options on the Set Validity Period screen, and click Next. Click Next again, and then click Install. During the install, you may see a warning. Ignore it.
|
In Exercise 3, you will learn about managing a CA to communicate with an online responder.
To proceed with this exercise, you must have completed Exercises 1 and 2.
Please note that after you follow all the steps described, this
exercise will not be totally complete unless you have an easily
accessible online responder.
Open the Certification Authority tool by selecting Administrative Tools => Certification Authority.
Right-click the CA name, and select Properties, as shown here.

Select the Extensions tab.
Under Location, you could place the URL of your OCSP. For our purposes, leave it blank.
Note that if you were able
to complete this exercise, you could click OK and then choose from any
additional options on the Extensions tab, such as Include in the CDP
Extension of Issued Certificates.