Administrators often have to deploy updates throughout the entire
enterprise. This could include updates to the following:
- Operating systems
If you're working in a
complex environment, this probably includes several different versions
of Windows (possibly going back as far as Windows NT), as well as the
probable presence of Linux or Unix, including Mac OS X.
- Applications
When I say applications,
you have to consider standardized Microsoft applications, as well as
third-party applications and custom applications. In total, they
represent three different stages of updates that have to be conducted,
because not all applications are well known enough or complex enough to
support automatic updating processes.
- Drivers
Factoring drivers
into the equation provides a conundrum for many enterprises. More often
than not, the rule for drivers is "if it ain't broke, don't fix it."
But the problem with that philosophy is that many vendors will say that
certain driver updates are critical to the functionality of their
hardware. This results in vendors and support contracts recommending or
demanding updates and company policies refusing to accommodate them.
Ultimately, something has to give, but which one depends on the
circumstance and pure chance.
- Firmware
Firmware plays a major role
in the enterprise. Sometimes, pieces of hardware will experience
functionality problems that will have to be fixed by firmware updates.
And firmware updates usually involve the certainty of one problem,
downtime, and the possibility of another, critical failure. So, these
present yet another problem that you have to deal with.
Accordingly, deploying updates
(if done manually) can require hundreds, if not thousands, of hours of
labor because each update is applied to a computer and subjected to
numerous tweaks and updates. To avoid this, Windows administrators can
use the Windows Software Update Services (WSUS) technology.
With WSUS, you can
automate the process of deploying updates by setting up a server as a
dedicated update server (the WSUS server). This server then sends
updates to various computers throughout the enterprise automatically, or
as determined by the user, which alleviates the need to go install each
of these updates one at a time, computer by computer. Additionally,
WSUS can roll back updates and install or uninstall drivers based on the
administrator's decision. If you use a proper deployment, Windows
software updates can become a very relaxed process.
The process can be deployed
either remotely or locally —this is the administrator's decision. In
either case, Windows requires the answers to two questions to deploy an
update:
The first question is
asked by the update server so it knows where the data it should
distribute is located. Knowing this, it can make sure the right type of
update is applied to computers, which factors into the second question,
"Where should this update be placed?" WSUS has two separate group roles
that aid in the process of answering this question:
- WSUS Administrators
This is a local group on the WSUS server that is responsible for preparing update policies and administering the WSUS console.
- WSUS Reporters
This is another local group that can run reports on updates to determine their impact on the environment.
1. WSUS Server Deployment
Usually whenever a WSUS
deployment is created, as few servers as possible are used. There are
several reasons for this, but this is mainly because WSUS is incredibly
powerful and capable of supporting tens of thousands of computers at the
same time, making just one server capable of supporting all but the
largest of large networks. Therefore, it's not practical to have
numerous update servers spread throughout the network.
This can change,
however, depending on the complexity of the network. Specifically, the
physical number of servers can change depending upon how many
subnetworks or different sites are present throughout the enterprise.
The more subnetworks, the more transitions at the packet level have to
be completed through routers in order to deploy these updates.
Consequently, best practices strongly recommend having a WSUS server run
on your local area network. And, since it's impractical and ultimately
practically impossible to have that many users on one local area
network, more WSUS servers have to be implemented.
2. Anatomy of WSUS
The current version of WSUS
as of the printing of this book is Windows Software Updates Services
version 3.0 Service Pack 1. It is not available by default with Windows
Server 2008, but it can be downloaded freely at Microsoft.com
in either X86 or X64 version, based on the configuration of your
Windows Server 2008 machine. Each version can deploy updates to any
version of Windows on your network once it has been set up.
Regardless of the version, WSUS uses two different streams, called the upstream and the downstream.
2.1. Upstream
An upstream
in WSUS is any server that functions as a central authority that is
responsible for the constant broadcast and upload of Windows Update.
Generally, the upstream used as the original point of authority is the
actual Windows Update web server maintained by Microsoft. However, in
certain deployments, WSUS servers can be configured as Windows Update
upstream configuration computers in order to more thoroughly control the
reception of updates throughout your enterprise.
2.2. Downstream
The next layer of server
down from an upstream server is (as the name slightly implies) a
downstream server. Downstream servers are servers along the WSUS path.
They receive their updates from an upstream server and are then
responsible for cycling and distributing the updates to the rest of the
environment. Using downstream servers, WSUS adds an extra layer of
complexity as these servers forward the information they are given.
However, WSUS also adds a level of security if configured properly.
Here's how the path works in a downstream server–based environment:
The originating server sends a request for an update.
An upstream server sends the updates.
A downstream server sends the update to the destination machine.
The destination machine applies the update.
3. WSUS Update Hierarchy and Administration Decisions
I have covered two WSUS
components and types of servers so far: upstream servers and downstream
servers. With these types of servers, you have to keep in mind a couple
of considerations. The first is to identify the upstream server, in
other words, the point of origin. Is it Microsoft Update? Or is it your
own custom server? The answer determines how the rest of your
infrastructure will be laid out. As I've said before, usually this is
Microsoft Update.
The next portion is the
harder part of this decision: the downstream server. Downstream servers
can be deployed in two modes: replica mode and autonomous mode.
3.1. Replica Mode
With replica mode,
downstream servers take the information they receive from an upstream
server and replicate it through the rest of the environment. This means
they receive updates and then send those updates through the entire
enterprise. One of the upsides of this configuration mode is that it's
simple to configure. One of the downsides is that it is very bandwidth
intensive and requires a lot of dedicated time that may not be available
at the moment that updates are required.
3.2. Autonomous Mode
Using autonomous mode,
downstream servers function as individual entities that can be
configured by lower-level update administrators. Using powers granted to
them by local administrators, lower-level administrators can choose
which updates are and are not applied to their network. This is highly
advantageous because sometimes parts of a network are running critical
pieces of software that cannot risk the volatility of an update or are
running a component that is not compatible with the rest of the network.
In Exercise 1, you'll learn how to install and set up WSUS.
|
Note that before installing WSUS,
you must have IIS 7 installed and that you must have Microsoft Report
Viewer installed. You can obtain each of these files through www.microsoft.com.
Double-click the install file. Choose Full Server Installation because a console installation will not allow for the GUI you need in this exercise. Click Next. Agree to the terms of service, and then click Next. On
the Windows Server Update Services 3.0 SP1 Setup Wizard's Select Update
Source screen, make sure the Store Updates Locally option is selected
and that C:\WSUS is the default folder,
as shown here. This makes sure that all updates are stored in this
location when they are downloaded. Click Next.
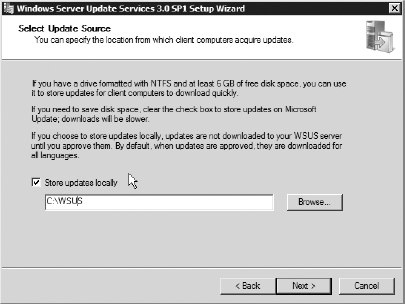
On
the next screen, Database Options, leave the default settings as shown
here, and then click Next. Alternatively, you could use an existing
database for this, but you will create a new one within the WSUS folder
in this exercise. Click Next.

On
the Web Site Selection screen, choose the Create a Windows Server
Update Services 3.1 SP1 Web Site option. This creates a custom web site
for you to be able to view Windows updates. Click Next.
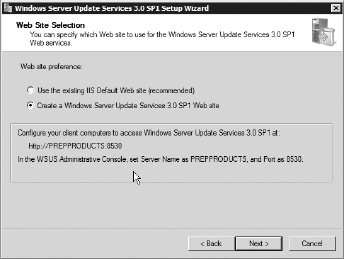
Click Next on the Summary screen. Afterward, WSUS will begin to install; this may take a while. Once
complete, this will launch the Windows Server Update Services
Configuration Wizard shown here. Upon the first step, it will ask you a
couple of configuration questions about your network. Make sure these
concerns are alleviated, and click Next when complete.
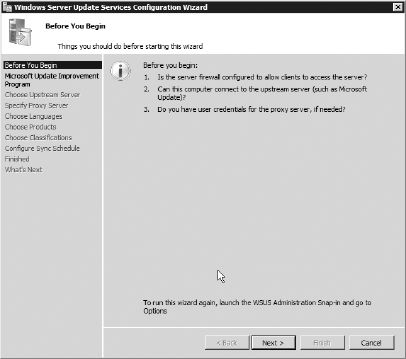
Click
Next upon the improvement program, unless you do not want your data
shared. In that case, unselect the box, and click Next. On
the Choose Upstream Server screen, you can choose where this server
receives updates from. Since this is the only WSUS server in this
exercise, choose Synchronize from Microsoft Update. Alternatively, if
you have a more complex environment, you could specify the WSUS server
to receive data from another WSUS server and then specify the server
name and port number of that server. For now, click Next. Click Next on the Specify Proxy Server screen because you do not require a proxy server. On
the Connect to Upstream Server screen, the Windows Server Update
Services Configuration Wizard will tell you that it needs to connect to
Microsoft Update to collect information. You will need to click the
Start Connecting button, as shown here. This will take a few moments as
the server connects to Microsoft Update. Afterward, click Next.
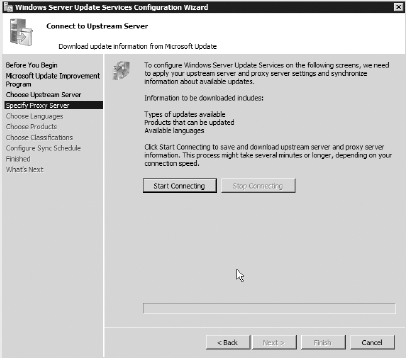
You
can then choose any specific languages you would like to receive and
even configure your updates to choose all languages available. For this
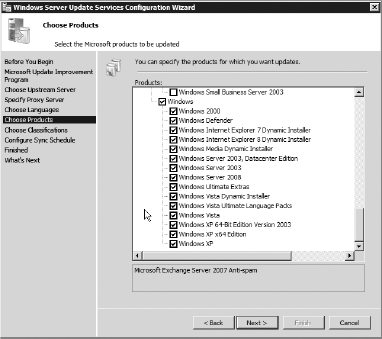
exercise, choose English, and then click Next. The
next screen, Choose Products, is where you want to pay some careful
attention. Here, you can choose any Microsoft product you want to
update. As you can see, you have many choices. For this simple example,
leave the default Microsoft Office and Windows selected. In a real
environment, you may need to choose many more selections. For now, click
Next.
Next,
you can choose the classification of updates. This includes special
tools, updates, drivers, critical updates, and so forth. You can choose
which you would like to receive, but the default selection is quite
intuitive. This is because it contains the most critical information
necessary to keep your environment running. Make your selection, and
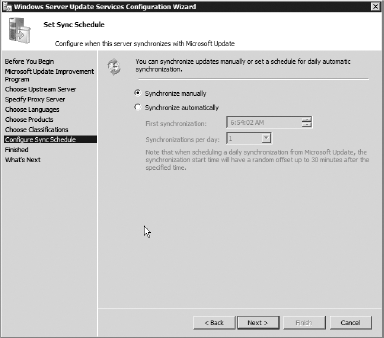
then click Next. On
the next screen, choose Synchronize Automatically, and leave it at the
default time. This makes the WSUS server check Microsoft Update once per
day to see whether there are any new updates. Click Next.
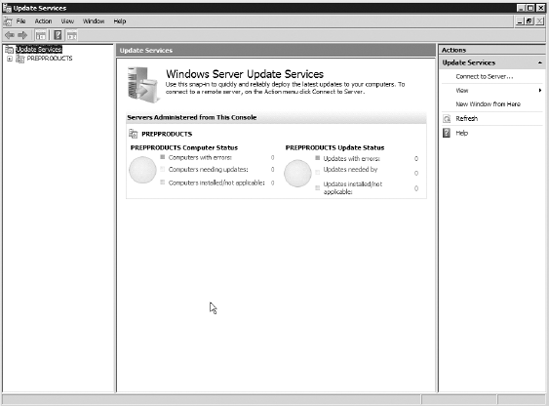
Click
Next on the Finished screen, and then click Finish again. This launches
the WSUS home screen and will signify that you have completed your
installation.
|
Now that you have WSUS installed, in Exercise 2 you'll learn how to set up WSUS.
|
To complete this exercise, you must have completed Exercise 1.
Open WSUS by selecting Administrative Tools => Microsoft Windows Server Update Services 3.0 SP1. You may see a message informing you that the snap-in is being installed. Based
upon the number of products and classification of updates you selected,
selecting your WSUS server will produce a list of several updates, as
shown here.

Now,
before you can get started using Windows Software Updates Services, you
have to begin by creating a GPO for your domain that lets you use WSUS.
This is because WSUS is administrated through Group Policy. Open the GPMC by selecting Administrative Tools => Group Policy Management. Expand your domain, and then select the Group Policy Objects container. Right-click in the GPO area on the right side of the screen, and select New. In the dialog box, name the policy WSUS Policy. Once the policy is created, open the Group Policy Management Editor by right-clicking the WSUS policy and selecting Edit. Expand
the Policies section of the Computer Configuration area, right-click
Administrative Templates, and select Add/Remove Templates.
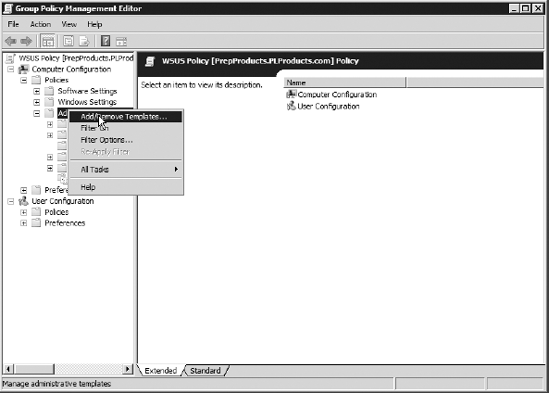
In the Filename box, type wuau, and then click Open. This opens the default administrative template that is used for administering WSUS. Under the Computer Configuration, select Administrative Templates => Windows Components => Windows Update. On the right side, double-click Configure Automatic Updates. Select
the radio button Enabled, and then change the first drop-down list to
3-Auto Download and Notify for Install. Leave the other options default. Click the Next Setting button. Select the radio button Enabled, and then set the two boxes to http://<yourservername>. Click the Next Setting button.

Select the Enabled button again, and then change the syncing period to a period of your choosing; 22 to 24 hours is appropriate. Close the editor, right-click your domain in the GPMC, and select Link an Existing GPO. Select WSUS Policy, and then click OK. Now,
return to the Windows Update Service home screen. If you click
Computers on the left, at least the main computer and most likely
several other computers will show up when you click the Search button in
the upper-right corner. If they do not, you can issue the following
command on your domain controller in the console: gpupdate /force
Also, on any client
computers connected to your domain controller, you can tell them to
automatically look for a new update server by issuing the wuauclt.exe /detectnow command.
At this point, Group
Policy should now be set up on WSUS, and you should be able to view
computers on your WSUS home screen. If not (or if you experience trouble
along the way), you can reference the Microsoft "Step-by-Step Guide" to
WSUS, located on Microsoft.com.
|
4. WSUS Grouping
When the WSUS Management
User Services screen is launched, by default it loads a home screen that
includes several notifications and a single group on the left. This
group is referred to as the Unassigned Computers group. When rolling out
updates, WSUS supports the ability to group computers based on the need
to update individual platforms.
As you saw earlier,
WSUS supports all Microsoft business products. Thus, certain groups may
require different deployments of updates, based on the type of products
installed. This type of deployment is called client-side deployment and is used as an alternative to Group Policy–specific deployment for individual groups.
To create a new user group
using WSUS grouping, you can start WSUS, select the Computers area after
expanding the server name, expand the All Computers area, and click Add
Computer Group on the right, as shown in Figure 3.
