Most of the time, you will access Microsoft Dynamics
CRM through one of its two primary user interfaces: the web client or
Microsoft Dynamics CRM for Outlook. The exercises and examples in this article use the web client, unless otherwise specified. To help you better understand how to navigate the software,
the various components of the web interface are described here.

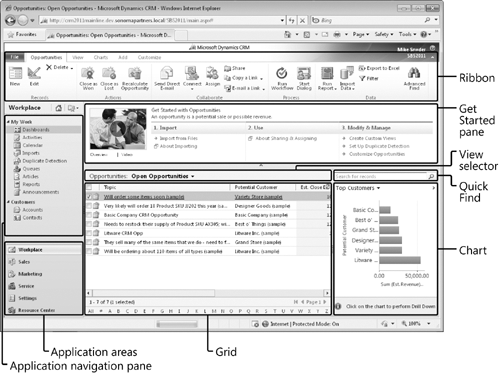
The following list describes the sections of the user interface:
Ribbon The ribbon includes buttons and tabs that let you quickly access system actions. If you have used the 2007 Microsoft Office
system or Office 2010, you will recognize the ribbon because it appears
in most of the Office applications as well. The ribbon is unique
because the buttons and tabs dynamically update based on what the user
is doing within the system. For example, navigating to Contacts will
display different ribbon buttons and tabs than when you navigate to
Opportunities. The idea behind the ribbon is to display the most common
activities to a user relative to where he or she is in the system, which
will save clicks.
Grid
The grid displays a list of records. Each record set is known as a data
view in Microsoft Dynamics CRM. The grid consists of rows and columns
of data. At the bottom of the grid, you can find information about the
number of records in the view. The grid also includes an index
bar that allows you to quickly filter records in the grid based on the
starting letter. Microsoft Dynamics CRM applies the ribbon actions
against the records selected in the grid. For example, if you select
three records in a grid and click a button on the ribbon, Microsoft
Dynamics CRM will apply that button’s action to the three records you
selected.
Application navigation pane This portion of the user
interface provides access to the various types of Microsoft Dynamics
CRM data. Simply click a hyperlink in the application navigation pane to
view that set of records.
Application areas
Each application area provides a logical grouping of Microsoft Dynamics
CRM records. The default application areas are Workplace, Sales,
Marketing, Service, Settings, and Resource Center. If you click one of
these buttons, Microsoft Dynamics CRM will update the application
navigation pane to display the records grouped within that section.
Get Started pane The Get
Started pane displays help information about how to work with Microsoft
Dynamics CRM. The help information consists of different types of
content such as videos, hyperlinks to help pages, or links that launch
system actions. The Get Started pane content dynamically updates with
different help information depending on the type of records you are
viewing.
Tip:
You can collapse and expand
the Get Started pane by clicking the arrow located directly beneath the
pane. You can also turn off the Get Started pane for all records by
updating your personal options.
View selector The view selector allows you to select different views of data.
Quick Find The Quick Find functionality allows you to enter text to quickly search for specific records.
Chart This area of the user
interface displays charts and graphs. The data that appears in the
chart is specific to the currently selected view. For example, viewing a
top-customers chart with the Open Opportunities view selected will show
the chart with all of the open opportunities. Viewing a top-customers
chart with the My Open Opportunities view selected will show the chart
only with the opportunities that you own. The actual appearance of the
chart might vary, depending on your data.
Tip:
As with the Get Started pane,
the chart can be collapsed and expanded by clicking the arrow located
in the upper-right corner of the Chart area.
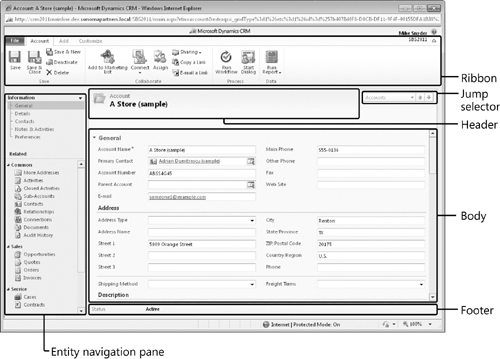
When you open a record in Microsoft Dynamics CRM, you’ll see additional parts of the user interface.

Ribbon Just like the ribbon in the main user interface, the ribbon on each individual record includes buttons and tabs related to that record type.
Entity navigation pane
Similar to the application navigation pane, the entity navigation pane
displays different types of Microsoft Dynamics CRM records. However, the
entity navigation pane displays only those records that are linked to
the open record.
For example, clicking the Contacts link in the entity navigation pane
of an account record will display only those contacts that have the open
account record listed as their parent customer. In addition to showing
related records, you can click the text links located under Information
in the navigation pane to jump to specific sections of the form.
Body The body displays the data related to the open record. The fields on the entity form are sometimes referred to as attributes.
Header The record
header includes data about the record, and it always remains visible
when the record is open even if you click one of the related entities in
the navigation pane.
Footer
Just like the header, the footer remains visible at all times when you
have the record open. You might want to include certain data fields in
the footer so that you can view them at any time when working with a
record.
Jump selector
If you open a record from a view of data, the jump selector allows you
to quickly jump to other records in the view. By clicking the picklist,
you can see a list of contacts from the originating view and select one.
In addition, you can click the Up or Down arrow to open the previous or
next record from the view.
Tip:
You can use the Ctrl+>
(right angle bracket) keyboard shortcut to advance to the next record or
Ctrl+< (left angle bracket) to move back to the previous record.