Configuring Demand-Dial Interfaces
The first step in
deploying demand-dial routing is to configure a demand-dial interface
on each computer you want to function as a demand-dial router. You can
configure these interfaces by using the Demand-Dial Interface Wizard.
You can run this wizard as an extension of the Routing And Remote Access
Server Setup Wizard, or as an option after the Routing And Remote
Access service has already been configured and enabled.
If you have
previously configured and enabled the Routing And Remote Access service
without demand-dial functionality, you must enable this functionality
before you create any demand-dial interfaces. You achieve this task by
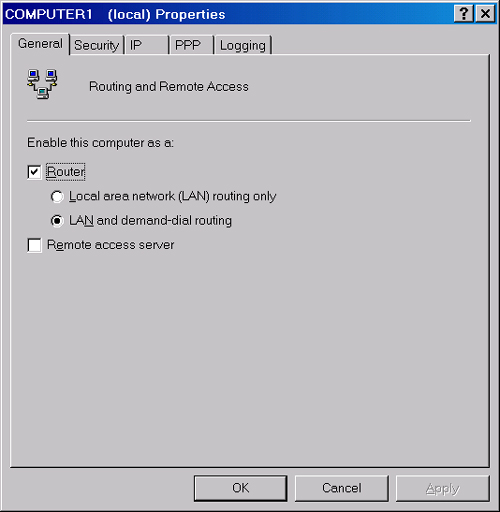
selecting the LAN And Demand-Dial Routing option on the General tab of
the Routing And Remote Access service properties dialog box, as shown in
Figure 1.
Once
you have enabled demand-dial routing, you can launch the Demand-Dial
Interface Wizard by right-clicking the Network Interfaces node in the
Routing And Remote Access console tree and then clicking New Demand-Dial
Interface. The wizard allows you to configure the basic features of the
interface.
After the basic
demand-dial interface has been created, you can configure and manage its
properties in a more detailed way in the Routing And Remote Access
console. Demand-dial interface management in the Routing And Remote
Access console can be divided into four areas: shortcut menu commands,
network interface properties, port and device properties, and IP routing
interface features.
Shortcut Menu Commands
The shortcut menu
commands for each demand-dial interface are those that appear when you
right-click the interface in the details pane of the Routing And Remote
Access console. The interfaces themselves appear in the details pane
when you select the Network Interfaces node in the Routing And Remote
Access console tree. (See Figure 2.)
Note that in addition to the management features listed below, this
shortcut menu allows you to connect/disconnect and enable/disable the
demand-dial interface.
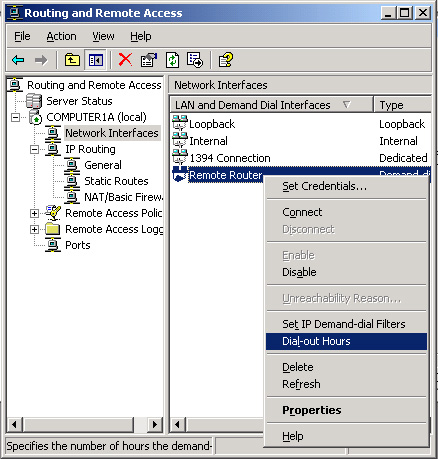
The following list describes the four commands that are unique to the demand-dial interface shortcut menu:
Set Credentials Allows you to configure the user name and password that the interface uses when it connects to a remote router.
Unreachability Reason Explains why the last connection attempt was unsuccessful.
Set IP Demand-Dial Filters
Allows you to limit the type of traffic that initiates a demand-dial
connection through this interface. Connections can be limited (filtered)
by source address, destination address, and protocol.
Dial-Out Hours Allows you to restrict the number of hours that the demand-dial interface can be used.
Network Interface Properties
When the Network
Interfaces node is selected, you can configure these settings in the
properties dialog box of the demand-dial interface. The dialog box
consists of the four tabs described in the following sections.
General Tab
This tab allows
you to adjust modem features and to set the primary phone number
associated with the demand-dial interface. You can use the Alternates
button when editing the properties of a dial-up connection to configure a
list of alternate phone numbers for the interface to call in case one
is unreachable. You can also choose to adjust the alternate list
automatically so that numbers successfully reached are given higher
priority.
Options Tab
This tab is shown in Figure 3.
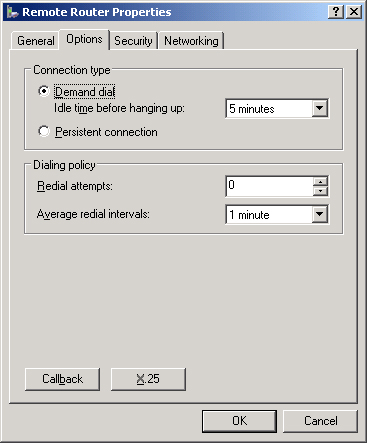
In the Connection Type
area, this tab allows you to configure the interface as Demand Dial or
Persistent Connection. Demand-dial interfaces dial on demand, and
persistent interfaces redial whenever the connection is lost. Also note
that when you configure the interface as Demand Dial, this tab allows
you to specify the amount of time the connection should stay idle before
it disconnects.
The Dialing Policy area allows you to configure the number of redial attempts and the time interval between redials.
The Callback button
allows you to configure the callback feature. This feature requires the
interface, when it receives a call, to disconnect the call and
immediately call back to a predetermined number, thus ensuring that only
authorized parties establish a connection.
The X.25 button allows you to configure the interface for use over X.25 networks.
Security Tab
This tab allows you to
require password and/or data encryption for the demand-dial connection.
Advanced settings allow you to specify a set of allowable authentication
protocols over which the interface can submit and receive user
credentials. By default, Challenge Handshake Authentication Protocol
(CHAP), Microsoft CHAP (MS-CHAP), and Microsoft CHAP version 2 (MS-CHAP
v2) are selected as the authentication protocols. Finally, this tab also allows
you to specify a logon script for use with the demand-dial interface.
Networking Tab
This
tab allows you to bind and configure typical elements of a network
connection, such as Internet Protocol, File And Printer Sharing For
Microsoft Networks, and Client For Microsoft Networks.
Port and Device Properties
The Ports Properties dialog box is shown in Figure 4. You open this dialog box by right-clicking the Ports node in the Routing And Remote Access console and clicking Properties.
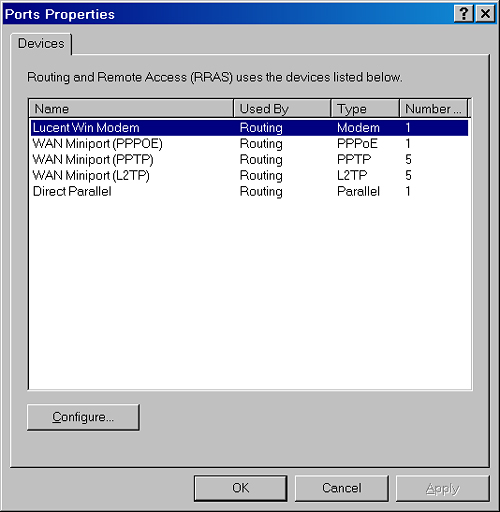
By selecting the modem
used in the demand-dial connection and clicking the Configure button,
you open the Configure Device dialog box, as shown in Figure 5.
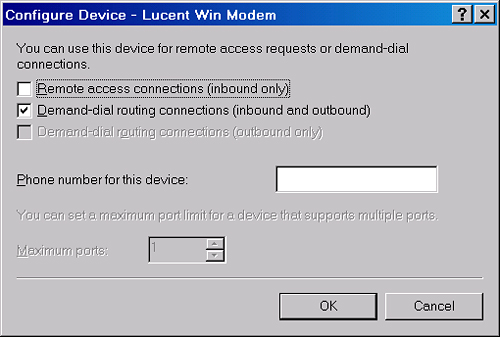
This dialog box
enables you to configure the modem for either inbound only or inbound
and outbound connections. It also allows you to specify a phone number
for the device. This number can be read by the calling interface and can
be used for remote access policies that use the Called-Station-Id
attribute. The phone number is required for BAP-enabled connections and
is dialed by the client when additional connections are created.
A
final management feature associated with the Ports node is the Port
Status dialog box. When you select the Ports node in the Routing And
Remote Access console, the list of connection ports is listed in the
details pane. This list includes the available modem device or devices.
You can view details about the status of a modem by double-clicking the
modem device and opening the Port Status dialog box. This dialog box
presents statistics about a modem (when active) and allows you to reset
the modem connection.
IP Routing Interface Features
These management
features are accessible through the IP Routing node of the Routing And
Remote Access console. When you select the General node within the IP
Routing node, the interfaces configured for your server appear in the
details pane. Right-clicking a demand-dial interface reveals various
demand-dial management and trouble-shooting commands, as shown in Figure 6.
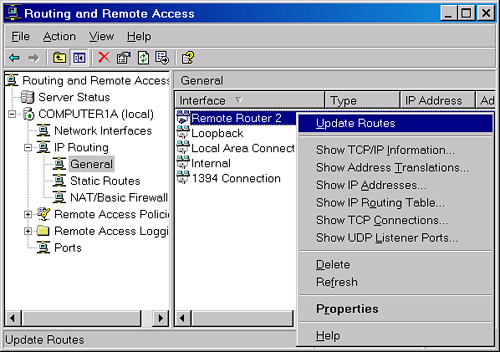
Update Routes
This
command appears on the shortcut menu of the IP Routing demand-dial
interface. When the RIP routing protocol is installed and this feature
is enabled, selecting the Update Routes command automatically updates
the static routes across the demand-dial interface. Static routes
updated with this command require no further configuration and are thus
known as autostatic
routes. Because of the intermittent nature of dial-on-demand
connections, autostatic routes for these connections are used in place
of normal router-to-router communication through RIP. Note also that you
can update autostatic routes automatically by using a script scheduled
to run periodically by the Task Scheduler service.
TCP/IP Statistics
The next
group of features available on this shortcut menu allows you to view
current TCP/IP information such as that available with the command-line
commands Ipconfig, Route Print, and Netstat. You can use this
information, which includes details about active TCP and User Datagram
Protocol (UDP) connections, bytes sent, and assigned IP addresses, to
verify and troubleshoot network connectivity.
IP Routing Interface Properties
Finally, the demand-dial interface shortcut menu allows you to open the demand-dial interface properties dialog box, shown in Figure 7.
This dialog box is distinct from the demand-dial interface properties
dialog box available when the Network Interfaces node is selected. This
dialog box contains three tabs: General, Multicast Boundaries, and
Multicast Heartbeat.
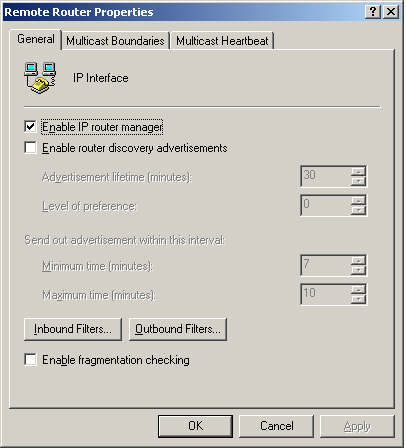
On
the General tab, the Enable IP Router Manager check box is enabled by
default. IP Router Manager is a component of the Routing And Remote
Access service that is responsible for many routing features, including
packet filtering, network address translation, and dynamic routing. You
can clear the check box to temporarily disable IP routing and change the
Administrative Status of the interface to Down.
The Enable Router Discovery Advertisements check box is cleared by default. This check box refers to a feature called router discovery that requires configuration at the host in addition to the router. Through this feature, network hosts send out router solicitations to discover routers. Routers then respond to these solicitations through periodic advertisements.
Through these advertisements, hosts can then determine when these
routers are down. Router discovery solicitations and advertisements work
through Internet Control Message Protocol (ICMP) messages.
The Input Filters button and Output Filters button refer to a feature called packet filtering. Through this feature, you can configure Routing And Remote Access to allow
or deny traffic on the basis of source, destination, or protocol type
(TCP or UDP port).
The Enable
Fragmentation Checking check box, cleared by default, refers to a
feature of packet filtering. If you have blocked packets from a given
source address, this option ensures that fragments of packets
originating from the same address are blocked as well.