Managing General IP
Routing Properties
Certain features
provided by the Routing And Remote Access service relate to IP routing
in general. You can manage these features only in the General Properties
dialog box associated with the General subnode within the IP Routing
node in the Routing And Remote Access console.
To open the General
Properties dialog box, right-click the General node within IP Routing
and then click Properties. The General Properties dialog box contains
three tabs: Logging, Preference Levels, and Multicast Scopes. (Because
multicasting is not covered on the 70-291 exam, only the first two of
these tabs are discussed here.)
Logging Tab
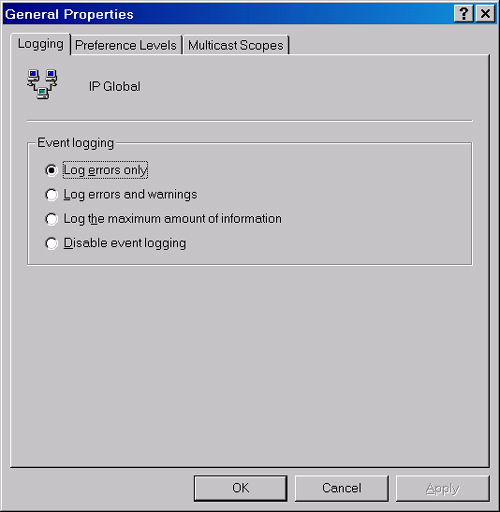
Figure 10 shows the Logging tab. This tab allows you to configure which
IP routing events are written to the Event Log. By default, only errors
are written to the Event Log, but you can select two higher logging
levels: Log Errors And Warnings, and Log The Maximum Amount Of
Information. In addition, you can disable logging in IP routing when you
select the Disable Event Logging option.

Preference Levels
Tab
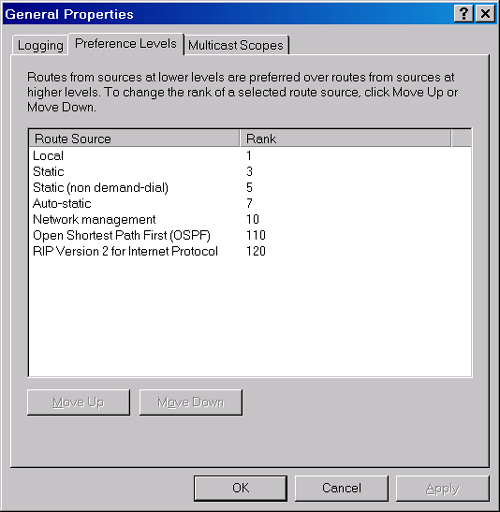
Figure 11 shows the Preference Levels tab. IP routing decisions are
performed according to routing tables, and this feature allows you to
arrange the priority of routes collected from various sources. When two
sources provide a conflict in routes, only the route with the higher
preference level is added to the routing table. These preference levels
therefore supersede any metrics assigned to routes.

Preference levels are
listed in order. The first (top) route source has the highest priority
and the lowest rank number (1). The lowest route source has the lowest
priority and the highest rank number (120). You can adjust the rank of a
route source by clicking a source on the list and using the Move Up
button and Move Down button as needed.
Working with
Routing Tables
Routers read the destination addresses of
received packets and then route those packets according to directions
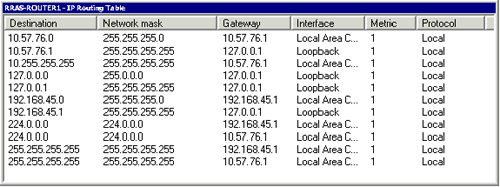
provided by routing tables. Figure 12 shows a routing
table used by an IP router.

The routing table contains entries called routes that provide
directions toward destination networks or hosts. Three types of routes
exist:
Host route This type
of route provides a route to a specific destination host or to a
broadcast address. In IP routing tables, host routes are distinguished
by a 255.255.255.255 network mask.
Network route This type of route provides a route to a
specific destination network. In IP routing tables, network routes can
be distinguished by any subnet mask between 0.0.0.0 and 255.255.255.255.
Default
route Routing tables contain a single default
route. This route is used to forward all packets whose destination
address does not match any address listed in the routing table. In IP
routing tables, the default route is defined by the 0.0.0.0 address and
0.0.0.0 network mask.
Viewing the IP
Routing Table
You can view the IP
routing table through the Routing And Remote Access console or through a
command prompt.
In the Routing And Remote
Access console, expand the IP Routing node, right-click the Static
Routes node, and then click Show IP Routing Table. (Figure 12 shows an example output from this operation.)
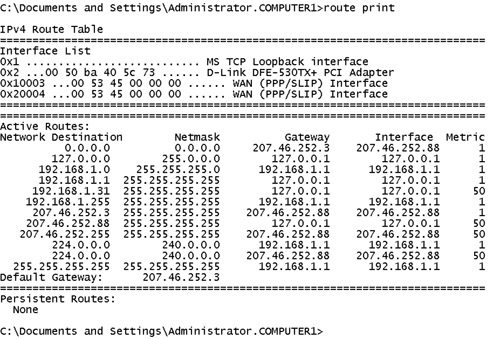
To view the routing
table from a command line, type route print
and press Enter. Figure 13 shows an example
output.

Reading the IP
Routing Table
Routers use routing
tables to determine where to send packets. When IP packets are sent to
an IP router, the router reads the destination address of the packet and
compares that destination address to the entries in the routing table.
One of these entries is used to determine which interface to use to send
the packet and to which hop (gateway)
the packet will be sent next.
To assist in this
process, each routing table entry includes the five columns described in
the following sections, as shown in Figure 13.
Network
Destination
This column
provides entries that the router compares to the destination address of
every received IP packet. A few of these entries are common to most
routing tables. For example, the entry 0.0.0.0 represents the default route,
used when no other matches are found in the routing table. The entry
127.0.0.0 points to the loopback address of 127.0.0.1, which corresponds to the local
machine. Each entry of 224.0.0.0, furthermore, refers to a separate
multicast route. Finally, entries with a final octet value of 255
represent a broadcast address. Broadcast addresses include specific
subnet broadcast addresses, such as 192.168.1.255, and the limited broadcast address 255.255.255.255,
which is general for all networks and routers.
Netmask
The value in this column
determines which part of the IP packet’s destination address is
compared to the entries in the Network Destination column. This
information is important because the largest match determines the route
or table entry that is applied to the packet.
For instance,
suppose the router whose routing table is shown in Figure 13 receives two packets, the first destined for the address
192.168.1.1 and the second destined for the address 192.168.1.2. Both
packets match the third routing table entry because the netmask value of
255.255.255.0 signifies that the first three octets (plus a 0 for the
fourth octet) are compared to the table’s network destination value of
192.168.1.0.
However, only the
first packet matches the fourth entry because the netmask of
255.255.255.255 signals that all four octets are compared to the table’s
network destination value of 192.168.1.1. The fourth entry is thus
applied to the first packet because this entry represents the largest
match in the routing table. In this manner, the third entry is applied
to the second packet because that entry represents the packet’s only
match in the routing table aside from the default route.
Gateway
When a particular route
or table entry is applied to a packet, the gateway value determines the
next address or hop for which that packet is destined. For example,
according to the routing table shown in Figure 13, an IP packet with a destination such as 206.73.118.5
(which matches only the default route of 0.0.0.0) would next be
forwarded to the gateway address of 207.46.252.3. Note that the gateway
value for the default route is the same as the default gateway address
configured in TCP/IP properties.
A basic concept to
understand for the gateway value is that this address should be distinct
from that of the network destination listed in the same routing table
entry, even when the network destination itself is within broadcast
range of the router. For example, in Figure 13,
the sixth entry provides directions to the 207.46.252.0/24
destination—one of two subnets to which the router is directly
connected. (The other subnet is 192.168.1.0/24.)
Even though the router is
directly connected to the 207.46.252.0/24 subnet, the router receives
packets destined for this subnet only through its 192.168.1.1 interface.
(Packets originating from the 207.46.252.0/24 subnet do not need the
router to reach the same subnet.) From this perspective, you can see
that the next hop for packets originating from one of the router’s local
subnets is the opposite interface of the router. Therefore, the routing
table specifies as the gateway the router’s interface on that
destination subnet (207.46.252.88).
Tip
Another way
to understand the necessary distinction between the gateway address and
the network destination address is to think of each routing table entry
as providing directions (an interface and gateway) to a given
destination. With this analogy in mind, it makes sense that these
entries wouldn’t provide directions merely by repeating the destination
queried for. (How do you get to 192.168.1.5? Just go there!)
Consequently, when the network destination is within a router’s
broadcast range, the router’s routing table provides directions to this
destination by pointing not to the destination itself but to the
router’s own local address that faces the destination. This gateway
value will thus be the same as the interface value. Similarly, even in
cases where the destination is one of the router’s own addresses, the
routing table specifies a distinct address—the loopback address of
127.0.0.1—as the interface and gateway. |
Interface
When a particular route
(table entry) is applied to a packet, the interface value specified in
that route determines which local network interface is used to forward
the packet to the next hop. For example, in Figure 13,
an IP packet with a destination of 131.107.23.101 matches only the
default route. According to the routing table, such a packet is sent
through the interface 207.46.252.88 toward the default gateway address.
Metric
This column indicates
the cost of using a route. If separate routes (entries) match an IP
packet’s destination address equally, the metric is used to determine
which route is applied. Lower metrics have precedence over higher
metrics.
For the routing
protocol RIP, the metric is determined by the number of hops before the
network destination. However, you can use any algorithm to determine the
metric if you are configuring a route manually.
Static and
Dynamic Routing
For every host
and router, IP automatically builds a simple routing table that includes
only the essential network destinations. These addresses can occur in
eight types and include the default address, the loopback address, the
default gateway address, locally configured addresses, local subnet
addresses, local subnet broadcast addresses, the limited broadcast
address, and multicast addresses for each adapter.
All
of these eight routing table entry types describe routes that are
connected directly to the IP host or router. This default arrangement
might work for simple routing situations, but in a complex network, a
router needs to be told which among its many interfaces to use to send
packets destined for unknown (non-neighboring) networks.
To allow routing tables
to properly forward traffic to hosts that are outside broadcast range,
you must choose between one of two alternatives. First, you can add
routes to these destinations manually by using the Route Add command or
by using the Routing And Remote Access console. This process defines static routing.
Second, you can configure a dynamic routing protocol such as RIP or OSPF
to allow routers to share routing table information with each other.
This process defines dynamic routing.
Table 1 compares some of the basic differences between static and
dynamic routing.
Table 1. Comparing
Static and Dynamic Routing
| Static Routing | Dynamic Routing |
|---|
| A feature of IP. | A
feature of routing protocols such as RIP or OSPF. |
| Routers
do not share routing information. | Routers
share routing information automatically. |
| Routing
tables are built and sustained manually. | Routing tables are
built and sustained dynamically. |