Copying Templates
There are also methods in
the PAPI for copying templates from one template gallery to another.
Let’s add a Copy Template dialog to CMS Explorer:
1. | Add a web form named CopyTemplate.aspx to the
project.
|
2. | Drag and
drop Styles.css onto the web form.
|
3. | Toggle to HTML
view and enter the following code between the <form>
tags:<table>
<tr>
<td colspan="2">
<h1>Copy Template</h1>
<h2>Current Path: (Add Literal for displaying the path here)</h2>
</td>
</tr>
<tr>
<td>Destination Gallery:</td>
<td>
(Add the text box for the destination gallery here)
</td>
</tr>
<tr>
<td colspan="2">(Add the Label for displaying error messages here)</td>
</tr>
<tr>
<td colspan="2" align="right">
(Add the Copy button here)
<INPUT type="button" value="Close"
onclick="javascript:window.close();">
</td>
</tr>
</table>
|
4. | Switch to Design
view. Drag and drop the following controls from the Web Forms section
of the toolbox and set their properties as specified:
| Control | Property | Value |
|---|
| Literal | ID | litOriginalTemplate | | TextBox | ID | txtDestination | | Label | ID | lblErrorMessage | | | Text | (empty string) | | Button | ID | btnCopy | | | Text | Copy Template |
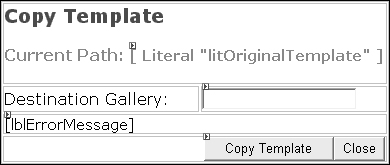
Here’s the completed dialog in Design
view:
To make a copy of a template, we will follow the steps below:
- Get an instance of the template we wish to make a copy of.
- Get
an instance of the destination template gallery.
- Perform
the copy operation by calling the Template.CopyTo() method.
Let’s start by getting an instance of the template we wish to make
a copy of.
|
5. | Add the Microsoft.ContentManagement.Publishing
namespace to the code-behind file:
. . . code continues . . .
// MCMS API
using Microsoft.ContentManagement.Publishing;
namespace CmsExplorer
{
  . . . code continues . . .
}
|
6. | Next, we get the template’s GUID from the CMSObjectGuid
querystring parameter and pass it as an input parameter to the Searches.GetByGuid()
method. If the method returns an instance of the template, we display
its path on the screen. Otherwise, we display an error message. Add the
highlighted code above and within the Page_Load() event
handler.
private CmsHttpContext cmsContext;
private Template originalTemplate;
private void Page_Load(object sender, System.EventArgs e)
{
  cmsContext = CmsHttpContext.Current;
// Clear all error messages, if any
lblErrorMessage.Text = String.Empty;
// Get an instance of the original template
string cmsObjectGuid = String.Empty;
if (Request.QueryString["CMSObjectGuid"] != null)
{
cmsObjectGuid = Request.QueryString["CMSObjectGuid"];
originalTemplate = cmsContext.Searches.GetByGuid(cmsObjectGuid)
as Template;
if (originalTemplate != null)
{
// Display the template's path
litOriginalTemplate.Text = originalTemplate.Path;
}
else
{
// Uh-oh we can't get an instance of the template.
lblErrorMessage.Text = "Original Template not found!";
}
}
}
|
7. | Now, let’s get an instance of the destination
template gallery. The user should have entered the path of the
destination template gallery in the textbox provided. So to get an
instance of the destination template gallery, we will simply use the Searches.GetByPath()
method. Should the user enter an invalid path or a path of a gallery in
which they do not have rights to create templates, an error message is
displayed on the screen. Toggle to Design
view and double-click on the btnCopy button to get to the btnCopy_Click()
event handler. Add the following code:
private void btnCopy_Click(object sender, System.EventArgs e)
{
  try
{
// creating a copy of a template
// get the destination template gallery
TemplateGallery destinationGallery;
string destinationGalleryPath = txtDestination.Text;
destinationGallery = cmsContext.Searches.GetByPath(
destinationGalleryPath) as TemplateGallery;
if (destinationGallery != null)
{
if (destinationGallery.CanCreateTemplates)
{
// TODO:Add code to copy template here
}
else
{
// We do not have rights to create templates in the
// specified destination template gallery
lblErrorMessage.Text =
"You do not have rights to create templates "
+ "in the destination template gallery.";
}
}
else
{
// We can't get an instance of the destination template gallery.
lblErrorMessage.Text = "Destination Template Gallery not found!";
}
}
catch(Exception ex)
{
// rollback all changes
cmsContext.RollbackAll();
// the CMS context needs to be disposed of after a rollback
cmsContext.Dispose();
// display error message
lblErrorMessage.Text = ex.Message;
}
}
|
Go
ahead and make the user interface more user-friendly by providing a
Browse button for users to pick a destination template gallery from a
tree or list instead of getting them to type the entire path. For the
purpose of keeping the sample short, we won’t go through this here.
|
|
8. | With instances of both the original template and the
destination template gallery, we are ready to start the copy operation.
To do so, we will simply call the Template.CopyTo() method on
the original template, passing the destination template gallery as an
input parameter. The template won’t be saved until we call CmsHttpContext.CommitAll().
We will also have to submit the template before it is available to
other template designers. Add the code shown below:
private void btnCopy_Click(object sender, System.EventArgs e)
{
  . . . code continues . . .
      if (destinationGallery.CanCreateTemplates)
       {
        // copy the template
Template copyTemplate =
originalTemplate.CopyTo(destinationGallery);
// commit the copied template to the repository and its state
// changes from "New" to "Saved"
cmsContext.CommitAll();
// submit it to change its state from "Saved" to "Published"
// and to make it available to other template designers
if (copyTemplate.CanSubmit)
{
copyTemplate.Submit();
cmsContext.CommitAll();
}
// display the success message
lblErrorMessage.Text = "Template copied successfully!";
      }
  . . . code continues . . .
}
|
The copied template will inherit all committed
property values and custom property and placeholder definition
collections from the original template.
Unlike connected
templates, copied templates are not linked in any way to the original
template. Updates to the original template do not change the properties,
definition collection, or state of the copied template.
Let’s attempt to make a copy
of the Plant template:
1. | In CMS Explorer, click Templates.
|
2. | Navigate to TropicalGreen
| PlantCatalog.
|
3. | Click the Edit link
for the Plant template.
|
4. | Click Copy.
|
5. | In the Destination
Gallery field, enter /Templates/MyTemplateGallery/.
|
6. | Click Copy Template.
|
7. | Click Close.
|
8. | Back at CMS Explorer, navigate to MyTemplateGallery. A copy of the Plant
template now resides there.
|
The only way to copy
template galleries is to use Site Manager. There isn’t a TemplateGallery.CopyTo()
method in the PAPI.
However, be
careful when using the “Copy” function for template galleries in Site
Manager. If there are connected templates within the source gallery,
this relationship is not preserved in the destination gallery.
