Out of the box, you can choose to manage template
galleries and templates using either Site Manager or Template Explorer,
which might be OK if you are using Visual Studio .NET as your
development tool (as recommended). A compelling reason to write an
administrative module to manage template galleries and templates is to
work with them without having to open VS.NET. We have found this
particularly useful when attempting to work in an environment where
VS.NET is not installed such as on a production or a staging server. Or
perhaps business requirements call for certain actions to be performed
when a template gallery or template is created. Whatever the occasions
may be, you may need to modify template gallery and template properties,
placeholder definition and custom property collections through code.
The PAPI offers a wide
range of methods and properties to work with template galleries and
templates. We explore the most frequently used methods in this section,
beginning with the creation of template galleries.
Creating Template
Galleries
Template galleries can
be created from both Site Manager and Template Explorer. Now we will
show you how we can create them from code. Let’s add a Create Template
Gallery dialog to the CMS Explorer interface.
1. | Add a new web form to the project with the name CreateTemplateGallery.aspx.
|
2. | In Design view,
drag and drop styles.css from Solution Explorer onto the web
form.
|
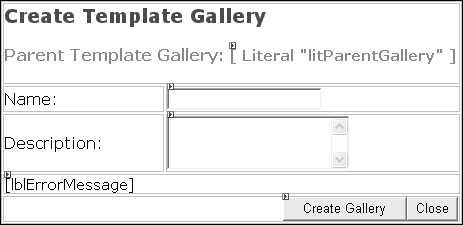
3. | Toggle to HTML view. Insert a table with five
rows. Code it in the same way as shown overleaf. A level-1 heading with
the text Create Template Gallery forms the first row. The rest
of the table consists of text labels and temporary markers indicating
where the controls should go later.
<table>
<tr>
  <td colspan="2">
    <h1>Create Template Gallery</h1>
    <h2>
      Parent Template Gallery:
      (Add Literal for displaying the path here)
    </h2>
  </td>
</tr>
<tr>
  <td>Name:</td>
  <td>(Add the text box for the Name here)</td>
</tr>
<tr>
  <td>Description:</td>
  <td>(Add the text box for the Description here)</td>
</tr>
<tr>
  <td colspan="2">
    (Add the Label for displaying error messages here)
  </td>
</tr>
<tr>
  <td colspan="2" align="right">
    (Add the Create Gallery button here)
    <INPUT type="button" value="Close"
      onclick="javascript:window.close();">
  </td>
</tr>
</table>
|
4. | Switch
back to Design view, drag the
following controls from the Web Forms section of the Toolbox onto the
form and delete the text markers. Arrange them as shown in the following
diagram. Template galleries only have Name and Description
properties to modify.
| Control | Property | Value |
|---|
| Literal | ID | litParentGallery | | TextBox | ID | txtName | | TextBox | ID | txtDescription | | | Rows | 3 | | | TextMode | MultiLine | | Label | ID | lblErrorMessage | | | Text | (empty string) | | Button | ID | btnCreate | | | Text | Create Gallery |
|
5. | Add the Microsoft.ContentManagement.Publishing
namespace to the code-behind file:
. . . code continues . . .
// MCMS API
using Microsoft.ContentManagement.Publishing;
namespace CmsExplorer
{
  . . . code continues . . .
}
|
6. | In the Page_Load()
event handler, we get the GUID of the parent template gallery from the CMSObjectGuid
querystring parameter, and pass it to the Searches.GetByGuid()
method to get a reference to the gallery itself.
TemplateGallery parentGallery;
CmsHttpContext cmsContext;
private void Page_Load(object sender, System.EventArgs e)
{
  cmsContext = CmsHttpContext.Current;
lblErrorMessage.Text = String.Empty;
string cmsObjectGuid = String.Empty;
if (Request.QueryString["CMSObjectGuid"] != null)
{
cmsObjectGuid = Request.QueryString["CMSObjectGuid"];
parentGallery = cmsContext.Searches.GetByGuid(cmsObjectGuid) as
TemplateGallery;
if (parentGallery != null)
{
litParentGallery.Text = parentGallery.Path;
}
else
{
lblErrorMessage.Text = "Parent Gallery not found!";
}
}
}
|
7. | Toggle to
Design view and double-click on
the btnCreate button. In the btnCreate_Click() event
handler, add the following code:
private void btnCreate_Click(object sender, System.EventArgs e)
{
  try
{
if (parentGallery.CanCreateTemplateGalleries)
{
// get the template gallery's name
string name = txtName.Text.Trim();
if (!Utility.ValidateMCMSObjectName(name))
{
throw new Exception("Specified template gallery name is not "
+ "valid. Must be only alphanumeric "
+ "characters, open or close parens, "
+ "hyphens, underscores, periods, or "
+ "spaces. No period at the end and no "
+ "consecutive periods are allowed. ");
}
// create the template gallery
TemplateGallery newGallery;
newGallery = parentGallery.CreateTemplateGallery();
newGallery.Name = name;
newGallery.Description = txtDescription.Text;
cmsContext.CommitAll();
// display the success message
lblErrorMessage.Text = "Template Gallery created successfully!";
}
else
{
lblErrorMessage.Text = "You do not have rights to create a "
+ "template gallery.";
}
}
catch (Exception ex)
{
// rollback all changes
cmsContext.RollbackAll();
// the CMS context needs to be disposed of after a rollback
cmsContext.Dispose();
// display error message
lblErrorMessage.Text = ex.Message;
}
}
|
Before creating the
template gallery, the code performs a couple of validation checks to see
if:
The user has the
rights to create sub-template galleries in the parent template gallery.
This is done by checking that the TemplateGallery.CanCreateTemplateGalleries property returns a Boolean true.
The name supplied by the user is
a valid template gallery name. A valid name contains only the
characters, A-Z, a-z, 0-9,-, _, (space), (), and periods. It should also
not end with a period or contain two or more consecutive periods.
If all validation checks pass,
the code uses the TemplateGallery.CreateTemplateGallery() method to create a new template gallery object. We
then set the gallery’s Name and Description properties to the values entered in the
textboxes. As before, we call the CmsHttpContext.CommitAll() method to save the new template gallery to the
repository.
Save and build the solution. Let’s create a
template gallery with our new dialog:
1. | From the CMS Explorer interface, click Templates.
|
2. | Select New | New Template
Gallery.
|
3. | In the
New Template Gallery dialog, enter the following values:
| Property | Value |
|---|
| Name | MyTemplateGallery | | Description | This
template gallery was created from the PAPI |
|
4. | Click Create Gallery
and close the dialog. Refresh CMS Explorer and check that the new
template gallery is created in the root template gallery. As an
exercise, you could program the dialog to close itself and refresh the
parent page automatically. |
