Creating Templates
Another useful feature
of the PAPI is its ability to generate templates through code. This is
particularly useful when you need to generate many templates, consisting
of placeholder and custom property definitions based on some predefined
logic (for instance, a schema from a legacy application that is to be
migrated to MCMS).
In this exercise,
we will build a Create Template dialog for CMS Explorer:
1. | Add a new web form to the CMS Explorer project. Name the
new form CreateTemplate.aspx.
|
2. | In Design view,
drag and drop styles.css from Solution Explorer onto the web
form.
|
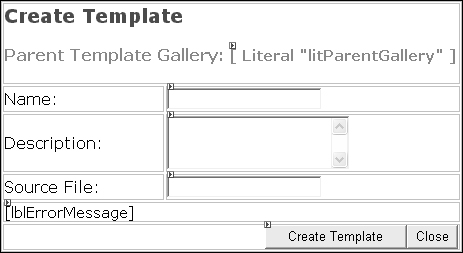
3. | Toggle to HTML view and add a table consisting of
six rows as shown below:
<table>
<tr>
  <td colspan="2">
    <h1>Create Template</h1>
    <h2>
      Parent Template Gallery:
      (Add Literal for displaying the path here)
    </h2>
  </td>
</tr>
<tr>
  <td>Name:</td>
  <td>(Add text box for the Name here)</td>
</tr>
<tr>
  <td>Description:</td>
  <td>(Add text box for the Description here)</td>
</tr>
<tr>
  <td>Source File:</td>
  <td>(Add text box for the source file here)</td>
</tr>
<tr>
  <td colspan="2">(Add the label for displaying error messages here)</td>
</tr>
<tr>
  <td colspan="2" align="right">
    (Add the Create Template button here)
    <INPUT type="button" value="Close"
      onclick="javascript:window.close();">
  </td>
</tr>
</table>
|
4. | In Design view, add controls from the Web
Forms section of the Toolbox and arrange them as described below:
| Control | Property | Value |
|---|
| Literal | ID | litParentGallery | | TextBox | ID | txtName | | TextBox | ID | txtDescription | | | Rows | 3 | | | TextMode | MultiLine | | TextBox | ID | txtSourceFile | | Label | ID | lblErrorMessage | | | Text | (empty string) | | Button | ID | btnCreate | | | Text | Create Template |
|
5. | In the
code-behind file, add the following namespaces:
. . . code continues . . .
// MCMS API
using Microsoft.ContentManagement.Publishing;
// Following is required for creating placeholder definitions
using Microsoft.ContentManagement.Publishing.Extensions.Placeholders;
namespace CmsExplorer
{
  . . . code continues . . .
}
|
6. | In the Page_Load()
event handler, add code that gets a reference to the current CmsHttpContext
object as well as a reference to the parent template gallery in which
to create the new template.
private TemplateGallery parentGallery;
private CmsHttpContext cmsContext;
private void Page_Load(object sender, System.EventArgs e)
{
  cmsContext = CmsHttpContext.Current;
lblErrorMessage.Text = String.Empty;
string cmsObjectGuid = String.Empty;
if (Request.QueryString["CMSObjectGuid"] != null)
{
cmsObjectGuid = Request.QueryString["CMSObjectGuid"];
parentGallery = cmsContext.Searches.GetByGuid(cmsObjectGuid)
as TemplateGallery;
if (parentGallery != null)
{
litParentGallery.Text = parentGallery.Path;
}
else
{
lblErrorMessage.Text = "Parent Gallery not found!";
}
}
}
|
7. | Toggle to
Design view and double-click on
the btnCreate button. In the btnCreate_Click() event
handler, add the code shown below:
private void btnCreate_Click(object sender, System.EventArgs e)
{
  try
{
// create the new template
Template newTemplate;
if (parentGallery.CanCreateTemplates)
{
// get the template's name
string name = txtName.Text.Trim();
if (!Utility.ValidateMCMSObjectName(name))
{
throw new Exception("Specified template gallery name is not "
+ "valid. Must be only alphanumeric "
+ "characters, open or close parens, "
+ "hyphens, underscores, periods, or "
+ "spaces. No period at the end and no "
+ "consecutive periods are allowed. ");
}
newTemplate = parentGallery.CreateTemplate();
newTemplate.Name = name;
newTemplate.Description = txtDescription.Text;
newTemplate.SourceFile = txtSourceFile.Text;
// commit the changes
cmsContext.CommitAll();
// display the success message
lblErrorMessage.Text = "Template created successfully!";
}
else
{
lblErrorMessage.Text =
"You do not have rights to create a template.";
}
}
catch(Exception ex)
{
// rollback all changes
cmsContext.RollbackAll();
// the CMS context needs to be disposed of after a rollback
cmsContext.Dispose();
// display error message
lblErrorMessage.Text = ex.Message;
}
}
|
As
before, the code performs the following validation checks before
creating the template:
Checks to see if
the user has the necessary rights to create templates in the current
template gallery. We do this by retrieving the value of the TemplateGallery.CanCreateTemplates
property.
Checks the name supplied in
the txtName text box to see if it is a
valid name. The same rules as for naming template galleries apply to
templates.
The code basically uses
the TemplateGallery.CreateTemplate()
method to create the template. Once it has been created (and before we
assign its Name, DescriptionSourceFile property values), the new template gets the
following property values: and
The
Custom Property and Placeholder Definition collections are both empty.
CreatedBy, LastModifiedBy, and OwnedBy reflect the user that carried out the create
template operation.
CreatedDate
and LastModifiedDate contain the date
and time that the template was created.
The
template’s state is New.
Its
name is New Template.
SourceFile and Description are empty
strings.
Once the template has
been successfully created, we assign the new template the name,
description, and source file values entered in the textboxes. Note that SourceFile is the PAPI equivalent of the Template File property seen in Template
Explorer.
As before, in order for
the changes to be made permanent, we commit them to the database. The CmsHttpContext.CommitAll()
method is similar to the SaveNew to Saved. Should there be any errors, the message is
displayed in the label and all changes are rolled back. function in Template Explorer. Once committed,
the state of the template changes from
Submitting the
Template
After the template has
been created and committed to the repository, it will be in the Saved state. Until it is published, by checking it in
with Template Explorer, other template designers are not able to modify
it. The equivalent of checking in templates in the PAPI is the Template.Submit() method. Once submitted, the template’s state changes
from Saved to Published. Authors
and editors are then able to use it to create postings.
Modify the code in the btnCreate_Click() event handler to submit the new template as
shown below:
private void btnCreate_Click(object sender, System.EventArgs e)
{
  try
  {
    // create the new template
    Template newTemplate;

    if (parentGallery.CanCreateTemplates)
    {
      // get the template's name
      string name = txtName.Text.Trim();

      if (!Utility.ValidateMCMSObjectName(name))
      {
        throw new Exception("Specified template gallery name is not "
                          + "valid. Must be only alphanumeric "
                          + "characters, open or close parens, "
                          + "hyphens, underscores, periods, or "
                          + "spaces. No period at the end and no "
                          + "consecutive periods are allowed. ");
      }

      newTemplate = parentGallery.CreateTemplate();
      newTemplate.Name = name;
      newTemplate.Description = txtDescription.Text;
      newTemplate.SourceFile = txtSourceFile.Text;

      // commit the changes
      cmsContext.CommitAll();

      // submit the template
if (newTemplate.CanSubmit)
{
newTemplate.Submit();
cmsContext.CommitAll();
// display the success message
lblErrorMessage.Text = "Template created successfully!";
}
else
{
lblErrorMessage.Text = "You do not have rights to submit"
+ " a template.";
}
    }
    else
    {
      lblErrorMessage.Text = "You do not have rights to create a template.";
    }

  }
  catch(Exception ex)
  {
    // rollback all changes
    cmsContext.RollbackAll();

    // the CMS context needs to be disposed of after a rollback
    cmsContext.Dispose();

    // display error message
    lblErrorMessage.Text = ex.Message;
  }
}
The code first checks the
Template.CanSubmit property to see
if the template can be submitted by the user. If so, it then calls the Template.Submit()
method.
Creating Custom
Property Definitions
Given a
template object, you can add custom property definitions to its existing
collection. In this example, we are going to take another shortcut.
Instead of providing a user interface for entering the name, type, and
default value of the custom property (like the one found in Template
Explorer), we are going straight to coding. We will create a text custom
property definition that has the following properties and values:
| Property | Value |
|---|
| Name | LastSubmittedBy |
| DefaultValue | (blank string) |
In the btnCreate_Click() event handler, add the following code within
the try block:
private void btnCreate_Click(object sender, System.EventArgs e)
{
  try
  {
    // create the new template
    Template newTemplate;

    if (parentGallery.CanCreateTemplates)
    {
      . . . code continues . . .

      newTemplate = parentGallery.CreateTemplate();
      newTemplate.Name = txtName.Text;
      newTemplate.Description = txtDescription.Text;
      newTemplate.SourceFile = txtSourceFile.Text;

      // create the custom property definition
CustomPropertyDefinition customProp;
customProp = newTemplate.CreateCustomPropertyDefinition();
customProp.Name = "LastSubmittedBy";
customProp.DefaultValue = String.Empty;
      // commit the changes
      cmsContext.CommitAll();

      // submit the template
      if (newTemplate.CanSubmit)
      {
        newTemplate.Submit();
        cmsContext.CommitAll();

        // display the success message
lblErrorMessage.Text = "Template created successfully!";
}
else
{
lblErrorMessage.Text = "You do not have rights to submit"
+ " a template.";
      }
    }
    else
    {
      lblErrorMessage.Text = "You do not have rights to create a template.";
    }
  }
  catch(Exception ex)
  {
    // rollback all changes
    cmsContext.RollbackAll();

    // the CMS context needs to be disposed of after a rollback
    cmsContext.Dispose();

    // display error message
    lblErrorMessage.Text = ex.Message;
  }
}
The code
uses the Template.CreateCustomPropertyDefinition() method to add a custom property definition
to the template. Once the custom property has been created, we assign
its property values.
|
When creating a
template and adding custom property definitions to it with the PAPI, you
must call CommitAll() somewhere between the TemplateGallery.CreateTemplate()
and Template.Submit() calls.
Otherwise, you will find that the template has an additional custom
property definition named NewCustomPropertyDefinitionX (where X is an incremental number). This is a known bug
with the PAPI.
|
In this example, we added a
simple text custom property definition. For the more complex selection
custom property definition, the technique is very similar. The code
snippet below shows how to create a custom property definition named MenuLocation
with four allowed values: Left, Right, Top, and Bottom.
It specifies Top as the default value.
CustomPropertyDefinition customPropSelection;
customPropSelection = newTemplate.CreateCustomPropertyDefinition();
customPropSelection.Name = "MenuLocation";
customPropSelection.AddAllowedValue("Left");
customPropSelection.AddAllowedValue("Right");
customPropSelection.AddAllowedValue("Top");
customPropSelection.AddAllowedValue("Bottom");
customPropSelection.DefaultValue = "Top";
Creating
Placeholder Definitions
Placeholder
definitions can be created programmatically too, thanks to the PAPI’s Template.CreatePlaceholderDefinition() method. You can add any placeholder definition
to a template. Before you do so, it is a good idea to import its
namespace, which is why we imported Microsoft.ContentManagement.Publishing.Extensions.Placeholders
earlier.
In
this example, we add an HTMLPlaceholderDefinition to the newly created template. As before,
we are going to take a shortcut here and have the placeholder definition
automatically created with the following property values:
| Property | Value |
|---|
| Name | BigBoxOfContent |
| Description | A
placeholder created from the PAPI |
| AllowHyperlinks | True |
| AllowLineBreaks | True |
| AllowAttachments | True |
| AllowImages | True |
| MustUseResourceGallery | False |
| UseGeneratedIcon | False |
| Formatting | FullFormatting |
The Template.CreatePlaceholderDefinition() method accepts a single input parameter. It
could be one of two objects:
A placeholder
definition type. You can create a new HtmlPlaceholderDefinition,
XmlPlaceholderDefinition, ImagePlaceholderDefinition,
AttachmentPlaceholderDefinition, or use one of your own creation.
An existing placeholder
definition to create copies of. Using this method, the new placeholder
definition will inherit the properties of the specified placeholder
definition.
Add the highlighted code to the btnCreate_Click()
event handler. The code creates an HtmlPlaceholderDefinition based on the property values defined in the table
above.
private void btnCreate_Click(object sender, System.EventArgs e)
{
  try
  {
    // create the new template
    Template newTemplate;

    if (parentGallery.CanCreateTemplates)
    {
      newTemplate = parentGallery.CreateTemplate();
      newTemplate.Name = txtName.Text;
      newTemplate.Description = txtDescription.Text;
      newTemplate.SourceFile = txtSourceFile.Text;

      // create the custom property definition
      CustomPropertyDefinition customProp;
      customProp = newTemplate.CreateCustomPropertyDefinition();
      customProp.Name = "LastSubmittedBy";
      customProp.DefaultValue = String.Empty;

      // create the placeholder definitions
HtmlPlaceholderDefinition placeholderDef;
placeholderDef = newTemplate.CreatePlaceholderDefinition(
new HtmlPlaceholderDefinition()) as HtmlPlaceholderDefinition;
placeholderDef.Name = "BigBoxOfContent";
placeholderDef.Description = "A placeholder created from the PAPI";
placeholderDef.AllowHyperlinks = true;
placeholderDef.AllowLineBreaks = true;
placeholderDef.AllowAttachments = true;
placeholderDef.AllowImages = true;
placeholderDef.MustUseResourceGallery = false;
placeholderDef.UseGeneratedIcon = false;
placeholderDef.Formatting =
HtmlPlaceholderDefinition.SourceFormatting.FullFormatting;
      // commit the changes
      cmsContext.CommitAll();

      . . . code continues . . .
The Create Template dialog
is now complete. Save and build the solution. Let’s test it to see if
it works:
1. | In CMS Explorer, click on the Templates button. Open the MyTemplateGallery template gallery
created earlier.
|
2. | Select New | New Template.
|
3. | In the Create Template dialog, enter the following
values:
| Property | Value |
|---|
| Name | MyTemplate | | Description | This
template was created using the PAPI | | SourceFile | /tropicalgreen/plantcatalog/plant.aspx |
|
4. | Click Create Template
and close the dialog.
|
5. | Refresh the CMS Explorer screen and verify that MyTemplate
has been created in MyTemplateGallery.
|
Creating Connected
Templates
Connected templates are
created in the same way as templates, with the exception that we now
call the TemplateGallery.CreateConnectedTemplate() method.
Let’s try it out:
1. | Add a new web form to the project with the name CreateConnectedTemplate.aspx.
|
2. | Drag and drop Styles.css onto the web form.
|
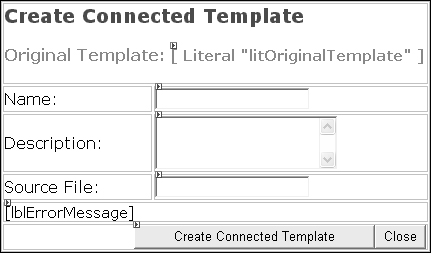
3. | Toggle to HTML
view and enter the following code (including the text markers):
<table>
<tr>
  <td colspan="2">
    <h1>Create Connected Template</h1>
    <h2>
      Original Template:
      (Add literal for displaying the path of the original template here)
    <h2>
  </td>
</tr>
<tr>
  <td>Name:</td>
  <td>(Add the text box for the Name here)</td>
</tr>
<tr>
  <td>Description:</td>
  <td>(Add the text box for the Description here)</td>
</tr>
<tr>
  <td>Source File:</td>
  <td>(Add text box for the source file here)</td>
</tr>
<tr>
  <td colspan="2">(Add the Label for displaying error messages here)</td>
</tr>
<tr>
  <td colspan="2" align="right">
    (Add the Create Connected Template button here)
    <INPUT type="button" value="Close"
      onclick="javascript:window.close();">
  </td>
</tr>
</table>
|
4. | Switch to
Design view. Drag and drop the
following controls from the Web Forms section of the Toolbox and delete
the text markers.
| Control | Property | Value |
|---|
| Literal | ID | litOriginalTemplate | | TextBox | ID | txtName | | TextBox | ID | txtDescription | | | Rows | 3 | | | TextMode | MultiLine | | TextBox | ID | txtSourceFile | | Label | ID | lblErrorMessage | | | Text | (empty string) | | Button | ID | btnCreate | | | Text | Create Connected Template |
The completed web form in Design
view looks like this:
|
5. | Now
let’s get an instance of the template (or the original template) on
which to base the connected template. Before we do so, first consider
how template designers and administrators create connected templates
from CMS Explorer. They will:
- Click the Templates
button.
- Navigate to the template gallery that contains
the original template.
- Click the Edit link next to the original template.
- Select
the Create Connected Template
link.
 |
Coded within the Create
Connected Template link is the path to CreateConnectedTemplate.aspx and a querystring parameter named CMSObjectGuid, which contains the GUID of the original template.
Here’s a sample of the generated URL, split on to several lines for
readability:
http://localhost/cmsexplorer/CreateConnectedTemplate.aspx?
NRMODE=Update
&FRAMELESS=true
&CMSObjectGuid=%7b5010EF8C-C33C-4F68-8430-D8DFAABA2EE0%7d
&NRNODEGUID=%7bE4D19123-9DD3-11D1-B44E-006097071264%7d
In order to get an
instance of the original template, we will extract the GUID from the CMSObjectGuid querystring parameter and pass it as the
input parameter for the Searches.GetByGuid() method.
To show that we really
have an instance of the original template, we will display the path of
the original template on the screen. If, for some reason, we are not
able to get an instance of the template, an error message will be
displayed instead. We’ll add the code that does the job next.
1. | Double-click anywhere on the web form to get to its
code-behind file. Add the Microsoft.ContentManagement.Publishing
namespace.
. . . code continues . . .
// MCMS API
using Microsoft.ContentManagement.Publishing;
namespace CmsExplorer
{
  . . . code continues . . .
}
|
2. | Above and
within the Page_Load() event handler, add the highlighted code:
private CmsHttpContext cmsContext;
private Template originalTemplate;
private void Page_Load(object sender, System.EventArgs e)
{
cmsContext = CmsHttpContext.Current;
// Clear all error messages, if any.
lblErrorMessage.Text = String.Empty;
// Get an instance of the original template
string cmsObjectGuid = String.Empty;
if (Request.QueryString["CMSObjectGuid"] != null)
{
cmsObjectGuid = Request.QueryString["CMSObjectGuid"];
originalTemplate = cmsContext.Searches.GetByGuid(cmsObjectGuid)
as Template;
if (originalTemplate!=null)
{
// Display the template's path
litOriginalTemplate.Text = originalTemplate.Path;
}
else
{
// Uh-oh we can't get an instance of the template.
lblErrorMessage.Text = "Original Template not found!";
}
}
}
|
3. | Now that we have an instance of the original
template, we are ready to create a connected template. A couple of
checks are first done to ensure that the user has rights to create
templates in the destination template gallery as well as that the name
given to the new template is valid.
The TemplateGallery.CreateConnectedTemplate() method
takes the original template as an input parameter and returns a
reference to the new connected template. We set the name, description,
and source file properties of the new connected template based on the
values entered by the user in the textboxes provided. Double-click on
the btnCreate button to get to the btnCreate_Click()
event handler. Add the code as shown below:
private void btnCreate_Click(object sender, System.EventArgs e)
{
  try
{
// Get an instance of the template gallery
TemplateGallery parentGallery = originalTemplate.Parent;
// Create the new connected template
Template newConnectedTemplate;
if (parentGallery.CanCreateTemplates)
{
// get the template's name
string name = txtName.Text.Trim();
if (!Utility.ValidateMCMSObjectName(name))
{
throw new Exception("Specified template gallery name is not "
+ "valid. Must be only alphanumeric "
+ "characters, open or close parens, "
+ "hyphens, underscores, periods, or "
+ "spaces. No period at the end and no "
+ "consecutive periods are allowed. ");
}
newConnectedTemplate =
parentGallery.CreateConnectedTemplate(originalTemplate);
//set the connected template's name
newConnectedTemplate.Name = txtName.Text;
//Set the connected template's description
newConnectedTemplate.Description = txtDescription.Text;
// Set the connected template's source file
newConnectedTemplate.SourceFile = txtSourceFile.Text;
// Commit the changes
cmsContext.CommitAll();
// Submit the connected template
if (newConnectedTemplate.CanSubmit)
{
newConnectedTemplate.Submit();
cmsContext.CommitAll();
// display the success message
lblErrorMessage.Text = "Connected Template created successfully!";
}
else
{
lblErrorMessage.Text = "You do not have rights to submit"
+ " a template.";
}
}
else
{
lblErrorMessage.Text =
"You do not have rights to create a template.";
}
}
catch(Exception ex)
{
// rollback all changes
cmsContext.RollbackAll();
// the CMS context needs to be disposed of after a rollback
cmsContext.Dispose();
// display error message
lblErrorMessage.Text = ex.Message;
}
}
|
Try out the code!
1. | On the CMS Explorer toolbar, click Templates.
|
2. | Select the MyTemplateGallery
template gallery that we created earlier.
|
3. | Click the Edit
link next for the MyTemplate
template.
|
4. | Click Create Connected Template.
|
5. | Enter the following values in the Create Connected
Template dialog:
| Property | Value |
|---|
| Name | MyConnectedTemplate | | Description | This
connected template was created using the PAPI | | Source File | /tropicalgreen/plantcatalog/columns.aspx |
|
6. | After you have filled in all the fields, click Create Connected Template.
|
7. | Close the dialog and refresh CMS Explorer. Note that
the new connected template has been created!
|
Until the connected
template is published by calling the Template.Submit() method, all templates connected to it will be
“checked-out” by the current user and thus not available to other
template designers for editing. Authors, editors, and moderators can,
however, use the template for creating postings after it has been
committed even though it has not been submitted.
