Servers
in an organization’s demilitarized zone (DMZ) are usually not domain
members and, thus, cannot do automatic mutual authentication with the
OpsMgr server. However, these servers are the most exposed in the
organization and, thus, critical to be monitored. Thankfully, there is a
well-defined process for using certificates to handle the mutual
authentication.
Note
This topic also applies to
machines that are workgroup servers or servers that are members of
domains where there is no trust to the OpsMgr domain.
Monitoring servers in the DMZ
requires an install of certificate-based mutual authentication. This
process has a lot of steps, but is straightforward. To install and
configure certificates to allow the DMZ servers to use mutual
authentication, the following five major tasks need to be completed:
1. | Create
a certificate template to issue the correct format of X.509
certificates for Operations Manager to use for mutual authentication.
|
2. | Request
the root CA certificate to trust the CA and the certificates it issues.
This is done for each DMZ server and possibly for the management
servers if not using an enterprise CA.
|
3. | Request
a certificate from the root CA to use for mutual authentication. This
is done for each DMZ server and for each management server.
|
4. | Install the Operations Manager agent manually. This is done for each DMZ server.
|
5. | Configure the agent to use the certificate. This is done for each DMZ server and for each management server.
|
These various X.509 certificates are issued from a certificate authority, which could be a Windows Server 2008 R2 CA.
Creating a Certificate Template
This step creates a
certificate template named Operations Manager that can be issued from
the Windows Server 2008 R2 certification authority web enrollment page.
The certificate template will support Server Authentication (OID
1.3.6.1.5.5.7.3.1) and Client Authentication (OID 1.3.6.1.5.5.7.3.2) as
well as allow the name to be manually entered rather than autogenerated from Active Directory because the DMZ server will not be an Active Directory domain member.
The steps to create the security template are as follows:
1. | Log on to the CA, which is DC1.companyabc.com in this example.
|
2. | Launch Server Manager.
|
3. | Expand Roles, Active Directory Certificate Services, and select Certificate Templates (fqdn).
|
4. | Right-click the Computer template and select Duplicate Template.
|
5. | Leave the version at Windows 2003 Server, Enterprise Edition and click OK.
|
6. | On the General tab in the Template Display Name field, enter Operation Manager.
|
7. | Select the Request Handling tab and mark the Allow Private Key to Be Exported option.
|
8. | Select the Subject Name tab and select Supply in the Request option. Click OK at the warning.
|
9. | Select the Security tab, select Authenticated Users, and check the Enroll right.
|
10. | Click OK to save the template.
|
11. | Select the Enterprise PKI to expose the CA.
|
12. | Right-click the CA and select Manage CA.
|
13. | In the certsrv console, expand the CA, right-click Certificates Templates, then select New, Certificate Template to Issue.
|
14. | Select the Operations Manager certificate template and click OK.
|
The new Operations Manager template will now be available in the Windows Server 2008 R2 web enrollment page.
Requesting the Root CA Server Certificate
This allows the DMZ server to
trust the Windows Server 2008 R2 CA. This does not need to be done on
the OpsMgr management servers, as the Windows Server 2008 R2 CA is an
enterprise CA and all domain members automatically trust it. If the CA
is not an enterprise CA, the steps need to be completed for the
management servers as well.
To request and install the root CA certificate on the DMZ server, execute the following steps:
1. | Log on to a DMZ server with local administrator rights.
|
2. | Open a web browser and point it to the certificate server, in this case https://dc1.companyabc.com/certsrv. Enter credentials if prompted.
|
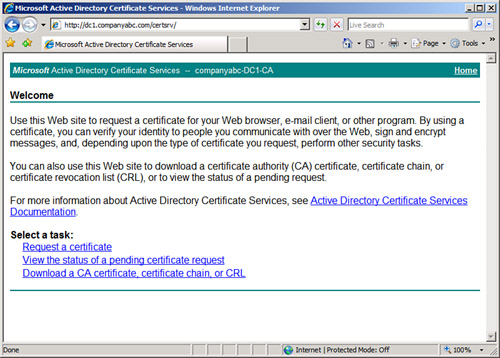
3. | Click the Download a CA Certificate, Certificate Chain, or CRL link (shown in Figure 1).
|
4. | Click
the Download CA Certificate link. Note: If the certificate does not
download, add the site to the Local Intranet list of sites in Internet
Explorer.
|
5. | Click Open to open the CA certificate.
|
6. | Click Install Certificate to install the CA certificate.
|
7. | At the Certificate Import Wizard screen, click Next.
|
8. | Select Place All Certificates in the Following Store option button.
|
9. | Click Browse.
|
10. | Click the Show Physical Stores check box.
|
11. | Expand the Trusted Root Certification Authorities folder and select the local computer store.
|
12. | Click OK.
|
13. | Click Next, Finish, and OK to install the CA certificate.
|
14. | Close any open windows.
|
Repeat for all DMZ servers.
Now the DMZ servers will trust certificates issued by the certification
authority. The next step is to request the certificates to use for the
mutual authentication for all servers.
Requesting a Certificate from the Root CA Server
Each of the management servers and the servers in the DMZ will need to be issued certificates to use for communication.
The steps to request a certificate are as follows:
1. | Log on as an administrator, then open a web browser and point it to the certificate server (in this case, https://dc1.companyabc.com/certsrv).
|
2. | Click the Request a Certificate link.
|
3. | Click the Advanced Certificate Request link.
|
4. | Click the Create and Submit a Request to This CA link.
|
5. | In the Type of Certificate Template field, select Operations Manager.
|
6. | In the Name field, enter the FQDN (fully qualified domain name) of the target server.
Note
Go to the actual server to
get the name! On the server, go to Computer Properties, Computer Name.
Copy the full computer name and paste it into the Name field of the
form.
|
7. | Click Submit.
|
8. | Click Yes when you get the warning pop-up.
|
9. | Click Install This Certificate.
|
10. | Click Yes when you see the warning pop-up. The certificate is now installed in the user certificate store.
Note
The certificate was installed
in the user certificate store, but needs to be in the local computer
store for Operations Manager. The ability to use web enrollment to
directly place the certificate into the local computer store was removed
from the Windows Server 2008 web enrollment, so the certificate needs
to be moved manually.
|
11. | Select Start, Run and then enter mmc to launch an MMC console.
|
12. | Select File and Add/Remove Snap-In.
|
13. | Select Certificates and click the Add button.
|
14. | Select My User Account and click Finish.
|
15. | Select Certificates again and click the Add button.
|
16. | Select Computer Account and click Next.
|
17. | Select the local computer, click Finish, and then click OK.
|
18. | Expand the Certificates – Current User, Personal, and select the Certificates folder.
|
19. | In
the right pane, right-click the certificate issued earlier and select
All Tasks, Export. The certificate can be recognized by the certificate
template name Operations Manager.
|
20. | At the Certificate Export Wizard, click Next.
|
21. | Select Yes, Export the Private Key. Click Next.
|
22. | Click Next.
|
23. | Enter in a password and click Next.
|
24. | Enter in a directory and filename and click Next.
|
25. | Click Finish to export the certificate. Click OK at the pop-up.
|
26. | Expand the Certificates (Local Computer), Personal, and select the Certificates folder.
Note
If this is the first certificate
in the local computer store, the Certificates folder will not exist.
Simply select the Personal folder instead and the Certificates folder
will be created automatically.
|
27. | Right-click in the right pane and select All Tasks, Import.
|
28. | At the Certificate Import Wizard, select Next.
|
29. | Click Browse to locate the certificate file saved earlier. Change the file type to Personal Information Exchange (.pfx) to see the file. Click Next.
|
30. | Enter in the password used earlier, select the Mark This Key as Exportable, and click Next.
|
31. | Click Next.
|
32. | Click Finish and then click OK at the pop-up to complete the import.
|
The preceding steps need to be completed for each DMZ server and for each management server.
Installing the Agent on the DMZ Server
The agent needs to be
installed manually on each DMZ server. Normally, agents would be pushed
by the Operations Manager console, but DMZ servers typically reside in
the DMZ and are not members of the domain.
The steps to manually install the agent are as follows:
1. | Log on as an administrator and insert the OpsMgr 2007 R2 installation media.
|
2. | At the AutoPlay menu, select Run SetupOM.exe.
|
3. | Select Install Operations Manager 2007 R2 Agent from the menu.
|
4. | Click Next.
|
5. | Click Next to accept the default directory.
|
6. | Click Next to specify management group information.
|
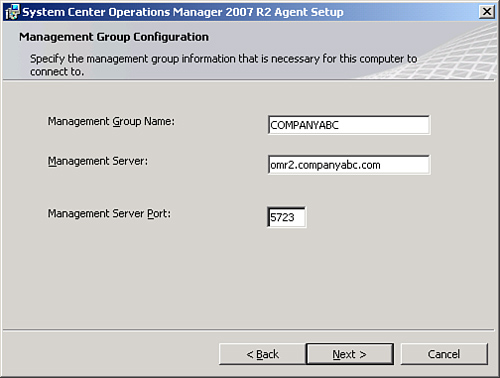
7. | Type
in the management group name and FQDN of the management server. Keep
the default management server port as 5723. The example shown in Figure 2 has COMPANYABC as the management group name and omr2.companyabc.com as the management server.
|
8. | |
9. | Click Next at the Agent Action Account page to leave the local system as the action account.
|
10. | Click Install to complete the installation.
|
11. | When the installer is finished, click Finish.
|
The preceding steps need to be completed for each DMZ server.
The agent is installed, but
will not communicate correctly with the management server. This is
because the agent has not been configured to use the certificate for
mutual authentication. This will be done in the next section.
Configuring the Agent to Use the Certificate
After the agent is installed,
the agent still needs to be configured to use the correct certificate.
The OpsMgr installation includes a utility called MOMCertImport.exe
that configures the agent to use certificates for authentication and
specifies which certificate in the local computer store to use. The tool
does not do any validation checking of the certificate itself, so care
needs to be taken that the correct certificate is selected.
The steps to configure the agent to use a certificate are as follows:
1. | Log on as an administrator on the DMZ server and insert the OpsMgr 2007 R2 installation media.
|
2. | At the AutoPlay menu, select Run SetupOM.exe.
|
3. | Select Browse This CD from the menu.
|
4. | Select the SupportTools directory and then the AMD64 directory.
Note
Windows Server 2008 R2 is a 64-bit operating system, so the AMD64
is the correct folder for the 64-bit binaries. If the procedure is
being run for 32-bit servers, select the appropriate directory for the
binaries such as i386.
|
5. | In the directory, double-click MOMCertImport.exe.
|
6. | In
the pop-up window, select the certificate issued previously and click
OK. The View Certificate button can be used to view the certificate
details if the correct certificate is not obvious.
|
The Operation Manager
service will restart automatically to have the certificate selection
take effect. The preceding steps need to be repeated for each DMZ server
and for each management server.
The Operations Manager
event log can be viewed with the Windows Event Viewer. It is named
Operations Manager and is located in the Applications and Services Logs
folder in the tool. Any problems with the certificate will be shown in
the log immediately following the start of the System Center Management
service.
