Understanding Routing Protocols
In Routing And Remote Access, routing protocols
provide communication between routers. Windows Server 2003 includes
four routing protocols that can be added to the Routing And Remote
Access service: the dynamic routing protocols RIP and OSPF, the
multicast routing protocol IGMP Router And Proxy, and DHCP Relay Agent.
Adding and Configuring Routing Protocols
To configure a routing
protocol, you must first add the routing protocol to the Routing And
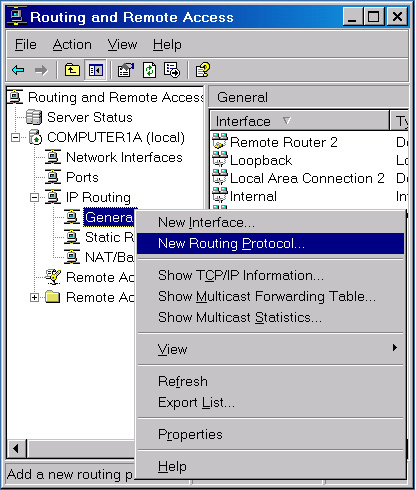
Remote Access console. You perform this task by right-clicking the
General node within IP Routing in the Routing And Remote Access console
and clicking New Routing Protocol, as shown in Figure 1.
Once
the routing protocol is available for configuration in the Routing And
Remote Access console, you must enable the protocol on the appropriate
network interfaces. You perform this task by right-clicking the new
protocol in the console tree and then clicking New Interface on the
shortcut menu. After the protocol has been enabled on the appropriate
interfaces, you can configure the routing protocol through the protocol
properties or the interface properties.
Configuring RIP
RIP
is a dynamic routing protocol that helps routers determine the best
path through which to send given data. Routes to destinations are chosen
according to lowest cost. By default, this cost is determined by the
number of hops or routers between endpoints; however, you can manually
adjust the cost of any route as needed.
Importantly, RIP discards
routes that are determined to have a cost higher than 15. This feature
effectively limits the size of the network in which RIP can operate.
Another important feature of RIP is that RIP-enabled routers advertise
their entire routing tables to each other every 30 seconds. The service
therefore generates a substantial amount of network traffic.
RIP Environment
A RIP routed environment is best suited to a small-to-medium-sized, multipath, dynamic IP internetwork:
A small-to-medium-sized internetwork is defined as 10 to 50 networks. In addition, the diameter of a RIP network cannot exceed 15 routers.
Multipath means that multiple paths are available for packets to travel between any two endpoints on the internetwork.
Dynamic means that the topology of the internetwork changes over time.
Advantages and Disadvantages of RIP
The main advantage of RIP
is that it is easy to deploy. You can implement it on your network
simply by enabling the protocol on each router. However, RIP does not
scale well to large networks because of the 15-hop limitation. Other
disadvantages of RIP include its high convergence times in medium-sized
networks and its inability to factor costs other than hops (such as
bandwidth) into the route cost metric.
Managing RIP Security
RIP includes a number of configurable security features, including authentication, peer filtering, route filters, and neighbors.
Tip
You need to be familiar with these RIP security features for the exam. |
RIP Authentication
To prevent the
corruption of RIP routes by an unauthorized RIP router or a malicious
attacker, you can configure RIP router interfaces to use simple password
authentication. Received RIP announcements that do not match the
configured password are discarded. Note, however, that the password is
sent in plaintext. Any user with a network sniffer such as Network
Monitor can capture the RIP announcements and view the password.
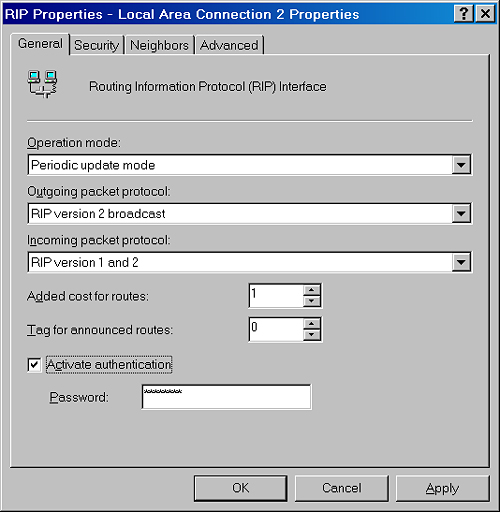
You configure RIP
authentication by selecting the Activate Authentication check box and
specifying a password on the General tab of the RIP interface properties
dialog box, as shown in Figure 2.
Peer Filtering
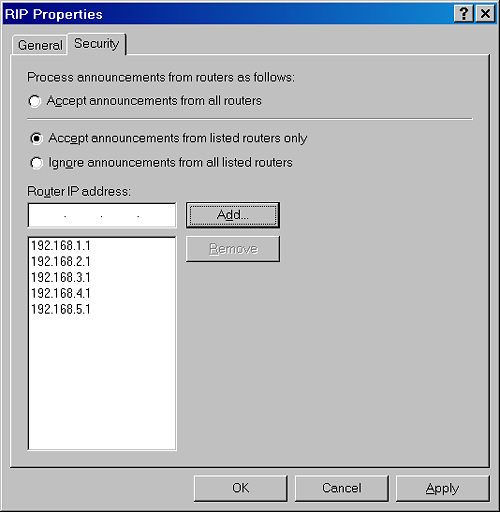
You can configure each
RIP router with a list of routers (designated by IP address) from which
RIP announcements are accepted. By default, RIP announcements from all
sources are accepted. By configuring a list of RIP peers, RIP
announcements from unauthorized RIP routers are discarded.
You configure RIP peer filtering on the Security tab of the global RIP Properties dialog box, as shown in Figure 3.
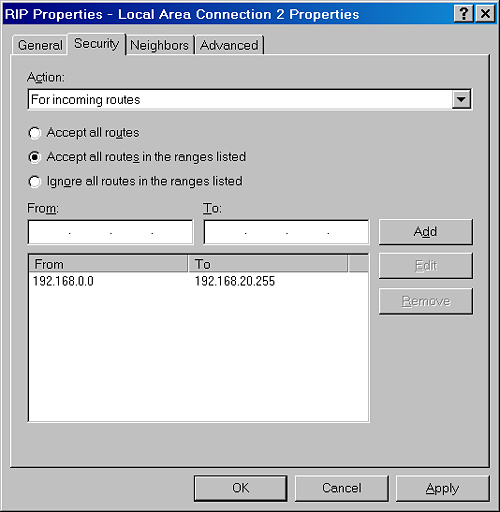
Route Filters
You
can configure route filters on each RIP interface so that the only
routes considered for addition to the routing table are those that
reflect reachable network IDs within the internetwork. For example, if
an organization is using subnets of the private network ID 10.0.0.0,
route filtering can be used so that the RIP routers discard all routes
except those within the 10.0.0.0 network ID.
You configure route filters on the Security tab of the RIP Properties dialog box, as shown in Figure 4.
Neighbors
By
default, RIP either broadcasts (RIP version 1 or RIP version 2) or
multicasts (RIP version 2 only) announcements. To prevent RIP traffic
from being received by any node except neighboring RIP routers, the
server running Routing And Remote Access can unicast RIP announcements.
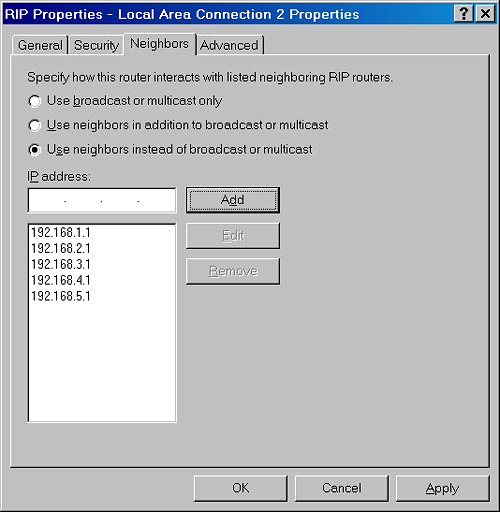
You configure RIP neighbors on the Neighbors tab of the RIP Properties dialog box, as shown in Figure 5.
