OSPF Overview
OSPF is designed for exchanging routing information within a large or very large internetwork.
The biggest advantage of
OSPF is that it is efficient; OSPF requires little network overhead even
in very large internetworks. The biggest disadvantage of OSPF is its
complexity; it requires proper planning and is difficult to configure
and administer.
OSPF uses a Shortest
Path First (SPF) algorithm to compute routes in the routing table. The
SPF algorithm computes the shortest (least cost) path between the router
and all the networks of the internetwork. SPF-calculated routes are
always loopfree.
Instead of
exchanging routing table entries like RIP routers, OSPF routers maintain
a map of the internetwork that is updated after any change to the
network topology. This map, called the link state database,
is synchronized between all the OSPF routers and is used to compute the
routes in the routing table. Neighboring OSPF routers form an adjacency, which is a logical relationship between routers to synchronize the link state database.
Changes
to internetwork topology are efficiently flooded across the entire
internetwork to ensure that the link state database on each router is
synchronized and accurate at all times. Upon receiving changes to the
link state database, the routing table is recalculated.
As the size of the link
state database increases, memory requirements and route computation
times increase. To address this scaling problem, OSPF divides the
internetwork into areas
(collections of contiguous networks) that are connected to each other
through a backbone area. Each router keeps a link state database for
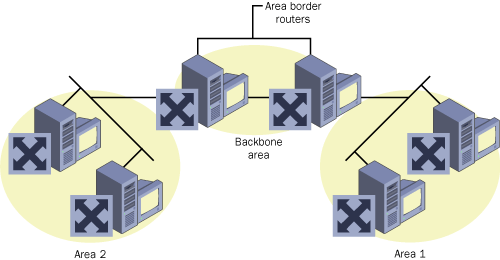
only those areas that are connected to the router. Area border routers
(ABRs) connect the backbone area to other areas.
To further reduce the amount of routing information flooded into areas, OSPF allows the use of stub areas. A stub area
can contain a single entry and exit point (a single ABR), or multiple
ABRs when any of the ABRs can be used to reach external route
destinations.
Figure 6 shows a diagram of an OSPF internetwork.

OSPF vs. RIP
OSPF has the following advantages over RIP:
OSPF can scale to large or very large internetworks.
OSPF has no hop limit.
OSPF has faster convergence times.
OSPF uses less network bandwidth.
OSPF-calculated routes are always loopfree.
Understanding DHCP Relay Agent
DHCP Relay Agent
is a routing protocol that allows client computers to obtain an address
from a DHCP server on a remote subnet. Typically, DHCP clients
broadcast DHCPDiscover packets that are then received and answered by a
DHCP server on the same subnet. Because routers block broadcasts, DHCP
clients and servers must normally be located on the same physical
subnet.
However, two
methods can help you work around this limitation. First, if the routers
separating the DHCP server and clients are RFC 1542-compliant, the
routers can be configured for Boot Protocol (BOOTP) forwarding. Through
BOOTP forwarding, routers forward DHCP broadcasts between clients and
servers and inform servers of the originating subnet of the DHCP
requests. This process allows DHCP servers to assign addresses to the
remote clients from the appropriate scope.
The second way to allow
remote communication between DHCP servers and clients is to configure a
DHCP relay agent on the subnet containing the remote clients. DHCP
relay agents intercept DHCP Discover packets and forward them to a
remote DHCP server whose address has been preconfigured. Although DHCP
Relay Agent is configured through Routing And Remote Access, the
computer hosting the agent does not need to be functioning as an actual
router between subnets.
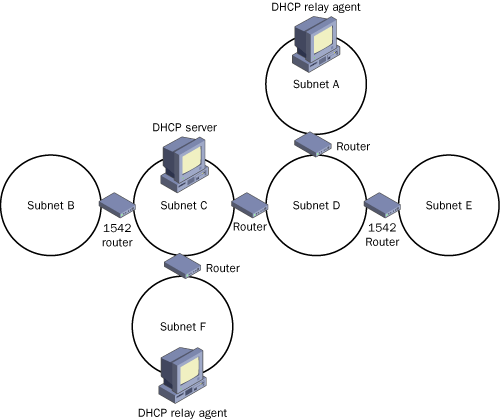
Figure 7 shows a network topology with six subnets.

Tip
Expect to see a topology question about DHCP Relay Agent and RFC 1542-compliant routers on the exam. |
In the network, clients on all subnets except D and E will be able to obtain an IP address from the DHCP server on Subnet C:
Subnet A
contains a DHCP relay agent. If we assume that the DHCP relay agent is
configured to point toward the IP address of the DHCP server on Subnet
C, DHCP clients on Subnet A will be able to obtain an address from this
server.
Subnet B
does not contain a DHCP server or a DHCP relay agent. However, the DHCP
Discover broadcasts from clients on Subnet B are able to pass through
the RFC 1542–compliant router (provided that BOOTP forwarding has been
enabled). Therefore, the DHCP client requests on Subnet B are received
by the DHCP server on Subnet C. This DHCP server can then answer these
requests accordingly.
Subnet C contains a DHCP server. Clients on this subnet will be able to receive an address from the DHCP server directly.
Subnet
D does not contain a DHCP server or a DHCP relay agent. Although one of
its routers is 1542-compliant, this only helps pass DHCP request
broadcasts to another subnet that does not have a DHCP server or a DHCP
relay agent. As a result, clients on Subnet D will not be able to obtain
an address from the DHCP server on Subnet C.
Subnet
E, like Subnet D, does not contain a DHCP server or a DHCP relay agent.
The 1542-compliant router does not allow the clients on Subnet E to
connect to a DHCP server.
Subnet
F is configured with a DHCP relay agent. If the relay agent is
configured with the address of the DHCP server on Subnet C, the clients
on Subnet F will have their DHCP requests intercepted by the DHCP relay
agent and answered by the DHCP server.
Note
You
cannot use the DHCP Relay Agent component on a computer running any of
the following: the DHCP service, the NAT routing protocol component with
automatic addressing enabled, or ICS. |
Configuring the DHCP Relay Agent
To configure the DHCP
Relay Agent, first add the DHCP Relay Agent routing protocol to the
Routing And Remote Access console. To add the DHCP Relay Agent, complete
the following steps:
1. | Open the Routing And Remote Access console.
|
2. | In the console tree, right-click the General node, and then click New Routing Protocol.
|
3. | In the New Routing Protocol dialog box, click DHCP Relay Agent, and then click OK.
|
Second, configure the
DHCP Relay Agent to point to the address of at least one remote DHCP
server. (More than one DHCP server can be used for fault tolerance.)
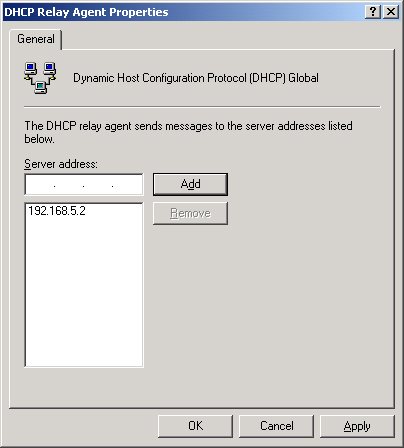
This configuration is achieved through the DHCP Relay Agent Properties
dialog box, shown in Figure 9-36. To configure global DHCP Relay Agent properties, complete the following steps:
1. | Open the Routing And Remote Access console.
|
2. | In the console tree, right-click the DHCP Relay Agent node within IP Routing, and then click Properties.
|
3. | On the General tab, in the Server Address text box, type the IP address of your DHCP server, and then click Add.
|
4. | Repeat step 3 for each DHCP server you need to add, and then click OK.
|

Third, enable the
protocol on the interface or interfaces pointing to the network segment
containing the DHCP clients. To enable the DHCP Relay Agent on a router
interface, complete the following steps:
1. | Open the Routing And Remote Access console.
|
2. | In the console tree, right-click the DHCP Relay Agent node, and then click New Interface.
|
3. | Click the interface you want to add, and then click OK.
|
4. | In the DHCP Relay Properties dialog box, on the General tab, verify that the Relay DHCP Packets check box is selected.
|
5. | If needed, in Hop-Count Threshold and Boot Threshold (Seconds), click the arrows to modify the thresholds.
|
Verifying that DHCP Relay Agent Is Functioning
You can verify that
the DHCP Relay Agent is functioning by using the Routing And Remote
Access console. To do so, select the DHCP Relay Agent node and view the
statistics in the details pane. The details pane compiles requests
received, replies received, requests discarded, and replies discarded.
If this data reveals that both requests and replies have been received,
the DHCP Relay Agent is functioning.