This next exercise uses two standard lists in a
SharePoint 2010 Team Site: the Calendar list and the Tasks list. The
goal of this example is to show the basic capabilities of the lookup
column using a business example where a department tracks tasks using a
Tasks list, and has weekly meetings that are managed in the Calendar
list. The manager wants to use SharePoint to make the meeting more
productive and wants to use the lookup column to pull additional
information from the Tasks list into the Calendar list.
Consider the possibility that
the Tasks list might have different permissions configured than the
Calendar list. For example, on this site, the administrator may only
allow project managers to edit the Calendar list, whereas all
departmental employees can add to the Tasks list.
Before jumping into the
example, some information about the functionality and limitations of the
lookup column should be provided. To begin with, only certain column
types are available to lookup columns. The following list shows the
supported column types:
Single Line of Text
Number
Date and Time
Calculated
If other column types exist in
the list that is being connected to with the lookup column, they will
not be available for selection. This limitation should be kept in mind
when planning for the use of lookup columns.
Caution
Exceeding eight lookup columns
per list view consumes a large amount of SQL resources, which can
result in performance degradation when the view is rendered. Although
there can be more than eight lookup columns in the list, make sure to
limit the number that are included in specific views.
Follow these steps to learn more about the lookup column’s functionality:
1. | Create a new site using the Team Site template.
|
2. | Click the link to the Tasks list from the Quick Launch.
|
3. | Click the List tab on the Ribbon, and click the Create Column icon.
|
4. | Title the column Flags, and select Single Line of Text as the column type. Leave the other fields on their default values and click OK to save.
|
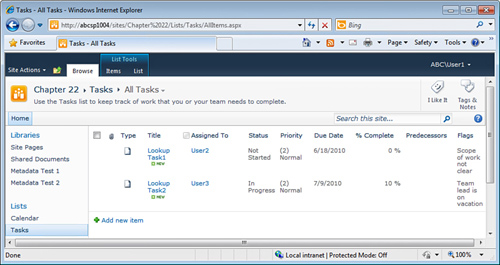
5. | From the Tasks list, click Add New Item. Enter the following content in the appropriate fields:
- Title— Enter Lookup Task 1
- Status— Not Started
- % Complete— Enter 0%
- Assigned To— Enter a sample username
- Start Date— Enter a sample start date in the future
- End Date— Enter a sample end date that is after the start date
- Flags— Enter Scope of work not clear
Leave the other fields with the default values. Click Save when the data has been entered.
|
6. | After again, click Add New Item. Enter the following content in the appropriate fields:
- Title— Enter Lookup Task 2
- Status— In Progress
- % Complete— Enter 10%
- Assigned To— Enter a sample username
- Start Date— Enter a sample start date in the past
- End Date— Enter a sample end date in the future
- Flags— Enter Team lead is on vacation
Leave the other fields with the default values. Click Save when the data has been entered.
|
7. | The task list should look similar to Figure 1.

|
8. | Now click the link to Calendar from the Quick Launch.
|
9. | Click the Calendar tab on the Ribbon, and then click List Settings.
|
10. | Scroll down until the link to Create Column appears, and then click Create Column.
|
11. | Enter Task Lookup as the title of the column, and then click Lookup (information already on this site).
|
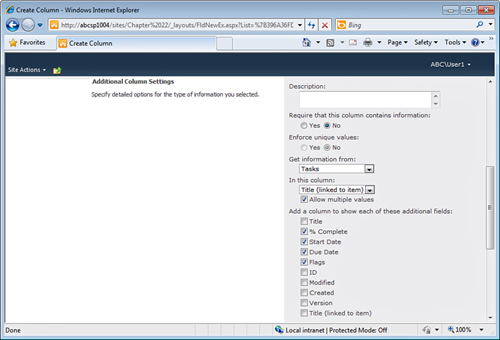
12. | Scroll
down to the Additional Column Settings section, and click the drop-down
menu under Get information From, and select Tasks. The page will update
to now show the columns that are valid lookup columns.
|
13. | Select Title (linked to item) from the list.
|
14. | Check the box next to Allow Multiple Values.
|
15. | Then check the boxes next to % Complete, Start Date, Due Date, and Flags. Leave the other values at their defaults, as shown in Figure 2, and click OK.

|
16. | Click Calendar from the breadcrumb trail to return to the Calendar list.
|
17. | Click the Events tab, and then click New Event from the Ribbon.
|
18. | Enter the following values in the new event:
- Title— Status Meeting
- Location— Meeting Room A
- Start Time— Enter a date and time in the next week
- End Time— Enter a date and time one hour after the start time
- Task Lookup— Click Lookup Task 1 and click the Add button; then click Lookup Task 2, and click the Add button.
Leave the other fields at their defaults and click Save.
|
19. | The
event will now appear on the calendar on the date specified. Click the
name of the event to see the event details, and it should be similar to Figure 3.
Note that even though only the tasks names were selected, the list item
is populated with additional values from the Tasks list: % Complete,
Start Date, Due Date, and Flags information is populated. The links to
Lookup Task1 and Lookup Task2 can be clicked on from this screen to open
the tasks to see additional information.

|
20. | Close the Calendar item window by clicking Close.
|
21. | From the Calendar, click the Calendar tab, and then click List Settings.
|
22. | Locate the Task Lookup:% Complete column, and click it. Change the column name to Task % Complete
and click OK. Note that the name of the column is now changed without
breaking the functionality of the column. So, the administrator can make
these lookup column titles more user friendly than the default names
that are assigned.
|
An additional option provided
in a lookup column is to Enforce Relationship Behavior. While
experimenting with this functionality, it is not unusual to see a
message display that states “This lookup field cannot enforce a
relationship behavior because this list contains incompatible fields.”
The following example provides a case where Enforce Relationship
Behavior can be tested.