Logo
programming4us
programming4us
programming4us
programming4us
Home
programming4us
XP
programming4us
Windows Vista
programming4us
Windows 7
programming4us
Windows Azure
programming4us
Windows Server
programming4us
Windows Phone
 
Windows Server

SharePoint 2010 : Working with Lookup Columns in Document Libraries (part 2) - Testing Enforce Relationship Behavior

- Free product key for windows 10
- Free Product Key for Microsoft office 365
- Malwarebytes Premium 3.7.1 Serial Keys (LifeTime) 2019
3/30/2011 6:31:00 PM

Testing Enforce Relationship Behavior

To continue the process of understanding lookup columns, the Enforce Relationship Behavior setting needs to be experienced. The example provided in this section leverages an Announcements list and a lookup column to connect to a list of donated items, which makes it easy for an organization to create an announcement when someone offers an item of value to other employees. The Restrict Delete setting will be applied to ensure that once the announcement has gone out, the details of the donated item are still available. Restrict Delete means that the child item cannot be deleted because it is related to an item in the “parent” list. Following that configuration, the Cascade Delete option will be configured, and in that case, the deletion of the child item causes a deletion of the parent item.

This example scratches the surface of what’s possible in enforced relationships between lists but provides a real-world example that can be leveraged in numerous ways within the organization. Database developers will immediately see the similarities between this capability and the types of joins and other interactions possible between database tables and will no doubt be able to leverage lookup columns in many creative ways.

Follow these steps to create two lists and leverage the Enforce Relationship Behavior setting:

1.
Create a new site using the Team Site template.

2.
Create a new list using the Custom List template and name it Donations.

3.
From the Donations list, click the List tab, and then click List Settings.

4.
Scroll down and click the Create Column link.

5.
Name the new column Item Description and check Single Line of Text; leave the other settings and click OK.

6.
Return to the list all items view by clicking the list name in the breadcrumb.

7.
Click Add New Item.

8.
Enter a title for the entry, such as Kodak Z7590 Camera, and enter text in the Item Description field such as 5.0 Megapixels, 10x zoom, very portable, works great.

9.
Click All Site Content from the Quick Launch, and click Announcements in the Lists section of the page.

10.
In the Announcements list, click the List tab, and then click List Settings.

11.
Scroll down and click Create Column.

12.
Title the column Donation Lookup and select the Lookup type of column.

13.
In the Additional Column Settings section of the screen, click the drop-down menu under Get Information From, and select Donations. Verify that Title appears in the drop-down menu under In This Column. Check the box next to Item Description in the next section down, as shown in Figure 4.
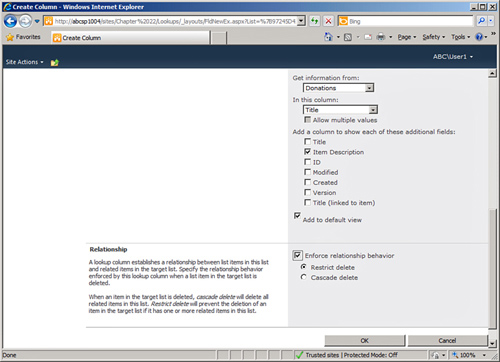
Figure 4. Selecting the Enforce Relationship Behavior option for a lookup column.

14.
Check the box next to Enforce Relationship Behavior, and then check the circle next to Restrict Delete, as is also shown in Figure 4.

15.
Click OK. Click OK for the message “This column must be indexed to enforce a relationship behavior. Do you want to index this column.”

16.
Click the Announcements link from the breadcrumb to return to the All Items view of the Announcements list.

17.
Click the Add New Announcement link.

18.
Enter a title for the announcement (for example, Generous donation!). Click the drop-down list in the Donations Lookup field and select Kodak Z7590 Camera. Click OK. The result should look like Figure 5.
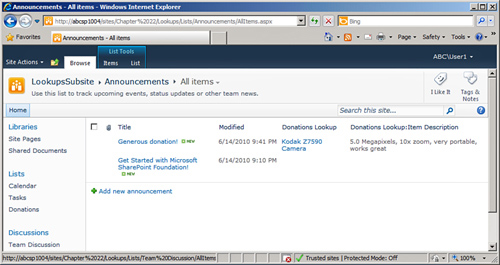
Figure 5. Announcement with lookup information.

19.
Return to the Donation list by clicking its link in the Quick Launch.

20.
Access the drop-down menu for the list item entered in steps 7 and 8, and click Delete Item. Click OK to confirm the deletion. An error message will appear, stating “This item cannot be deleted because an item in the ‘Announcements’ list is related to an item in the ‘Donations’ list.”

Tip

Use lookup columns with the Enforce Relationship Behavior option and Restrict Delete to ensure that the target item of the lookup can’t be deleted if it is referenced by an item in the “parent” list.

21.
Next, the lookup column will be set to Cascade Delete. Start by clicking All Site Content from the Quick Launch, and click Announcements from the Lists section.

22.
Click the List tab, and then click List Settings.

23.
Scroll down to the Columns section and click Donations Lookup column.

24.
Scroll down to the Relationship section, and this time select Cascade Delete. Click OK.

25.
Navigate to the Donations list by clicking its link in the Quick Launch.

26.
Access the drop-down menu for the list item (Kodak Z7590 Camera in this example) and click Delete Item. A message will appear, stating “Sending this item to the site Recycle Bin will also send any related items in the following lists to the site Recycle Bin: [Announcements]. Are you sure you want to send the item(s) to the site Recycle Bin?” Click OK.

27.
Navigate to the Announcement list to verify that the announcement is also deleted.

Tip

When related items are deleted in a Cascade Delete enforced relationship, restoring the child item from the Recycle Bin also restores the related item.

Other -----------------
- Managing Metadata and Content Types in SharePoint 2010 : Differences in Multiple Lines of Text Columns in Libraries and Lists
- BizTalk 2010 Recipes : Document Mapping - Using XSLT Call Templates
- Windows Server 2008 R2 Disks
- Windows Server 2008 R2 : File System Access Services and Technologies
- Windows Server 2008 R2 File System Overview/Technologies
- Reviewing the Column Choices in SharePoint 2010 (part 2) - Leveraging Validation Settings & Enforcing Unique Values in Columns
- Reviewing the Column Choices in SharePoint 2010 (part 1) - An Introduction and Practical Application of Calculated Columns
- SharePoint 2010 : Working with Metadata in a Word 2010 Document and Document Libraries
- Windows Server 2008 Server Core : Configuring Directory Services - Creating New Objects Using the DSAdd Utility (part 2)
- Windows Server 2008 Server Core : Configuring Directory Services - Creating New Objects Using the DSAdd Utility (part 1)
 
 
Top 10
- Microsoft Visio 2013 : Adding Structure to Your Diagrams - Finding containers and lists in Visio (part 2) - Wireframes,Legends
- Microsoft Visio 2013 : Adding Structure to Your Diagrams - Finding containers and lists in Visio (part 1) - Swimlanes
- Microsoft Visio 2013 : Adding Structure to Your Diagrams - Formatting and sizing lists
- Microsoft Visio 2013 : Adding Structure to Your Diagrams - Adding shapes to lists
- Microsoft Visio 2013 : Adding Structure to Your Diagrams - Sizing containers
- Microsoft Access 2010 : Control Properties and Why to Use Them (part 3) - The Other Properties of a Control
- Microsoft Access 2010 : Control Properties and Why to Use Them (part 2) - The Data Properties of a Control
- Microsoft Access 2010 : Control Properties and Why to Use Them (part 1) - The Format Properties of a Control
- Microsoft Access 2010 : Form Properties and Why Should You Use Them - Working with the Properties Window
- Microsoft Visio 2013 : Using the Organization Chart Wizard with new data
 
programming4us
Windows Vista
programming4us
Windows 7
programming4us
Windows Azure
programming4us
Windows Server