The basic concepts associated with backup and restore
operations are easy to understand. Backups capture data, and restore
operations put that data back. The devil is always in the details,
though, and this is especially true with SharePoint’s backup and restore
capabilities. Before attempting any form of backup or restore with
SharePoint, you need to check a number of line items in a rather lengthy
checklist.
The good news is that once you
have configured your environment properly for backup operations, there
is little else that you must configure to successfully conduct restore
operations.
Backup Settings
Only a handful of high-level
settings exist for configuration of catastrophic backup and restore
operations within Central Administration, and you access these through
the Configure Backup Settings link on the Backup and Restore page.
Clicking this link takes you to the BackupSettings.aspx page, as shown in Figure 1.
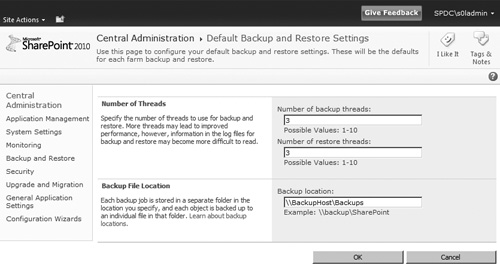
Number of Threads
SharePoint 2010 gives you
control over the number of threads that are spun-up to carry out both
catastrophic backup and catastrophic restore operations. By default,
each of these operations is configured to utilize three threads during
execution.
If you aren’t familiar
with threading, it is easiest in this scenario to equate a thread with
an object that is being backed up or restored. Specifying three backup
threads, for example, roughly translates into three objects being backed
up in parallel during the execution of the backup operation. Three
restore threads, on the other hand, means that three objects at a time
can be restored
simultaneously. The greater the number of threads of execution, the
greater the degree of parallelism and the faster you can potentially
process your objects for catastrophic backup or restore.
So, what is to stop you from
dialing your backup and restore threads up to their maximum value of 10?
First of all, there is the obvious warning on the BackupSettings.aspx
page indicating that it could become difficult to interpret the log
files that are generated during the backup and restore operations. With
10 concurrent writers to a single file, the contents are bound to appear
jumbled.
More important than
jumbled log files, though, is the potential impact that 10 threads of
parallel execution carries with regard to server resources. Processing
10 objects at once puts a significantly greater strain on the memory,
CPU, and disk resources of your SharePoint servers than processing only 3
objects at a time. In addition, streaming backup or restore data for 10
objects at once across a network places a greater load on your
infrastructure if it is involved in the equation. At the extreme, this
extra load could simply cause thrashing at one or more bottleneck points
on your servers and infrastructure, leading to poorer overall
performance instead of better.
As with most dials, some amount
of experimentation is required to find the sweet spot that allows you
to maximize your catastrophic backup and restore performance without
unintended side effects. Consider running multiple backup and restore
operations as a test, and vary only the number of threads in use for
each one. While conducting these tests, pay attention to the memory,
CPU, and disk load being placed on each server and infrastructure
component that is involved in the backup or restore operation. Once you
have found settings that offer the desired balance of performance and
system load, lock them in and document them. Remember, too, that
settings are specific and relevant only to the environment in which they
were tested and measured.
Backup File Location
Your choice of
catastrophic backup location is an important one. Microsoft recommends
that you use local disks whenever possible for maximum performance, and
this recommendation is easily observed when all elements of the
SharePoint farm, including SQL Server, are installed on a single
physical or virtual server. In the case of an all-in-one server, local
drive references for both SharePoint and SQL Server point to the same
location on the drive-mapped storage medium.
For most
practical purposes, multiserver SharePoint farms that intend to leverage
SharePoint’s catastrophic backup and restore capabilities must be able
to reach a network share that is accessible through a UNC path
specification. Microsoft also suggests that network shares with 1
millisecond or less of latency between themselves and the SQL Server(s)
housing SharePoint content should perform well.
When you select a backup file location on the BackupSettings.aspx
page, SharePoint doesn’t help you with any of the latency-related
issues described thus far. SharePoint does, however, notify you of
problems and potential remedies if you try to specify an invalid
location, as shown in Figure 2.
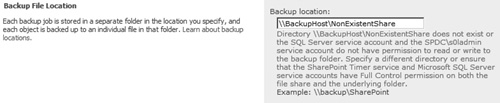
You
can only accept changes by clicking the OK button after valid settings
have been supplied. If valid settings cannot be supplied, the only
option is to click Cancel.
Services, Accounts, and Permissions
The execution of
backup and restore operations through Central Administration engages
quite a few moving parts. Each time one of these operations is
attempted, a number of different services, file locations, and security
contexts end up in the mix. Understanding the interactions of these
elements is essential to proper backup configuration and
troubleshooting.
Understanding the Security Context
The key to
understanding backup and restore operations that are initiated through
Central Administration is realizing that little actually happens within
the security context of the currently logged-on administrator. Instead,
administrators configure and prepare operations, such as a backup, that
are then handed off to other services for execution. The following list
of actions roughly represents the steps that are carried out when a full
farm catastrophic backup is run:
1. | You, the administrator, specify the parameters of the backup operation.
|
2. | A SharePoint Timer service backup job is created and scheduled for one-time execution using the settings you specified.
|
3. | During
a sweep, the Timer service begins execution of the backup job and
engages SQL Server for some of the required backup operations.
|
4. | Both the Timer service and SQL Server write directly to the designated backup area to carry out the backup.
|
5. | Upon completion, SQL Server is disengaged and the Timer service backup job completes.
|
6. | The backup is finished.
|
In the execution of the
previous steps, the only step that actually occurs within your
administrative account context is step 1. Each step after the first one
occurs within the context of a service account. Timer service actions
are carried out in the context of the SharePoint farm database
access account—the same account that is used as the Central
Administration site’s IIS application pool identity. SQL Server actions
are carried out in the context of the account under which the SQL Server
database engine is running. This differs significantly from the backup
and restore operations that are carried out through PowerShell, where
your administrative account context is the one that is primarily
utilized for SharePoint operations.
Services and Their Accounts
Ensuring that the
appropriate services are enabled and possess the necessary privileges to
carry out backup and restore tasks can be tricky. Thankfully, Central
Administration provides some useful guidance to ease the burden of
configuration in this area. At the top of each backup and restore
application page within Central Administration is a Readiness area. For
each backup and restore operation exposed, Central Administration alerts
you to the services that need to be running and their current state of
readiness for the desired operation. Figure 3 illustrates the Readiness area when a catastrophic backup operation is selected and you are directed to the Backup.aspx page.

If either the Timer service or the Administration service isn’t started when you navigate to the Backup.aspx
page, you receive a warning and a red exclamation mark instead of the
check mark for the affected service(s). You can continue your
configuration of the backup operation, but attempts to start a backup
without addressing the Readiness warnings result in an error and
failure.
Note
Readiness warnings
identify the Timer service as the Microsoft SharePoint Foundation Timer
2010 service and the Administration service as the Microsoft SharePoint
Foundation Administration 2010 service. If you attempt to locate
services with these names in the Microsoft Management Console (MMC)
Services snap-in, you won’t find them. In reality, these services appear
in the Services snap-in as the SharePoint 2010 Timer service and the
SharePoint 2010 Administration service, respectively.
In addition to the
aforementioned services running, you need to address a couple of
permission issues before carrying out a catastrophic backup or restore
operation. As mentioned in the full farm catastrophic backup example
earlier, both the SharePoint Timer service and the SQL Server service
read from and write to the backup file location you specify. For these
services to carry out their
duties, the accounts that the SharePoint Timer service and SQL Server
service run under must have Full Control permissions on the backup file
location for catastrophic backup and restore operations. If one or both
of the accounts that are associated with the services lack the
permissions they require on the backup file location, your requested
operation will fail.
Note
If your SQL Server service
is configured to use one of the built-in accounts such as Network
Service, be aware that SQL Server presents itself to network resources
using the machine’s computer account—not a separate domain user account.
The access requirements are
slightly different in the case of Granular Backup and Restore
operations. Each of these operations is carried out by the SharePoint
Timer service alone. SQL Server is not involved, so the rights of the
SQL Server service account aren’t a factor. For Granular Backup and
Restore operations, only the SharePoint Timer service must have Full
Control permissions on the backup file location.
User Accounts
Even though Central
Administration hands off the actual execution of backup and restore jobs
to service accounts, there are still some rights that you, the
administrator, require to access and carry out the necessary
configuration steps.
Granular Backup.
To access Granular Backup functions, you require nothing more than
membership in the Farm Administrators group. If you aren’t a member of
the Farm Administrators group, it is generally pretty obvious because
you can’t access Central Administration.
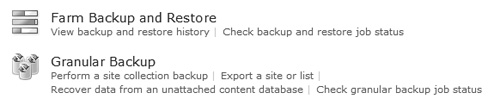
Farm Backup and Restore.
The catastrophic backup and restore functions that are available within
Farm Backup and Restore require that you are a member of the local
Administrators group on the server housing Central Administration. If
you are not a member of the server’s Administrators group but are a
member of the Farm Administrators group, a couple of the Farm Backup and
Restore functions are still available. As Figure 4
illustrates, though, the critical links to access backup, restore, and
settings configuration pages are removed via security trimming.
Full Backups Versus Differential Backups
One
of the options that is available to you when you are preparing a
catastrophic backup is whether to perform a full backup or a
differential backup. A full backup performs a complete backup of all
objects you select, whereas a differential backup only performs a backup
of the selected objects that have changed since the last full backup.
By extension, this means that differential backups tend to be smaller
than full backups—an attractive consideration if you are trying to make
the most of your investment in disk storage.
As stated, differential
backups only capture changes that have been made to the selected objects
since the last full backup. For differential backups to work, a full
backup of the selected objects must exist as a point of comparison to
identify what has changed. Without a full backup as a point of
comparison, you cannot perform differential backups. If you attempt to
create a differential backup without first having taken a full backup,
SharePoint simply throws up an informative error and aborts the
operation.
Caution
When mixing and matching
full and differential backup types, we have a simple recommendation: the
first backup created in the file backup location should be a full farm
catastrophic backup. If you begin with a full farm catastrophic backup,
you can subsequently execute a differential backup of any farm object
(including the full farm) without fear of potential problems or loss.
You can run into trouble if you try the opposite scenario, such as
executing a full backup of only a Web application followed by a
differential backup of your entire farm. SharePoint allows you to
execute this sequence of backup operations without error, but subsequent
catastrophic backups, whether full or differential, never capture more
data than just the original Web application until you perform a full
backup of greater scope. This scenario can be confusing and result in
unintentional data loss if you mistakenly expected the second full farm
differential backup to contain data for more than just the Web
application that was originally captured.
Using Unattached Content Databases
Another interesting
addition to the toolbox of Central Administration capabilities in
SharePoint 2010 is the ability to browse and recover data from
SharePoint content databases that are not attached to the farm, as shown
in Figure 5.
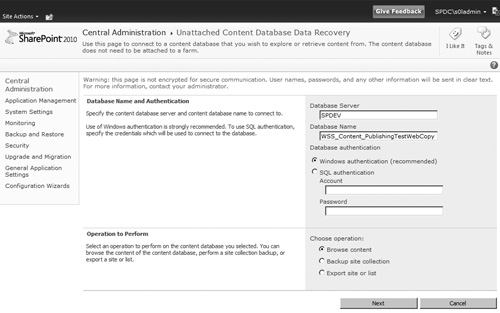
The UnattachedDbSelect.aspx page shown in Figure 9.15
is the entry point to working with unattached content databases, and
you can access it easily from the Backup and Restore page through the
Recover Data from an Unattached Content Database link. From this area,
it is possible to browse a content database, back up a site collection
within the content database, or export content directly from the
database.
To understand why this
feature is so powerful, you must first understand some of the
constraints of content databases and how recovery operations from them
were handled in the past.
Content Recovery Prior to SharePoint 2010
This
article spends a great deal of time discussing how to handle
catastrophic backup and restore scenarios, but in reality catastrophic
farm failures occur infrequently. On a day-to-day basis, administrators
more commonly find themselves faced with the problem of content loss in
some limited form. Whether through error, unintended or accidental site
deletion, or some other set of circumstances, users lose content from
within their SharePoint sites. This type of loss doesn’t constitute a
catastrophic failure; nonetheless, there is a real need for some type of
recovery from a catastrophic backup of the content database that housed
the content prior to its deletion or loss.
With SharePoint 2007, this type
of recovery scenario presented some specific challenges. In most of
these content recovery scenarios, the desire wasn’t to replace the
entire content database from backup. The goal was to simply recover a
specific item, list, site, and so on that had been deleted. These
object-level recovery scenarios were possible, but they were difficult
with SharePoint’s native backup/recovery and export/import tools.
Without additional tools, you commonly executed such a recovery
according to the following series of steps:
1. | You, the administrator, were notified of the lost content and asked to recover it from backup.
|
2. | You
needed to locate a backup of the content database that contained the
lost content. The backup could take the form of a SharePoint
catastrophic backup, a SQL Server database backup, or something else
entirely.
|
3. | You
restored the content database to a separate recovery farm
environment—or at least a farm that was not the current production farm.
|
4. | After
attaching the content database to a Web application in the recovery
farm, you located the object to be recovered and exported it. Such an
export was typically conducted through an STSADM.exe –o export operation.
|
5. | The export package that was generated from step 4 was copied to the production farm environment.
|
6. | In the production farm environment, the export package was imported to the appropriate site or other container using an STSADM.exe –o import operation.
|
7. | The recovered content was available for users once the import operation completed.
|
The greatest pain in this
sequence of steps typically centered on the recovery farm requirement
described in step 3. Why was an entirely separate SharePoint farm needed
just to recover some content? The answer, quite simply, is because two
copies of the same content database cannot be attached to the same
SharePoint farm at once. Every content database in SharePoint possesses a
GUID that differentiates it from all other content databases. If you
attempt to attach a content database possessing a specific identifier to
a farm where a database with that same identifier is already attached,
the operation fails.
In the case of a content
database that was restored from backup under SharePoint 2007, it wasn’t
possible to leverage the SharePoint object model (including the
functionality within the Content Deployment API that is needed for the STSADM –o export
operation) to recover objects from the database without first attaching
that database to a farm. The option to first detach the existing
content database from the production farm was always a possibility, but
it involved taking down all site collections housed in the target
content database—not just the site collection that was tied to the
content recovery operation. In most cases, the practical response to
these constraints was the use of a separate farm for recovery purposes.
Content Recovery Improvements in 2010
SharePoint 2010 simplifies
content recovery efforts tremendously by allowing you to work with
content databases and perform object model operations against those
databases without requiring that the databases are attached to a
SharePoint farm. This means that a recovery farm is no longer needed,
because SharePoint 2010 can continue to work with a production content
database that is attached to the farm at the same time it is exporting
content from an unattached copy of the same content database that was
restored from backup. In short, two copies of the database are present
in SQL Server, but only one of them is actually attached to the
SharePoint farm.
Note
For
the record, there isn’t anything stopping you from using the unattached
database recovery capability to back up or export data from a normal
production database that is actually still attached to the farm. This
capability is redundant with the site collection backup and content
export functions that are built into Central Administration, though, so
an actual usage scenario involving unattached recovery from an attached
database is left up to your imagination.
Removing the need for a
recovery farm obviously saves you the cost and overhead associated with
the maintenance of an additional SharePoint environment. It depends on
your specific needs and SharePoint environment, but the unattached
content database recovery capabilities of SharePoint 2010 may also allow
you to meet more aggressive recovery time objectives (RTOs) for content
restore operations. With SharePoint 2007, recovery farms were commonly
built as virtualized environments that lacked the processing power and
resources of their associated production environments. A fair amount of
time during content recovery operations was spent locating backups,
moving them between environments, patching the recovery environment to
an equivalent or greater version than production, and other “busy work”
tied to the second farm environment. With the ability to execute a
database restore and content recovery in one farm environment, much of
that extra time and overhead goes away or is at least reduced.
