SharePoint 2007 brought integrated Recycle Bins to
the platform, and they remain in SharePoint 2010 as a cornerstone of the
end user self-service recovery landscape.
How They Work
If you have worked with any
version of the Windows operating system since Windows 95, you are
probably well acquainted with the concept of a Recycle Bin and its
operation. When content is deleted from the file system in Windows, it
isn’t immediately deleted from the hard drive or local media where it is
located if a Recycle Bin is active for that location. Instead, the
deleted content is moved from where it resides to a special system
folder.
Recycle bins address the end
user problem of unintentionally and accidentally deleted content. If
content is accidentally deleted from the Windows file system, you can
recover it from the Recycle Bin and put it back into general
availability within the file system. Deleted content sits in the Recycle
Bin until it is either recovered or deleted (emptied) from the Recycle
Bin.
Content that is emptied from
the Recycle Bin is permanently deleted. Third-party tools exist that can
help with the recovery of content that is permanently deleted from the
Windows file system, but no mechanism is built into the operating system
to assist in this regard.
Recycling in SharePoint
SharePoint’s
Recycle Bin system is conceptually similar to the Recycle Bin that the
Windows operating system employs, but there are a handful of noteworthy
differences and points worth discussing:
SharePoint Recycle Bins are configured at the Web application level.
You can configure Recycle Bin settings for each Web application in your
SharePoint farm through the Web Application General Settings dialog box
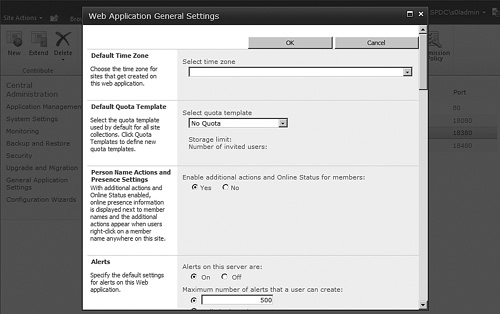
in the Central Administration site, as shown in Figure 1. By default, each newly created Web application is provisioned with the settings shown in Figure 1, and these settings apply to all site collections that are created within the Web application.
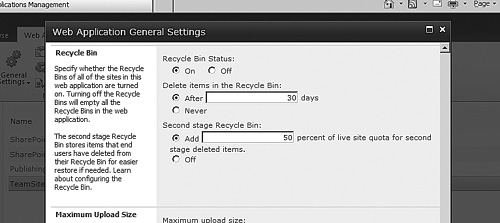
The SharePoint Recycle Bin has two configurable stages. As shown in Figure 1,
SharePoint’s Recycle Bin system actually has two separate stages. When a
user deletes an item, a document, or some other content from a site
collection, the deleted item is moved into the first stage Recycle Bin.
The first stage Recycle Bin is an area from which end users can recover
their own documents; it is basically the equivalent of their own
personal Recycle Bin. If a user then deletes an item from the first
stage Recycle Bin, the item is actually moved from the first stage
Recycle Bin to the second stage Recycle Bin. Only site collection
administrators can recover items from the second stage Recycle Bin. When
items have been deleted from the second stage Recycle Bin, they are
permanently deleted. By default, both the first and second stage Recycle
Bins are enabled in a Web application, so site collections created in
the Web application have first and second stage Recycle Bins available
to them.
Recycle Bin contents can be auto-expired. Items
in the first and second stage Recycle Bin areas have a lifetime of 30
days by default. After 30 days, these items are permanently deleted
regardless of their Recycle Bin stage. This means that items in the
first stage of the Bin are permanently deleted, as well; there is no
promotion or movement of items from the first to the second stage of the
Recycle Bin after the expiration period has elapsed, for example. You
can adjust the auto-deletion period for items or turn it off entirely
for site collections in a Web application using the Web Application
General Settings dialog box.
The size of the Recycle Bin is configurable.
To be more specific, the amount of storage available to the second
stage Recycle Bin is configurable. There is no separate storage set
aside for items in the first stage Recycle Bin; items count against any
maximum storage quota that has been established for a site collection.
The second stage Recycle Bin, on the other hand, is allotted an
additional amount of storage that is equal to 50 percent of the amount
allotted to the site collection by the quota template that is in effect.
You can adjust this percentage from 1 percent all the way up to 500
percent. There are no size restrictions on a site collection’s first and
second stage Recycle Bins if no quota template is in effect for the
site collection.
Configuring Recycle Bins
By default, both Recycle Bin
stages are enabled for new site collections that are created in a Web
application that utilizes the default Recycle Bin settings. This means
that end users automatically gain Recycle Bin protection for their site
collections, but the Web application defaults don’t include safeguards
to prevent uncontrolled site collection growth. Applying reasonable
limits for Recycle Bin usage and site collection growth is relatively
easy to do if you have Farm Administrator access within the Central
Administration site.
First, you must create a quota
template for assignment to the target Web application. The quota
template then becomes the basis for the limits that are placed on the
size of the first and second stage Recycle Bins on newly created site
collections within the Web application.
Second, you must
configure the target Web application to use the quota template by
default for new site collections when they are created. While the quota
template is being assigned, the Web application settings are also
adjusted to set desirable Recycle Bin limits for site collections
created within the Web application based on values that are specified in
the quota template.
Creating a Web Application Quota Template
The example that follows demonstrates how to use Central Administration to create a new quota template called 500MB Maximum Template
that restricts site collections that use the template to no more than
500MB, as suggested by its name. You can then use the quota template in
the next walk-through titled “Configuring a Web Application’s Recycle Bin Settings.”
Before attempting this
walk-through, ensure that you are a member of the SharePoint Farm
Administrators group. In addition, make sure that you are logged into a
computer that can access the SharePoint Central Administration site.
This is often your own workstation, but in some highly secure
environments, access to the Central Administration site may be
restricted to only a select group of servers and workstations.
Open
a browser and navigate to the Central Administration site. This example
uses a fictitious SharePoint 2010 Server farm with a Central
Administration site URL of http://spdev:18080.
If you intend to follow along in your own environment, simply
substitute your farm’s Central Administration site URL where
appropriate.
Depending
on the configuration of both the SharePoint farm and your client
browser, you may be prompted to log into the Central Administration
site. If you are so prompted, supply both your username and password. In
most cases, your username and password are your domain login
credentials.
When the Central Administration site loads, navigate to the Application Management page, as shown in Figure 2.
You do this by clicking the Application Management link in the Quick
Launch menu along the left side of the page. Alternatively, you can
click the Application Management link in the top-left region of the main
zone on the page.
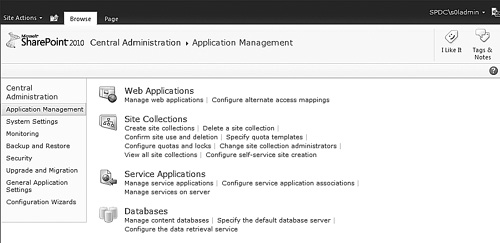
Click
the Specify Quota Templates link. It is the fourth link under the Site
Collections section in the main zone of the page, and it takes you to
the Quota Templates page.
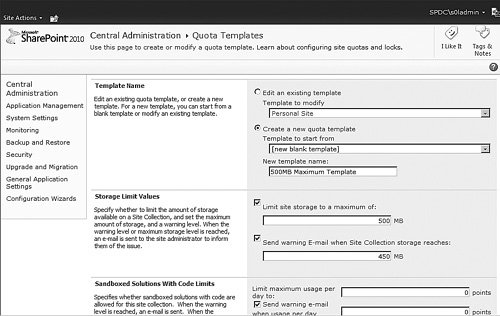
Select
the option button to Create a New Quota Template, and leave the
starting template default value intact so the quota template isn’t based
on another quota template. In the New Template Name text box, enter 500MB Maximum Template.
In
the Limit Site Storage to a Maximum Of text box, supply a value of 500.
This prevents new site collections that are created in a Web
application using the quota template from growing beyond 500MB. Ensure
that the check box associated with the text box remains checked.
In
the Send Warning E-Mail When Site Collection Storage Reaches text box,
supply a value of 450 and ensure that the associated check box remains
checked. If the site collection grows to 450MB or greater, an e-mail is
sent to the primary and secondary (if specified) site collection
administrators for the site collection warning that the storage
threshold has been crossed.
Leave the Sandboxed Solutions with Code Limits controls intact with their default values.
Note
If you intend to execute
sandboxed solutions in one or more of the site collections associated
with the Web application that a quota template will be applied to, you
must specify usage limit point values that are greater than the defaults
of zero; however, the use and configuration of sandboxed solutions is
beyond the scope of this book.
When you have executed these steps, the settings for the new quota template to be created should appear as in Figure 3. To actually create the quota template, scroll to the bottom of the page and click the OK button.
Configuring a Web Application’s Recycle Bin Settings
With a quota template in hand,
you are ready to configure the Web application of your choice. In this
example, a fictitious Web application with a URL of http://spdev:18380/
is configured to use the 500MB Maximum Template quota as the default
quota template for new site collections that are created within it. The
assignment of the quota template permits limits to be set on the amount
of storage consumed by new site collections that are created within the
Web application. A reduction in the size of the second stage Recycle Bin
to a limit of 100MB per new site collection is also carried out in this
example.
Before attempting this
walk-through, ensure that you are a member of the SharePoint Farm
Administrators group. In addition, make sure that you are logged into a
computer that can access the SharePoint Central Administration site.
This is often your own workstation, but in some highly secure
environments, access to the Central Administration site may be
restricted to only a select group of servers and workstations.
Repeat
steps 1 through 3 in the previous walk-through to arrive at the
Application Management page in the Central Administration site.
Click
the Manage Web Applications link. It is the first link under the Web
Applications section in the main zone of the page, and it takes you to
the Web Applications Management page.
If you are new to the Fluent UI, also known as “the ribbon,” Figure 4
may not be familiar to you. Many of the functions that are performed on
Web applications are performed through the ribbon once a Web
application has been selected. The first step in working with the ribbon
is ensuring that it is visible. If you don’t see the ribbon as shown in
Figure 4, you probably have the Browse tab selected. Click the Web Applications tab that is circled in Figure 4 to make the ribbon visible.
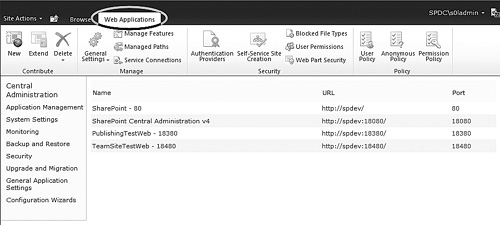
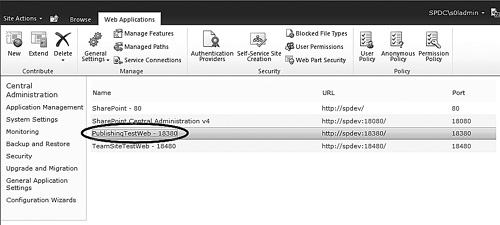
The Web application of interest in this example is the PublishingTestWeb – 18380 Web application with a URL of http://spdev:18380/. To select the Web application, click on the Web application link shown in Figure 5.
Once you have selected the Web application, the links and menus in the
ribbon shift from grayed-out and inactive to live and available.
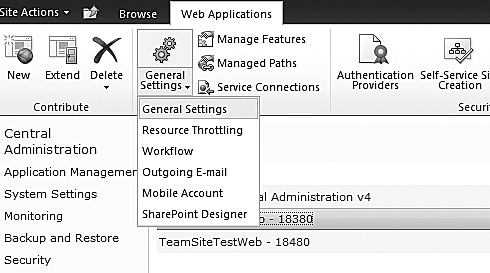
Expand the General Settings drop-down menu in the ribbon, as shown in Figure 6, and select the General Settings menu item. Doing so opens the Web Application General Settings dialog box pictured in Figure 7.
The
Select Quota Template drop-down selection box appears in the Default
Quota Template section, and by default it is set to No Quota. If the
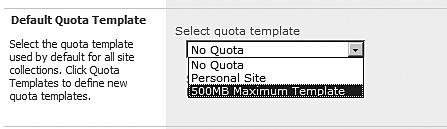
last walk-through was completed successfully, the 500MB Maximum Template should appear in the list of available quota templates, as shown in Figure 8.
Select it so that new site collections that are created within the Web
application are constrained to no more than 500MB by default.
Scroll down to the Recycle Bin section, as shown earlier in Figure 1.
Items that are placed in the first stage Recycle Bin count against the
maximum storage of 500MB per site collection, but this is not true of
the second stage Recycle Bin. The 50 percent additional storage
allocation means that deleted items that end up in the second stage
(site collection) Recycle Bin could consume up to an additional 250MB of
storage. To tighten up the amount of extra space that might be
consumed, change the Percent of Live
Site Quota for Second Stage Deleted Items value from 50 to 20. Once you
make this change, items in the second stage Recycle Bin are then only
able to consume up to an additional 100MB of storage (that is, 20
percent of 500MB) on top of the 500MB already allocated per new site
collection in the Web application.
Scroll down to the bottom of the Web Application General Settings dialog box and click the OK button to apply the changes made.
Note
If you have been
reading carefully, you have probably noticed that quota-related changes
to a Web application affect only new site collections that are created
within the Web application after a quota template has been assigned. At
the same time, it is possible to override the default quota template
specified for a Web application during the site collection creation
process. This means that individual site collections within a Web
application may possess a variety of different quota settings. If you
later want to change the quota settings that are applied to an existing
site collection, you need to use the Configure Quotas and Locks link on
the Application Management page or the Set-SPSite Power-Shell cmdlet with its QuotaTemplate
parameter. The Site Collection Quotas and Locks page that appears
provides the mechanism you need to alter the quota and alert settings on
existing site collections. With PowerShell and Set-SPSite, you can script out a process to update the quota template for multiple site collections in one fell swoop.
