A handful of the default
transport agents in Exchange Server 2010 are designed to run on servers
running the Hub Transport role in an Exchange Server organization. These
agents are designed to run against internal traffic as well as the
external traffic that is being routed inside the organization. These
agents are the Transport Rule agent, the AD RMS Prelicensing agent, and the Journaling agent, each of which is described further in the following sections.
Working with Transport Rule Agents
Transport Rule agents is
the generic term used to describe any server-side rule that is run on
the Hub Transport servers. These rules are very similar in design to
Outlook rules, but they are run against the entire organization.
To create a simple transport rule to test these article concepts, perform the following tasks in Exchange Management Console:
1. | From Exchange Management Console, expand Organization Configuration and then click on Hub Transport in the console pane.
|
2. | In the actions pane, click New Transport Rule.
|
3. | From
the New Transport Rule Wizard, enter a descriptive name for the rule
and ensure that the Enable Rule check box is checked. Click Next to
continue.
|
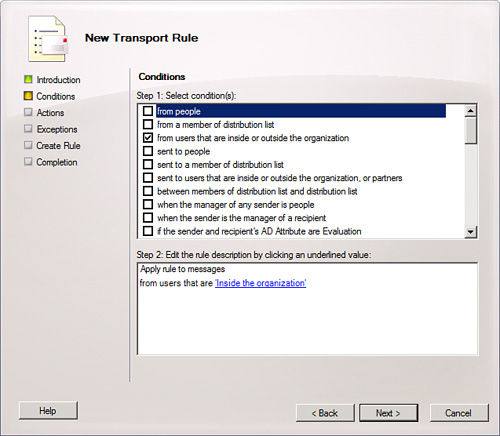
4. | In the Conditions box, shown in Figure 1,
select which conditions the rule will operate under. In this example,
it will fire on messages received from all users inside the company.
Click Next to continue.

|
5. | In the Actions box, select which action to take. Click Next to continue.
|
6. | In the Exceptions box, enter any potential exceptions to the rule, and click Next to continue.
|
7. | Click New to finalize the transport rule creation.
|
8. | Click Finish.
|
Caution
Transport rules
are very powerful, and improperly configuring a transport rule can
result in the loss of mail data or other issues. Use caution when
creating transport rules and always test them in a lab environment
first.
Transport rules use
Active Directory (AD) replication to replicate any changes made to
specific rules. Each Hub Transport server queries AD once every four
hours for changes made to transport agents, and then processes all new
messages based on the changes made to the rules.
Transport agents are
highly customizable, and it is wise to go through the wizards several
times to determine what type of rule functionality is available, and if
your specific organization can take advantage of them.
Note
When a change is made to a
transport rule, it can take multiple hours for that change to be
enforced. This has to do with the fact that the change must be
replicated over AD, which can be set to replicate slowly. In addition,
the Hub Transport servers use a cache to avoid constantly asking AD for
changes. This cache expires in four hours, so it is important to note
how long it can take before a change is properly replicated.
Configuring Rights Management Services Prelicensing Agent
The Rights
Management Services (RMS) Prelicensing agent is a transport agent that
runs on a Hub Transport server to allow for Rights Management processing
of emails. It verifies the authenticity of an email message without
prompting the user for authentication.
The RMS transport agent requires Windows Rights Management Services Service Pack 2 or higher to function properly.
Working with Journaling and Mail Retention Policies in Exchange Server 2010
Journaling in
Exchange Server 2010 is a method by which all copies of emails sent to
or from specific users is backed up and logged. Even if the original
email is deleted, the journaling system has access to the original
content in the email. Journaling is especially relevant
to many organizations looking to comply with governmental regulations
such as SEC Rule 17A-4, SOX, GLBA, HIPAA, the Patriot Act, and NASD
3110.
Exploring the Journaling Licensing Differences
Journaling in Exchange
Server 2010 goes beyond the capabilities present in the older versions
of Exchange Server. Exchange Server now allows for two types of
journaling:
Standard journaling—
Standard journaling is essentially the same journaling mechanism used
in pre-Exchange Server 2007 versions of Exchange Server. This form of
journaling requires that journaling be turned on to all users in a
specific database.
Premium journaling—
Premium journaling offers new capabilities, such as per-recipient
journaling, journal rule replication, and the ability to change the
scope of the journaling rule.
Premium journaling
allows for the scope of the journaling to be performed to be specified.
Options are to limit the scope to Internal, External, or Global. If the
scope is not changed from Internal to External, journaling is not
performed if the user sending the message is not remote.
Note
Premium
journaling requires an Exchange Server 2010 Enterprise Edition client
access license (CAL) to be purchased for each user of the system. This
should not be confused with Enterprise server licenses for Exchange,
which are per-server licenses as opposed to per-client licenses.
Enabling per Mailbox Journaling
Standard journaling is
turned on on a per-database basis. After being turned on, it is on for
all mailboxes within that database. To configure a database for mailbox
journaling, perform the following steps:
Caution
Per-database
journaling is very intensive, and can increase the processing and memory
needed by 25%. It is, therefore, important to understand the
implications of turning on journaling, and to limit the functionality
when possible.
1. | Within the Exchange Management Console, navigate to Organization Configuration and choose the Mailbox node in the console pane.
|
2. | Right-click on the database in the center pane and choose Properties.
|
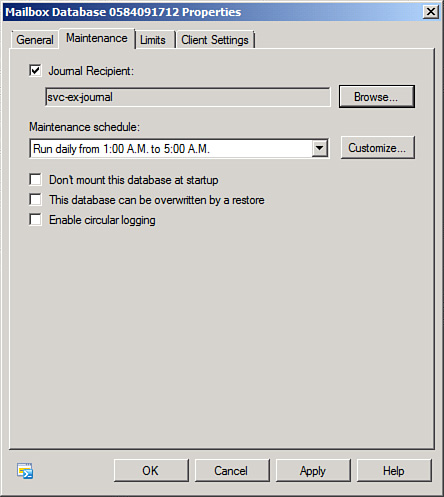
3. | On the Maintenance tab, check the Journal Recipient check box, as shown in Figure 2. Click Browse to select the mailbox that will be used for journaling.

|
4. | Click OK.
|
Caution
The mailbox that is
used for journaling should be closely guarded and protected, as all the
journaled messages from the databases will be stored there.
Creating Journal Rules
Journal rules can
be created to activate the premium journaling options available in
Exchange Server 2010 to those clients with Enterprise Edition Licensing
CALs. To set up a journal rule, do the following:
1. | From Exchange Management Console, click Organization Configuration, and then click the Hub Transport node.
|
2. | In the actions pane, click New Journaling Rule.
|
3. | Enter a descriptive name in the Rule Name field.
|
4. | Click Browse to locate a journal email address where journal reports will be sent.
|
5. | Change the scope to the desired level; this determines on which emails the rule will fire.
|
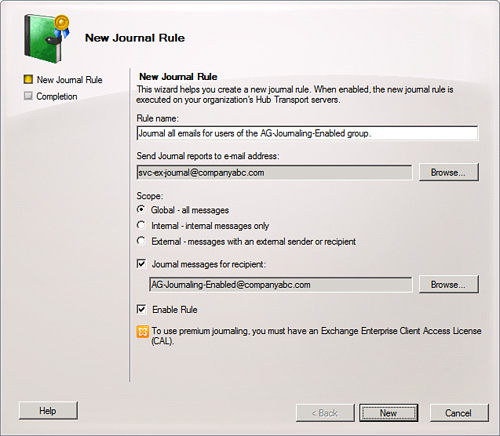
6. | If
you need to limit the journaling to a specific user or group of users,
you can check the Journal E-mail for Recipient check box and click
Browse to locate the group or user, as shown in Figure 3. When you are finished, click New.

|
7. | Click Finish.
|
Setting Up Email Disclaimers
Email
disclaimers have long been a desired feature in Exchange Server. In the
past, complex SMTP event sinks or third-party products have provided
this functionality, but Exchange Server 2010 now includes the built-in
ability to apply a legal disclaimer to the end of all email messages.
The transport rule topology is used for this mechanism.
To add a disclaimer to the Hub Transport role, do the following:
1. | From Exchange Management Console, click on the Hub Transport node under the Organization Configuration.
|
2. | Click New Transport Rule from the actions pane.
|
3. | Under Name, enter a descriptive name for the disclaimer and click Next.
|
4. | Leave the Conditions check boxes blank (so the rule will apply to all messages). Click Next.
|
5. | Click Yes when prompted with the warning about the rule applying to all messages.
|
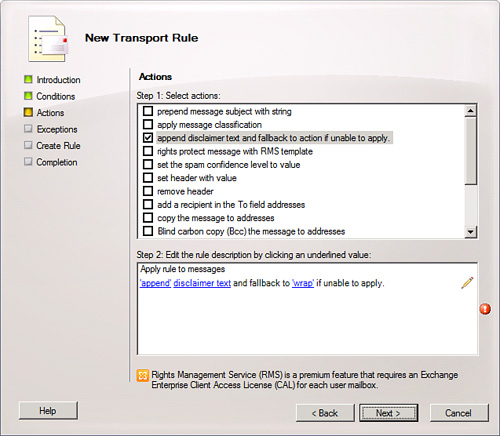
6. | In the Actions box, check the “Append Disclaimer Text...” check box, as shown in Figure 4.

|
7. | Click
the blue text shown in the diagram; this opens dialog boxes allowing
for the disclaimer to be written. Click Next when you are finished.
|
8. | Leave the Exceptions check boxes blank and click Next.
|
9. | Click New.
|
10. | Click Finish. |