Benefits of DHCP
With a DHCP
server installed and configured on your network, DHCP-enabled clients
can obtain IP addresses and related configuration parameters each time
they start and join your network. DHCP servers provide this
configuration in the form of an address lease offer to requesting
clients.
One main advantage of
using DHCP is that DHCP servers greatly reduce the time required to
configure and reconfigure computers on your network. DHCP simplifies
administration not only by supplying clients with IP addresses, but also
(optionally) with the addresses of the default gateway, DNS servers,
WINS servers, and other servers useful to the client. Another advantage
of DHCP is that by assigning IP addresses automatically, it allows you
to avoid configuration errors resulting from entering IP address
information manually at every host. For example, DHCP helps prevent
address conflicts caused when the same IP address is mistakenly assigned
to two hosts.
Installing the DHCP Server Service
To
set up a DHCP server, you must first install the DHCP Server role. This
role is not installed by the Windows Server Setup Wizard by default and
can be added either through the Windows Components Wizard or through
the Manage Your Server window.
To install a DHCP
server through the Manage Your Server window, from the Start menu select
Manage Your Server, click Add Or Remove A Role, and then select the
DHCP Server role. Click Next to begin the installation process.
To launch the
Windows Components Wizard, open Control Panel and double-click Add Or
Remove Programs. Then, in the Add Or Remove Programs window, click
Add/Remove Windows Components. The Dynamic Host Configuration Protocol
(DHCP) component, like the DNS component, is a subcomponent of the
Networking Services component in the Windows Components Wizard.
Note
You
must be logged on as an administrator—for example, a member of the
domain local security group DHCP Administrators or of the global group
Domain Admins—to install and manage a Windows component such as DHCP. |
Tip
Assign a static IP address to the computer on which you install the DHCP server. |
After the
installation wizard has completed, you can verify that the DHCP Server
service has been installed on your computer by opening the DHCP console
administrative tool. To access the DHCP console, click Start, select
Administrative Tools, and then select DHCP.
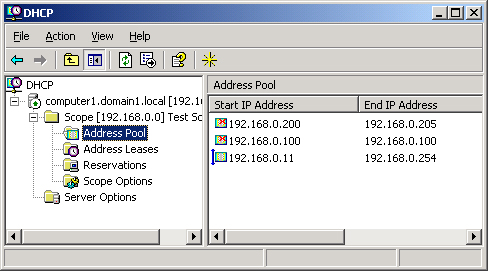
The DHCP console, shown in Figure 1,
is the interface from which you can configure and manage virtually all
features related to your DHCP server, including scopes, exclusions,
reservations, and options.

Authorizing the Server
DHCP
servers must be authorized if they are to be integrated in Active
Directory networks. Only domain controllers and domain member servers
participate in Active Directory, and only these server types can become
authorized. When your network includes Active Directory domains, the
first DHCP server you install on the network must be an authorized DHCP
server.
Stand-alone or
workgroup DHCP servers running Microsoft Windows 2000 Server or Windows
Server 2003 cannot become authorized in Active Directory networks, but
they can coexist with these networks as long as they are not deployed on
a subnet with any authorized DHCP servers. (Note, however, that this
configuration is not recommended.)
Stand-alone DHCP servers implemented together with authorized servers are known as rogue servers.
When a rogue DHCP server running Windows Server 2003 or Windows 2000
Server detects an authorized server on the same subnet, the stand-alone
server automatically stops its own DHCP Server service and stops leasing
IP addresses to DHCP clients.
When the DHCP Server
service is installed on a domain controller, you can perform the
authorization procedure simply by right-clicking the server node in the
DHCP console and selecting Authorize. You can use the following
procedure, however, to authorize DHCP servers hosted on both domain
controllers and member servers.
Note
To
have the necessary permissions to authorize or deauthorize a DHCP
server, you must be a member of the global security group Enterprise
Admins. |
To authorize a DHCP server in Active Directory, complete the following steps:
1. | Open the DHCP console.
|
2. | In the console tree, select DHCP.
|
3. | From the Action menu, select Manage Authorized Servers.
The Manage Authorized Servers dialog box opens.
|
4. | Click Authorize.
|
5. | When prompted, type the name or IP address of the DHCP server to be authorized, and then click OK.
|
6. | When
the Confirm Authorization dialog box appears, click OK again. Click
Close in the Managed Authorized Servers dialog box to return to the DHCP
console. |