Configuring Scopes
A DHCP scope
is a pool of IP addresses within a logical subnet, such as 192.168.0.11
through 192.168.0.254, that the DHCP server can assign to clients.
Scopes provide the essential means for the server to manage distribution
and assignment of IP addresses and of any related configuration
parameters to clients on the network.
Tip
When
a DHCP server uses a given scope to assign addresses to clients on the
local network, the server itself needs to be assigned an address that is
compatible with that scope. For example, if a scope distributes
addresses within the 192.168.1.0/24 range to the local network segment,
the DHCP server interface facing that segment must be assigned a static
address within the same 192.168.1.0/24 range. |
An IP address within a defined scope that is offered to a DHCP client is known as a lease. When a lease is made to a client, the lease is active.
Each lease has a specified duration, and the client must periodically
renew the lease if the client is going to continue to use the address.
The default lease duration value is eight days.
Leases can be renewed
for a variety a reasons. First, a client automatically attempts to renew
its lease after 50 percent of the client lease time elapses. A client
also attempts to renew a lease upon restarting. When a DHCP client shuts
down and restarts, it typically obtains a fresh lease for the same IP
address it had prior to the shutdown. Finally, leases are refreshed when
you execute the Ipconfig /renew command from a DHCP client computer.
You create scopes in
DHCP by using the New Scope Wizard, which you can launch by
right-clicking the DHCP server node in the DHCP console and then
selecting New Scope from the Action menu.
The pages of the New Scope Wizard listed next allow you to configure the corresponding scope features:
Scope Name page This page allows you to assign a name for the scope.
IP Address Range page
This page allows you to specify the starting and ending IP addresses
that define the range of the scope, along with the subnet mask you want
to assign to the distributed addresses.
Add Exclusions page This page allows you to specify the IP addresses within the defined range that you do not want to lease to DHCP clients.
Lease Duration page This page allows you to define the lease duration values. These lease durations are then assigned to DHCP clients.
Configure DHCP Options page This
page allows you to determine whether to configure DHCP options for the
scope through subsequent pages in the New Scope Wizard or later (after
the wizard has completed) through the DHCP console.
Important
If
you select the option to configure DHCP options later, the wizard does
not give you an opportunity to activate the scope. You must activate the
scope manually before it can begin leasing addresses. |
Router (Default Gateway) page (optional) This page allows you to specify which default gateway (and alternates) should be assigned to DHCP clients.
Domain Name And DNS Servers page (optional)
This page allows you to specify both the parent domain to be assigned
to client computers and the addresses of DNS servers to be assigned to
the client.
WINS Servers page (optional)
This page allows you to specify the addresses of WINS servers to be
assigned to the client. Clients use WINS servers to convert NetBIOS
names to IP addresses.
Activate Scope page (optional) This page allows you to determine whether the scope should be activated after the wizard has completed.
You can modify these features later through the DHCP console.
IP Address Range
When defining the
IP address range of a scope, you should use the consecutive addresses
that make up the subnet for which you are enabling the DHCP service.
However, you should also be sure to exclude from this defined range any
addresses of statically configured computers already existing on your
network. To exclude predefined addresses, you can simply choose to limit
the scope range so that it does not include any statically assigned
addresses. Alternatively, you can configure a scope that makes up the
entire subnet and then immediately define exclusion ranges (see the next section) for all of the subnet’s statically addressed computers.
One common method for
handling the need for both static and dynamically assigned addresses
within an address range is to reserve the first 10 addresses within any
subnet for statically addressed servers and to begin the DHCP scope with
the eleventh address. For example, in the subnet 192.168.1.0, you can
keep the addresses 192.168.1.1 through 192.168.1.10 for your statically
addressed servers, such as your DHCP server, your DNS server, your WINS
server, and other servers with addresses that should not change. You can
then define the addresses 192.168.1.11 through 192.168.1.254 as the
range for the subnet’s DHCP scope. (In another common implementation,
the first 20 addresses are reserved for statically addressed servers.)
If
servers on your network have already been configured with static
addresses in the middle of the subnet range, such as 192.168.1.110 and
192.168.1.46, you should use exclusion ranges to keep these addresses
from being assigned to other computers. Otherwise, because each subnet
can use only a single range of IP addresses for its scope, you need to
severely restrict the number of addresses available for lease.
Exclusion Ranges
An exclusion range
is a set of one or more IP addresses, included within the range of a
defined scope, that you do not want to lease to DHCP clients. Exclusion
ranges assure that the server does not offer to DHCP clients on your
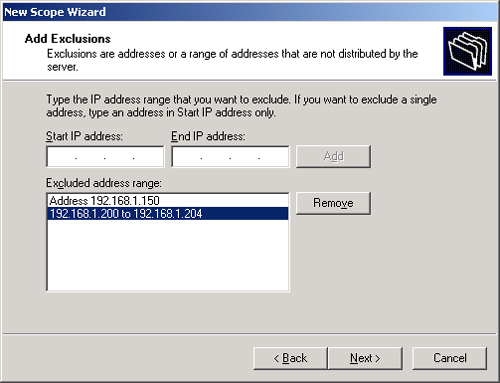
network any addresses in these ranges. For example, Figure 2
shows two exclusion ranges being configured for a new scope, one of
which consist of only one IP address. By setting an exclusion for these
addresses, you specify that DHCP clients are never offered these
addresses when they request a lease from the server.

You can also use
exclusion ranges at the edges of ranges. For example, you can define a
scope’s range as 192.168.1.1 through 192.168.1.254 and then define an
exclusion range of 192.168.1.1 through 192.168.1.10 to accommodate the
servers within the subnet that have IP addresses that are configured
manually (statically).
Tip
Because
Windows Server 2003 recommends that a computer running the DHCP service
have its IP address statically configured, be sure the server computer
has its IP address either outside of, or excluded from, the range of the
scope. |
After you define a DHCP scope and apply exclusion ranges, the remaining addresses form the available address pool within the scope. Pooled addresses are eligible for dynamic assignment by the server to DHCP clients on your network.
Using the 80/20 Rule for Servers and Scopes
To provide fault
tolerance for the DHCP service within a given subnet, you might want to
configure two DHCP servers to assign addresses for the same subnet. With
two DHCP servers deployed, if one server is unavailable, the other
server can take its place and continue to lease new addresses or renew
existing clients.
For balancing DHCP server
use in this case, a good practice is to use the 80/20 rule to divide the
scope addresses between the two DHCP servers. If Server 1 is configured
to make available most (approximately 80 percent) of the addresses,
Server 2 can be configured to make the other addresses (approximately 20
percent) available to clients.
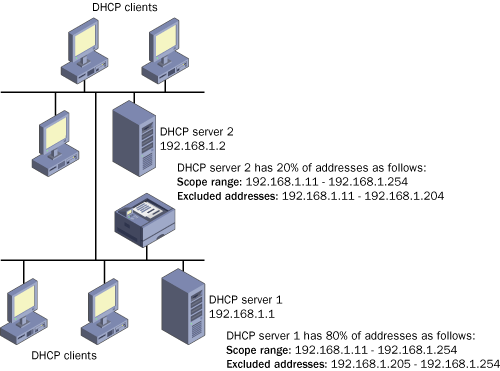
For example, in a
typical subnet with the address 192.168.1.0, the first 10 addresses are
reserved for static addresses, and the IP address range for the DHCP
scope defined on the subnet is 192.168.1.11 through 192.168.1.254. To
comply with the 80/20 rule, both Server 1 and Server 2 define the same
range for the scope, but the exclusions configured on each server
differ. On Server 1, the exclusion range is configured as the final 20
percent of the scope, or 192.168.1.205 through 192.168.1.254; this range
allows the server to lease addresses to the first 80 percent of the
scope’s range. On Server 2, the exclusion range for the scope is
configured as the first 80 percent of the scope, or 192.168.1.11 through
192.168.1.204. This range allows Server 2 to lease addresses to the
final 20 percent of the scope’s range.
Figure 3 illustrates this example of the 80/20 rule.

Creating Reservations
You use a reservation
to create a permanent address lease assignment by the DHCP server.
Reservations assure that a specified hardware device on the subnet can
always use the same IP address. For example, if you have defined the
range 192.168.1.11 through 192.168.1.254 as your DHCP scope, you can
then reserve the IP address 192.168.1.100 within that scope for the
network adapter whose hardware address is 00-b0-d0-01-18-86. Every time
the computer hosting this adapter boots, the server recognizes the
adapter’s Media Access Control (MAC) hardware address and leases the
same address 192.168.1.100.
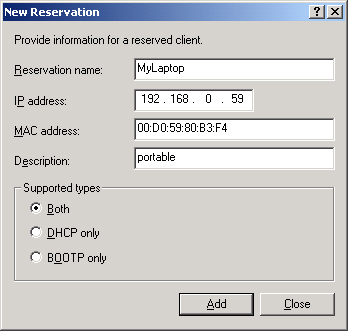
To create a
reservation within the DHCP console, open the scope in which you want to
create a reservation, right-click Reservations, and then select New
Reservation. This procedure opens the New Reservation dialog box, shown
in Figure 4.
To configure a reservation, you must type appropriate values into the
Reservation Name, IP Address, and MAC Address text boxes.

Reservations
cannot be used interchangeably with manual (static) configurations.
Certain computers, such as those hosting a DNS server or a DHCP server,
require their IP addresses to be configured manually and not
automatically by means of a DHCP server. In such cases, reservations are
not a valid alternative to static configurations.
However, you can use a
reservation when you want to assign a specific address to a
non-essential computer. Through this method, you can dedicate an address
while still enjoying the other benefits of DHCP, including centralized
management, address conflict prevention, and scope option assignment.
For example, you might find that a print server’s specific IP address
configuration is more easily managed through a centrally configured
reservation, which is continually renewed, than through a manual
configuration locally at the server. Finally, you should remember that
reservations can be made only to DHCP clients. In other words, a DHCP
server can lease a reservation only to clients that have been configured
to obtain an IP address automatically.
Tip
Look
for questions in which a particular address is simultaneously reserved
and excluded. In such cases, the reservation can’t work. |