Exercise 3: Use Netsh to Manage IPSec
Any task you can
perform with the IP Security Policy snap-in and the IP Security Monitor
snap-in, you can do with the Netsh command. You can also perform tasks
with Netsh that you cannot do from a console, such as the following:
instituting computer startup security, performing computer startup
traffic exemptions, running diagnostics, performing default traffic
exemptions, performing strong CRL checking, performing IKE (Oakley)
logging, modifying logging intervals, and creating a persistent policy.
You create
policies by configuring IKE parameters and adding rules that are
composed of filter lists, filter actions, and other configuration
parameters. In the following exercise, the commands create an IPSec
policy to negotiate telnet security between Computer1 and Computer2 and
to block telnet from any computer other than Computer2. You must create a
policy at both Computer1 and Computer2. You can do so, as the exercise
suggests, one command at a time. Alternatively, you could build a batch
file and run it to implement the policy.
When using the
Netsh command, this method, of course, would be the preferred way to do
so in the real world. Each command in the step-by-step exercise is
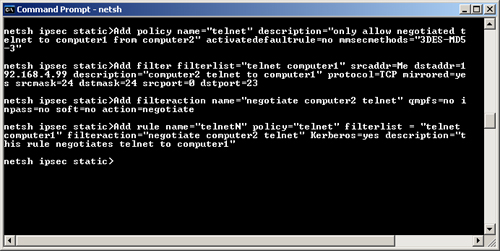
followed by pressing the Enter key. Figure 11-35
shows the commands to create the policy on Computer2 (steps 2 through
5), as entered at the Netsh IPSec Static command line. If you receive an
error message, correct your syntax. If you need to start all over
again, you can delete the policy with the command Delete Policy
Name=Telnet.
1. | Enter the Netsh IPSec Static context by entering the following commands:
|
2. | Create a policy on Computer1 by entering the following command:
Add policy name="telnet"
description="only allow negotiated telnet from computer2 to computer1"
activatedefaultrule=no mmsecmethods="3DES-MD5-3"
This policy needs two rules. One blocks all telnet
communications and the other negotiates telnet from Computer2 to
Computer1. To add the rules, you must first add the filter list, its
filters, and a filter action. If you create a filter for a filter list
that doesn’t exist, the filter list is created.
|
3. | To
create a filter list with one filter that triggers on telnet and a
source IP address of 192.168.0.2 (Computer2), type the following
command:
Add filter filterlist="telnet computer2"
srcaddr=192.168.0.2 dstaddr=Me description="computer2 telnet to computer1"
protocol=TCP mirrored=yes srcmask=32 dstmask=32 srcport=0 dstport=23
|
4. | Type the following command to add a filter action to negotiate telnet from Computer2 to Computer1:
Add filteraction name="negotiate computer2 telnet"
qmpfs=no inpass=no soft=no action=negotiate qmsecmethods="ESP[3DES,MD5]"
|
5. | Add the rule that will manage telnet negotiation by typing this command:
Add rule name="telnetN" policy="telnet" filterlist="telnet computer2"
filteraction="negotiate computer2 telnet"
Kerberos=yes description="this rule negotiates telnet if the source computer is
computer2"
Note that the rule ties the filter list and the filter action
and selects the authentication method. If no authentication method is
specified, Kerberos is used by default.
|
6. | Prepare
the filter list and filter action for the second rule. Create a filter
list with one filter that triggers on telnet and blocks telnet from all
computers:
Add filter filterlist="blocktelnet"
srcaddr=Any dstaddr=Me description="all telnet to computer1"
protocol=TCP mirrored=yes srcmask=24 dstmask=24 srcport=0 dstport=23
|
7. | Add a filter action to block all telnet communications:
Add filteraction name="block all telnet" inpass=yes action=block
|
8. | Add a rule that will manage this telnet negotiation:
Add rule name="telnetN" policy="telnet" filterlist="blocktelnet"
filteraction="block all telnet"
Kerberos=yes description="this rule negotiates telnet if the source computer is
computer2"
|
9. | Assign the policy:
set policy name=telnet assign=yes
|
10. | On Computer 2, log on as Administrator and open a command prompt.
|
11. | Open Netsh.
On Computer2, a single filter list, filter, and filter action
are necessary. You are providing it the means to negotiate the telnet
connection with Computer1. First, create the policy.
|
12. | Type the following command:
Add policy name="telnet"
description="only allow negotiated telnet to computer1 from computer2"
activatedefaultrule=no mmsecmethods="3DES-MD5-3"
|
13. | Next, create the filter list:
Add filter filterlist="telnet computer1"
srcaddr=Me dstaddr=192.168.0.2 description="computer2 telnet to computer1"
protocol=TCP mirrored=yes srcmask=32 dstmask=32 srcport=0 dstport=23
|
14. | Next, create the filter action:
Add filteraction name="negotiate computer2 telnet"
qmpfs=no inpass=no soft=no action=negotiate
|
15. | Then add the rule that will manage telnet negotiation:
Add rule name="telnetN" policy="telnet" filterlist = "telnet computer1"
filteraction="negotiate computer2 telnet"
Kerberos=yes description="this rule negotiates telnet to computer1"
|
16. | Finally, assign the policy. Remember, only one policy can be active at a time. You must run this command at both computers.
set policy name=telnet assign=yes
|
17. | Close Netsh.
|
