SSTP Troubleshooting
The
VPN scenario up to now was using the PPTP protocol for establishing the
tunnel. The Secure Socket Tunneling Protocol (SSTP) is configured by
default and should function; however, there are frequently problems with
the configuration and utilization of the certificates. The two main
problems are as follows:
This section covers troubleshooting these common problems with SSTP.
The RRAS computer
certificate must be added before the RRAS role is added to the VPN
server for SSTP to function properly. Otherwise, the wrong certificate
will be bound to the protocol.
You can check the listener using the following procedure:
1. | On the RRAS server, open a command prompt.
|
2. | Execute the command netstat –aon | findstr 443.
|
3. | Verify that the command returns TCP [::]:443 [::]:0 LISTENING 4. This indicates that the server is listening on port 443.
|
The next item to check is that
the listener is bound to the correct certificate. The listener can be
bound to a certificate that no longer exists in the certificate store of
the local computer, which can be a troubleshooting headache.
You can check the SSL binding using the following procedure:
1. | On the RRAS server, open a command prompt.
|
2. | Execute the command netsh http show sslcert.
|
The result will show the SSL certificate bindings, similar to the following text:
SSL Certificate bindings:
    IP:port                 : 0.0.0.0:443
    Certificate Hash        : f3919870176049e87b1ea2cf4bf148d1c3c6e922
    Application ID          : {ba195980-cd49-458b-9e23-c84ee0adcd75}
    Certificate Store Name  : MY
    Verify Client Certificate Revocation    : Enabled
    Verify Revocation Using Cached Client Certificate Only    : Disabled
    Usage Check    : Enabled
    Revocation Freshness Time : 0
    URL Retrieval Timeout   : 0
    Ctl Identifier          : (null)
    Ctl Store Name          : (null)
    DS Mapper Usage    : Disabled
    Negotiate Client Certificate    : Disabled

    IP:port                 : [::]:443
    Certificate Hash        : 9be2b8db741e08838ede5ee83c62c7b3e5f7ac0b
    Application ID          : {ba195980-cd49-458b-9e23-c84ee0adcd75}
    Certificate Store Name  : MY
    Verify Client Certificate Revocation    : Enabled
    Verify Revocation Using Cached Client Certificate Only    : Disabled
    Usage Check    : Enabled
    Revocation Freshness Time : 0
    URL Retrieval Timeout   : 0
    Ctl Identifier          : (null)
    Ctl Store Name          : (null)
    DS Mapper Usage    : Disabled
    Negotiate Client Certificate    : Disabled
The relevant areas to check
are the certificate hash and the application ID fields, which are listed
in two places. The application ID
{ba195980-cd49-458b-9e23-c84ee0adcd75} in each of the bindings indicates
that it was added by the RRAS SSTP. The 40-character hexadecimal
certificate hash for both bindings needs to match the appropriate
certificate in the RRAS server certificate store. As you can see in the
listing, one binding shows a hash value of
f3919870176049e87b1ea2cf4bf148d1c3c6e922 and the other binding shows a
hash value of 9be2b8db741e08838ede5ee83c62c7b3e5f7ac0b. Because they are
different, it is clear that one or both must be bound to the wrong
certificate.
To get the certificate hash from the certificate store, execute the following steps:
1. | Select Start, Run.
|
2. | Type mmc and click OK.
|
3. | Select File, Add or Remove Snap-ins.
|
4. | Select the Certificates snap-in, and click the Add button.
|
5. | Select Computer Account and click Next.
|
6. | Click Next to select the Local computer.
|
7. | Click OK.
|
8. | Expand the Certificates (Local Computer) folder.
|
9. | Expand the Personal folder.
|
10. | Select the Certificates folder.
|
11. | Right-click on the appropriate certificate, and select Open.
|
12. | Select the Details tab.
|
13. | Select
the Thumbprint field and write down the 40-character hexadecimal value.
In the case of VPN1 in this example, the thumbprint is
f3919870176049e87b1ea2cf4bf148d1c3c6e922.
|
This is the certificate hash and should match the certificate hash from the previous Netsh
command. If it does, the correct certificate is bound to the listener.
If the thumbprint does not match the certificate hash, the binding can
be corrected using the following steps.
In this case, the hash does
not match, so the binding needs to be remediated. This will be done by
deleting the bindings and re-creating them. The four commands are as
follows:
netsh http delete sslcert ipport=0.0.0.0:443
netsh http delete sslcert ipport=[::]:443
netsh http add sslcert ipport=0.0.0.0:443
       certhash=f3919870176049e87b1ea2cf4bf148d1c3c6e922
       appid={ba195980-cd49-458b-9e23-c84ee0adcd75} certstorename=MY
netsh http add sslcert ipport=[::]:443
       certhash=f3919870176049e87b1ea2cf4bf148d1c3c6e922
       appid={ba195980-cd49-458b-9e23-c84ee0adcd75} certstorename=MY
The first two commands delete
the bindings and the second two commands re-create the bindings with the
correct certificate hash. We could have only done (deleted and added)
the “[::]:443” ipport binding because that was the incorrect one.
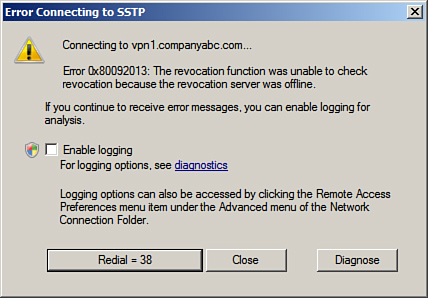
Finally, the
Certificate Authority revocation list must be available for SSTP to
function correctly. If it is not available, SSTP clients will generate
the error shown in Figure 11. The solution to this is to make the Certificate Authority revocation site available to clients over the Internet.
This is quite a
stringent requirement and is due to the combination of the firewall
piercing quality of SSTP and the potential to have disparate networks
connected at Layer 3. This revocation list requirement can present
problems for organizations using internal CAs, as the CA website must be
published. This could potentially present a security risk and would be
an argument for using a third-party Certificate Authority for the SSTP
connections.
Preventing SSTP Connections
The
SSTP tunneling protocol can help VPN clients traverse through NATs and
firewalls. This is a huge benefit of the protocol, but this is also a
potential security risk. This is because it in effect creates an OSI
Layer 3 connection between two networks, which might be against the
security policy of the originating network or destination network. For
example, a consultant might initiate a connection from a client site to
their corporate network, in effect connecting the two networks.
Because SSTP uses HTTPS (TCP
port 443), a port-based firewall cannot block the protocol without also
blocking all other HTTPS traffic. This is widely used by secure
websites, so this is not normally an option. This is one of the benefits
of the SSTP technology.
However, SSTP connections
can be prevented if the client traffic passes through an
application-level web proxy, which is a common configuration for
enterprises today. When a VPN client using SSTP connects, the client
will send an HTTP “CONNECT” request with a custom HTTP header named
“SSTPVERSION” with a value of “1.0.”
To prevent SSTP connection through a web proxy, simply block those requests with the customer HTTP header to disable SSTP.
