The best way to illustrate the concepts in this article is to walk through a sample VPN scenario. The example will walk
through the setup and testing of a VPN infrastructure that will include
health checks and remediation of a client. The sample VPN scenario
architecture is shown in Figure 1.
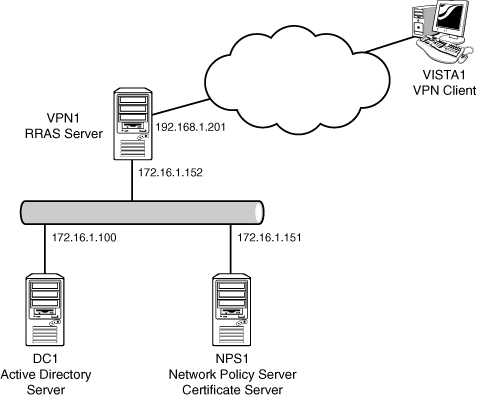
The scenario will use the systems with the basic configuration shown in Table 1. These examples assume that an Active Directory domain companyabc.com has been created and that DC1 is the domain controller.
Table 1. VPN Scenario Servers
| Server | Roles | Operating System | IP Address |
|---|
| DC1 | Directory server | Windows Server 2008 R2 | 172.16.1.100 |
| NPS1 | Network Policy Server Certificate server | Windows Server 2008 R2 | 172.16.1.151 |
| VPN1 | RRAS server | Windows Server 2008 R2 | 172.16.1.152 (internal)
192.168.1.201 (external) |
| VISTA1 | VPN client | Windows Vista SP1 | |
The steps to configure the VPN architecture will consist of the following:
- Set up the certificate server.
- Set up the Network Policy Server.
- Configure the Network Policy Server.
- Set up the RRAS.
- Set up the VPN client.
- Test the VPN connection.
- Control unhealthy VPN clients.
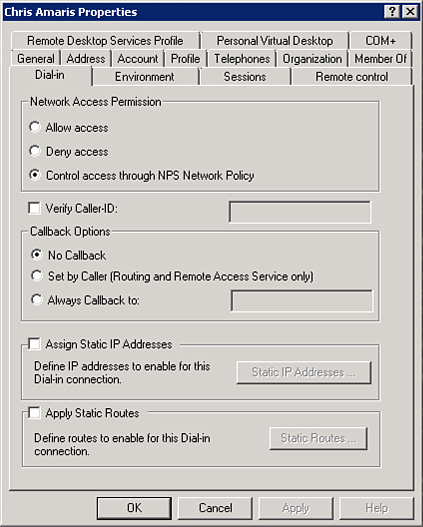
In
Windows Server 2008 R2 Active Directory, the users would need to be
enabled in the Dial-in tab of the account properties. As you can see in Figure 2, the default option is Control Access Through NPS Network Policy.
We’ll now step through the setup, configuration, and testing of a Windows Server 2008 R2 traditional VPN infrastructure.
Setting Up the Certificate Server
The first step is to configure
the certificate server. This server will be used to issue certificates
for the VPN infrastructure. The example uses Microsoft Certificate
Services, but a third-party CA and certificates could be used as well.
The NPS1 server was chosen for
this example, as it will be the centralized policy server and so is
well situated to provide certificate services. A completely separate
server could have been configured as well. The procedure assumes that
the Windows Server 2008 R2 operating system has been installed and that
the NPS1 server has joined the companyabc.com domain.
Install the Active Directory Certificate Services role on the NPS1 server using the following steps:
1. | Launch Server Manager.
|
2. | In the Roles Summary pane, select Add Roles to start the wizard.
|
3. | |
4. | Select Active Directory Certificate Services, and click Next.
|
5. | Click Next.
|
6. | Check the Certification Authority Web Enrollment to add the check mark.
|
7. | A
window opens with an additional set of role services and features
required to support web enrollment. Click Add Required Role Services to
add these prerequisites.
|
8. | Click Next.
|
9. | Leave the Enterprise option to create an enterprise CA, and click Next.
|
10. | Leave the Root CA option selected, and click Next.
|
11. | Leave the Create a New Private Key option selected, and click Next.
|
12. | Click Next to accept the cryptography options for the CA.
|
13. | Click Next to accept the CA name.
|
14. | Click Next to accept the default validity period of five years.
|
15. | Click Next to accept the default directories.
|
16. | Click Next.
|
17. | Click Next to accept the default web server role services.
|
18. | Click Install to install the roles.
|
19. | When the installation finishes, click Close to close the wizard.
|
This certificate server will be used on each of the components in the VPN infrastructure.
Certificate Autoenrollment
Next, configure the root CA so
that computer certificates are issued automatically through a group
policy using a GPO named Cert Auto Enrollment Group Policy Object.
To configure the computer certificate autoenrollment using the enterprise CA, use the following steps:
1. | On the domain controller DC1, launch Server Manager.
|
2. | Expand Features, Group Policy Management, Forest: companyabc.com, Domains, and select companyabc.com.
|
3. | In the console tree, right-click the domain companyabc.com and select Create a GPO in the Domain and Link It Here.
|
4. | Enter the name Cert Auto Enrollment Group Policy Object and then click OK.
|
5. | Right-click the Cert Auto Enrollment Group Policy Object and select Edit.
|
6. | In
the console tree of the Group Policy Management Editor, open Computer
Configuration, Policies, Windows Settings, Security Settings, and select
Public Key Policies.
|
7. | In
the details pane, right-click Automatic Certificate Request Settings,
point to New, and then click Automatic Certificate Request.
|
8. | In the Automatic Certificate Request Wizard, click Next.
|
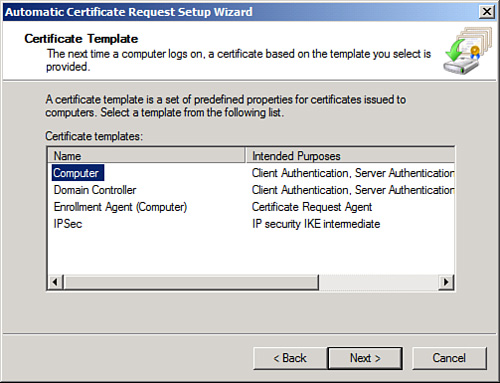
9. | On the Certificate Template page, click Computer (shown in Figure 3), click Next, and then click Finish.
|
10. | Close the Group Policy Management Editor and Group Policy Management Console.
|
Now each computer that is a member of the domain will be enrolled automatically with a computer certificate.
