Setting Up the RRAS Server
The RRAS server is the entity
that will actually connect to the Internet or DMZ, providing the direct
communications with the VPN clients, although the NPS system will be
authenticating and authorizing those connections.
The following steps assume
that Windows Server 2008 R2 is already installed, that the VPN1 server
is configured with an internal network interface card (NIC;
172.16.1.152) and an external NIC (192.168.1.201), and that the VPN1
server is a member of the companyabc.com Active Directory domain. In
addition, the network interfaces have been renamed to Internal and
External to reflect their connection.
The next step is to add and configure the Routing and Remote Access role to the VPN server:
1. | Launch Server Manager on the VPN server, and select Add Roles in the Roles Summary window.
|
2. | Click Next.
|
3. | Select the Network Policy and Access Services role, and click Next.
|
4. | Click Next.
|
5. | Select the Remote Access Service check box, and click Next.
|
6. | Click Install to install the role.
|
7. | Click Close to exit the wizard.
|
8. | Click Start, Administrative Tools, and Routing and Remote Access to launch the RRAS MMC.
|
9. | Right-click on the VPN server name, and select Configure and Enable Routing and Remote Access.
|
10. | Click Next.
|
11. | Select Remote Access (Dial-Up or VPN), and click Next.
|
12. | Check the VPN check box, and click Next.
|
13. | Select the Internet-facing network interface—in this example, the interface named External.
|
14. | Uncheck the Enable Security on the Selected Interface by Setting Up Static Packet Filters, and click Next.
|
15. | Leave the IP Address Assignment as Automatically, and click Next.
|
16. | Select Yes, Set Up This Server to Work with a RADIUS Server, and click Next.
|
17. | Enter the NPS system FQDN into the Primary RADIUS Server Name field, which in this example is nps1.companyabc.com.
|
18. | Enter the secret password in the Shared Secret field, which is the same password used earlier in the RADIUS Client setup.
|
19. | Click Next and then click Finish.
|
20. | A
message box appears, indicating that the properties of the DHCP Relay
Agent will need to be configured. This is because of the selection to
automatically assign IP addresses. Click OK to close the message box.
|
21. | Select the VPN server in the Routing and Remote Access MMC.
|
22. | Select Action and Properties.
|
23. | Select the Security tab.
|
24. | Click
on the Authentication Methods button and confirm that Extensible
Authentication Protocol (EAP) and Microsoft Encrypted Authentication
Version 2 (MS-CHAP v2) are selected.
|
25. | Click OK to close the Authentication Methods window.
|
26. | Select the IPv4 tab.
|
27. | Verify that the correct adapter is selected for the VPN server to obtain DHCP services—in this case, the Internal adapter.
|
28. | Click OK to close the Properties window.
|
The RRAS server is now configured and ready to accept VPN client connections.
Setting Up the VPN Client
The next step is to set up the VPN client. The four major tasks in this process are as follows:
These tasks prepare the client to connect and also validate, enforce, and remediate health policies.
If the client is a domain
member, the Security Center will be disabled. This can be enabled in the
local security policy through the following procedure:
1. | On the VPN Client computer, select Start, Run.
|
2. | Enter gpedit.msc and click OK.
|
3. | Expand Local Computer, Computer Configuration, Administrative Templates, Windows Components, and select Security Center.
|
4. | Double-click on Turn on Security Center (Domain PCs Only).
|
5. | Select Enabled and click OK.
|
6. | Close the Group Policy Edit tool.
|
The Remote Access
Quarantine Enforcement Client is normally disabled, so it will need to
be enabled on the client. This is done with the NAP Client Configuration
MMC (napclcfg.msc).
1. | On the client, select Start, Run.
|
2. | Enter napclcfg.msc and click OK.
|
3. | Select the Enforcement Clients folder.
|
4. | Select the Remote Access Quarantine Enforcement Client. (In Windows 7, use EAP Quarantine Enforcement Client.)
|
5. | Select Action, Enable to enable the client.
|
6. | Exit the NAP Client Configuration MMC.
|
The Network Access Protection
Agent service is normally set to manual, so it will need to be started
and set to start automatically.
1. | On the client, select Start, Run and then enter Services.msc.
|
2. | Highlight the Network Access Protection Agent service, and select Action, Properties.
|
3. | Change the Startup Type to Automatic, and click Start.
|
4. | Click OK to exit the service properties.
|
For PEAP to function
correctly, the client will need to trust the Certificate Authority. This
can be done using automatic enrollment for Active Directory domain
members, via the certificate enrollment site, or manually by exporting
and importing the certificate. For this example, we assume that the
client is not a domain member and that the certificate needs to be
distributed manually, such as via email.
To export the certificate from the Certificate Authority, execute the following steps:
1. | On the Certificate Authority server, select Start, Administrative Tools, and then Certification Authority.
|
2. | Highlight the Certificate Authority (in this case, companyabc-NPS1-CA) and select Action, Properties.
|
3. | Click on the View Certificate button.
|
4. | Select the Details tab, and click the Copy to File button.
|
5. | Click Next.
|
6. | Click Next to accept the default Export File Format.
|
7. | Enter a name for the certificate (in this case, c:\nps1 ca certificate) and click Next.
|
8. | Click Finish to export the certificate.
|
9. | Click OK to acknowledge the export, and then exit the Certification Authority MMC.
|
This certificate will be used
to certify the NPS1 Certificate Authority to the client, which will
allow the client to trust certificates issued by the Certificate
Authority. This will require that the client import the certificate into
the local computer trusted Certificate Authority store. To import a
certificate into the local computer trusted Certificate Authority store,
do the following:
1. | Copy the CA certificate file to the VPN client.
|
2. | Select Start, Run.
|
3. | Type mmc and click OK.
|
4. | Select File, Add or Remove Snap-ins.
|
5. | Select the Certificates snap-in and click the Add button.
|
6. | Select Computer Account and click Next.
|
7. | Click Next to select the Local computer.
|
8. | Click OK.
|
9. | Expand the Certificates (Local Computer) folder.
|
10. | Expand the Trusted Root Certification Authorities folder, and highlight the Certificates subfolder.
|
11. | Right-click the Certificates subfolder, and select All Tasks, Import.
|
12. | Click Next.
|
13. | Click the Browse button and navigate to the CA certificate file—in this example, nps1 ca certificate.cer.
|
14. | Click OK.
|
15. | Click Next.
|
16. | Click Next to place the certificate in the Trusted Root Certification Authorities folder.
|
17. | Click Finish and then click OK to acknowledge the certificate installation.
|
18. | Exit the console without saving.
|
This
allows the client to trust the certificates issued by the NPS1
Certificate Authority. The next step is to set up and configure the VPN
connection on the VPN client:
1. | On the client, select Start, Control Panel.
|
2. | Click on Network and Internet.
|
3. | Click on Network and Sharing Center.
|
4. | Click on Set Up a Connection or Network.
|
5. | Select Connect to a Workplace, and click Next.
|
6. | Click on Use My Internet Connection (VPN).
|
7. | Enter the Internet address—in this case, 192.168.1.201. You can also enter the FQDN vpn1.companyabc.com.
|
8. | Enter a destination name, such as Company ABC VPN Connection.
|
9. | Check the Don’t Connect Now check box, as we will need to configure additional settings.
|
10. | Click Next.
|
11. | Enter the username, the password, and the domain, and check the Remember This Password check box.
|
12. | Click Create to create the connection.
|
13. | Click Close.
|
14. | Click Manage Network Connections.
|
15. | Right-click on the Company ABC VPN Connection, and select Properties.
|
16. | Select the Security tab.
|
17. | In the Security Options window, select the Advanced (Custom Settings) option button.
|
18. | Click the Settings button.
|
19. | In the Logon Security window, select the Use Extensible Authentication Protocol (EAP) option button.
|
20. | Select Protected EAP (PEAP) (Encryption Enabled) from the drop-down list, and click the Properties button.
|
21. | Uncheck the Connect to These Servers check box.
|
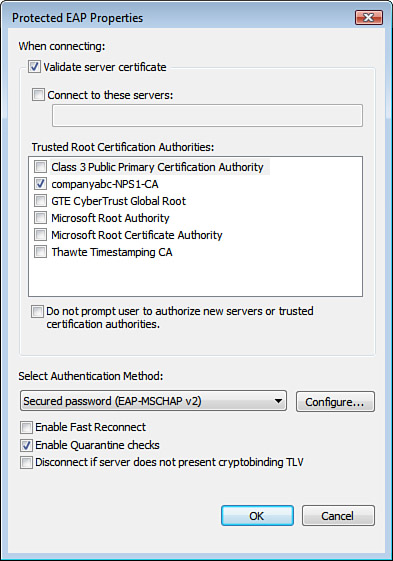
22. | Check
the box next to the previously imported CA certificate in the Trusted
Root Certification window—in this example, companyabc-NPS1-CA.
|
23. | Verify that Secured Password (EAP-MS-CHAP v2) is selected in the Select Authentication Method drop-down list.
|
24. | Uncheck the Enable Fast Reconnect check box.
|
25. | Check the Enable Quarantine Checks check box. The result should look like Figure 7.
|
26. | Click OK to close the Protected EAP Properties dialog box.
|
27. | Click OK to close the Advanced Security Settings dialog box.
|
28. | Click OK to close the connection properties.
|
The connection is now ready for use. The next step is to test the connection.
