The PAPI offers several methods for managing
resources. In this section, we will look at how you can programmatically
create and replace resources.
Creating Resources
When given the task of
uploading multiple files to resource galleries, each tagged with unique
names and descriptions, would you:
- Use Web Author to upload each file one at a time?
- Open
Site Manager, drag all files from Windows Explorer and drop them into
the resource gallery (you have to drop them actually onto the gallery
icon for this to work), and toggle back to Web Author to adjust their
names, display names, and descriptions?
While either of the above
solutions is acceptable when the number of resources to upload is
small, neither is particularly appropriate for cases where thousands of
files are to be uploaded and properly tagged. It would be a tedious and
time-consuming task indeed to manually handle each resource one by one.
Fortunately, using the
PAPI, you can write a script to automate the job of uploading of
resources. You can also set their properties how you wish as you go.
|
The
PAPI does not provide a method for creating resource galleries.
Resource galleries can only be created by using Site Manager.
|
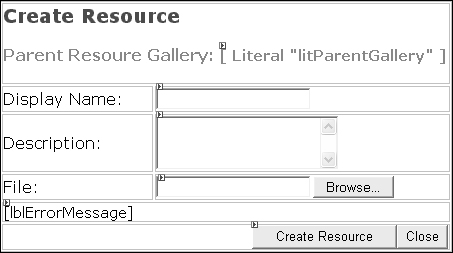
Let’s build a Create Resource dialog for the CMS Explorer:
1. | Add a new web form to the CMSExplorer project. Name the new web form CreateResource.aspx.
|
2. | In Design view, drag and drop styles.css onto the web form.
|
3. | Toggle to HTML view and add a table with six rows as shown below:
<table>
<tr>
  <td colspan="2">
    <h1>Create Resource</h1>
    <h2>
      Parent Resource Gallery:
      (Add Literal for displaying the path here)
    </h2>
  </td>
</tr>
<tr>
  <td>Display Name:</td>
  <td>(Add the text box for the display name here)</td>
</tr>
<tr>
  <td>Description:</td>
  <td>(Add the text box for the description here)</td>
</tr>
<tr>
  <td>File:</td>
  <td><INPUT type="file" id="File1" runat="server"></td>
</tr>
<tr>
  <td colspan="2">(Add the label for error messages here)</td>
</tr>
<tr>
  <td colspan="2" align="right">
    (Add the Create Resource button here)
    <INPUT type="button" value="Close"
      onclick="javascript:window.close();">
  </td>
</tr>
</table>
|
4. | With the CreateResource.aspx web form open in Design view, add controls (from the Web Forms section of the Toolbox) to the form and set them up as shown below.
| Control | Property | Value |
|---|
| Literal | ID | litParentGallery | | TextBox | ID | txtDisplayName | | TextBox | ID | txtDescription | | | Rows | 3 | | | TextMode | MultiLine |
| Control | Property | Value |
|---|
| Label | ID | lblErrorMessage | | | Text | (empty string) | | Button | ID | btnCreate | | | Text | Create Resource |
|
5. | Since a file is being uploaded to the server from the form, toggle to HTML view and set the form’s ENCTYPE property to multipart/form-data.
<body MS_POSITIONING="FlowLayout">
<form id="Form1" method="post" runat="server" enctype="multipart/form-data">
</form>
</body>
|
6. | As before, in addition to the existing namespaces, add the Microsoft.ContentManagement.Publishing namespace to the code-behind file.
. . . code continues . . .
// MCMS PAPI using Microsoft.ContentManagement.Publishing;

namespace CmsExplorer
{
. . . code continues . . .
}
|
7. | In the Page_Load() event handler, we add code to retrieve the GUID of the parent resource gallery from the CMSObjectGuid querystring parameter. Passing it to the Searches.GetByGuid() method gets a reference to the parent resource gallery.
Once we have gotten an instance of the parent resource gallery, we check the ResourceGallery.CanCreateResources property. If the user has the necessary rights, the property returns the Boolean true
(which means that the user is an MCMS administrator, a resource
manager, a template designer, or a channel manager assigned to the
parent resource gallery) and the Create Resource button is enabled. Otherwise, it is disabled.
. . . code continues . . .

private CmsHttpContext cmsContext;
private ResourceGallery parentGallery;
private void Page_Load(object sender, System.EventArgs e)
{
  cmsContext = CmsHttpContext.Current;
lblErrorMessage.Text = String.Empty;
string cmsObjectGuid = String.Empty;
if (Request.QueryString["CMSObjectGuid"]!=null)
{
cmsObjectGuid = Request.QueryString["CMSObjectGuid"];
parentGallery = cmsContext.Searches.GetByGuid(cmsObjectGuid)
as ResourceGallery;
if (parentGallery!=null)
{
litParentGallery.Text = parentGallery.Path;
// Enable or Disable the Create Resource button
btnCreate.Enabled = parentGallery.CanCreateResources;
}
else
{
lblErrorMessage.Text = "Parent Gallery not found!";
}
}
}
|
8. | Next, we will store all uploaded files in a temporary folder on the
server. MCMS already provides such a folder with the necessary write
permissions. Retrieve it by accessing the CmsHttpContext.Current.TemporaryUploadFolder
property. The code first checks to see if the uploaded file has a valid
name (one that adheres to the naming rules set by MCMS) then saves the
uploaded file to the Temp folder in the MCMS Server directory. With the file uploaded, we call the ResourceGallery.CreateResource() method, passing in the path of the file as an input parameter. Once the resource has been created, we set its Name and DisplayName properties and commit the changes to the repository. Toggle to Design view and double-click on the btnCreate button. In the btnCreate_Click() event handler, add code shown below:
private void btnCreate_Click(object sender, System.EventArgs e)
{
  try
{
if (File1.PostedFile != null)
{
// the temp folder for saving the posted file to
string filePath = CmsHttpContext.Current.TemporaryUploadFolder;
// get the file name from the posted file
string fileName = File1.PostedFile.FileName;
int indexOfSlash = fileName.LastIndexOf("\\") + 1;
fileName = fileName.Substring(indexOfSlash,fileName.Length -
indexOfSlash);
// append the file name to the path of the temp folder
filePath += "\\" + fileName;
// check to see if the file name is valid
if (!Utility.ValidateMCMSObjectName(fileName))
{
throw new Exception("Specified template gallery name is not "
+ "valid. Must be only alphanumeric "
+ "characters, open or close parens, "
+ "hyphens, underscores, periods, or "
+ "spaces. No period at the end and no "
+ "consecutive periods are allowed. ");
}
// save the file to a specified temp folder
File1.PostedFile.SaveAs(filePath);
// create the new resource
Resource newResource = parentGallery.CreateResource(filePath);
newResource.Name = fileName;
newResource.DisplayName = txtDisplayName.Text;
// commit the changes
cmsContext.CommitAll();
// delete the file that was saved to the temp folder
System.IO.File.Delete(filePath);
// display the success message
lblErrorMessage.Text = "Resource created successfully!";
}
else
{
// no file was selected for uploading
lblErrorMessage.Text = "Please select a file to upload";
}
}
catch(Exception ex)
{
// rollback all changes
cmsContext.RollbackAll();
// the CMS context needs to be disposed of after a rollback
cmsContext.Dispose();
// display error message
lblErrorMessage.Text = ex.Message;
}
}
|
|
Files that are to be added to the resource gallery must first be uploaded to the MCMS server as physical files. The ResourceGallery.CreateResource() method only accepts a valid path to an existing file in the file system.
|
Save and build the solution. To test the new dialog:
1. | Open CMS Explorer.
|
2. | Click Resources and navigate to the PlantCatalog resource gallery.
|
3. | Select New | New Resource from the toolbar.
|
4. | In the Create Resource dialog, enter the following values:
| Property | Value |
|---|
| DisplayName | MyResource | | Description | This resource was created from the PAPI | | File | Select any file located on your desktop |
|
5. | Click Create Resource.
|
Watch as the selected file is uploaded and created as a new resource in the PlantCatalog resource gallery (click the Refresh button to see the latest view).
