The Type
command is a simple method of displaying the content of a file on
screen. You use this command with text files; it won't display control
codes in a readable form and stops displaying text when it sees an end
of file character (ASCII 26). This command uses the following syntax:
TYPE [drive:][path]filename
The following list describes each of the command line arguments.
drive
Specifies the drive that holds the file for display. The default is the current drive.
path
Specifies the relative or absolute path of the file you want to display. The default is the current directory.
filename
Specifies the file you want to display on screen.
Many people combine the Type
command with other commands and utilities to achieve special effects.
In addition, you can use redirection to augment the functionality of the
Type command. By using the correct redirection, you can use the Type
command to send raw text to the printer reliably. The following
sections describe data redirection and the use of the most common Type command partner utility, the More utility.
1. Employing Data Redirection
Data redirection is the
process of sending data from one command or utility to another command
or utility. You can also redirect command or utility output to a device
or a file. Redirection provides the
means for sending output to a location other than the standard output
device (the console), obtaining input from a device other than standard
input (the keyboard), and using something other than the standard error
device (usually the console) to report problems. The command line
supports three forms of redirection: input, output, and pipe. Each
requires use of specialized symbols.
One of the most
common forms of redirection is the pipe and it uses the pipe symbol (|)
that appears over the backslash on most keyboards. In fact, the pipe is
much older than the PC and appears in the earliest Unix operating
systems (see the history at http://www.linfo.org/pipes.html
for details). The pipe accomplishes what its name implies; it acts as a
pipe between small applications. You connect the applications using the
pipe and data flows between the applications using the pipe. For
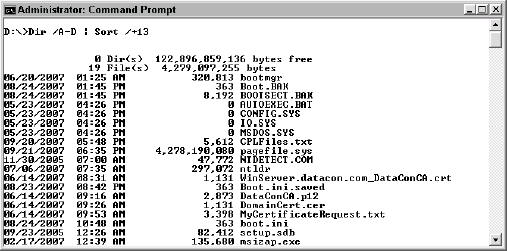
example, you can temporarily connect the Dir command to the Sort command to create a customized directory output using a command like this:
Dir /A-D | Sort /+13
The resulting command
obtains a listing of the current directory, without the directory
entries and sorts them by the time column. Figure 1 shows the results of this command.
Redirection
always works with a file or other streaming device. You never use
redirection with another command. The two types of redirection are input
and output, with output being the most commonly used. To output the
results of a command such as Dir or Sort
to a file, you use a greater than sign (>) or output redirection
pointer. Windows clears the file if it exists and places the command
output in it. However, you might want to place the results of several
commands into a file. In this case, you use two greater than signs
(>>). A double output redirection pointer always appends the
output of a command to the existing file. Here's an example of sending
the output of the Dir command to a file:
Dir *.TXT > MyFile.TXT
In this case, you'd end up with a file called MyFile.TXT that contains a list of all of the text files in the current directory.
Input relies on the less
than symbol (<) or input redirection pointer. You can always use a
file as input to a command that's expecting text or record data. In some
cases, you can use file input to generate commands as well. The point
is that a file or other streaming device acts as input. Although it's
extremely uncommon, you also have access to a double input redirection
pointer (<<). This symbol appends input to previous input for a
command.
The combination of
an output redirection pointer and an input redirection pointer can be
the same as a pipe. Here's an example of the two forms of redirection
used together:
Dir /A-D > MyFile.TXT
Sort /+13 < MyFile.TXT
In this case, the output of the Dir command appears in MyFile.TXT. The second command uses MyFile.TXT as input to the Sort command. The result is the same as the pipe example shown in Figure 14.3.
Although you can only
include one redirection symbol on a command line, you can use as many
pipes as needed to accomplish a task. This means that you can create a
series of pipes to connect any number of commands and create some
interesting command sequences. For example, you can combine the Dir, Sort, and More commands as shown here to provide output where you see one display at a time (see the "Using the More Utility" section for details on the More utility).
Dir /A-D | Sort /+13 | More
2. Using the More Utility
The More utility is one of
the few utilities that you never use by itself. You always use this
utility with some other utility or command. The More utility pauses the
display so that you can see output that normally requires multiple
screens to display. For example, you can combine the More utility with
the Dir command to display the list of
files in a directory one screen at a time. One of the most common uses
of the More utility is to provide a means of paging output from the Type command. You can also use redirection to input files to the More utility; the implied partner in this case is the Type command. This utility uses the following syntax:
MORE [/E [/C] [/P] [/S] [/Tn] [+n]] < [drive:][path]filename
command-name | MORE [/E [/C] [/P] [/S] [/Tn] [+n]]
MORE /E [/C] [/P] [/S] [/Tn] [+n] [files]
The following list describes each of the command line arguments.
drive
Specifies the drive that holds the file for display. The default is the current drive.
path
Specifies the relative or absolute path of the file you want to display. The default is the current directory.
filename
Specifies the file you want to display on screen.
/E
Enables the More utility extended feature set. You'll find a discussion of these features later in this section.
/C
Clears the
display prior to displaying a page. Normally, the More utility provides a
continuous display, so you can scroll back and forth through the screen
buffer.
/P
Expands form feed characters as displayable information, rather than reacting to them as an actual form feed.
/S
Removes excess blank lines from the display. The More utility squeezes multiple blank lines into a single blank line.
/T
nChanges the number of spaces for each tab. The default setting is 8 spaces.
+n
Displays the first file starting at line n. This feature lets you continue displaying a file from a known position after stopping a display during a previous session.
files
Specifies a list of files to display. The More utility sends the files to the Type command in the order specified. It separates each file with a blank. You must provide the list of files as the last argument.
The More utility includes an extended mode that you enable using the /E
command line switch. The extended mode provides additional
functionality to make it easier to work with output files. For example,
you can display a few additional lines to see part of a continuation of
data in a file. The following list describes the extended mode commands,
which you can type at the More prompt.
P
nDisplays the next n lines of the file. Type the P command. You'll see a Lines prompt. Type the number of lines to display and press Enter.
S
nSkips the next n lines of the file (doesn't display them). Type the S command. You'll see a Lines prompt. Type the number of lines to display and press Enter.
F
Displays the
next file in the list. If there's no next file, the More utility ends.
This action doesn't necessarily end the previous application in the
pipe. Press Ctrl+C to end the previous command (such as Type) as necessary.
Q
Quits the
More utility without displaying any additional data. This action doesn't
necessarily end the previous application in the pipe. Press Ctrl+C to
end the previous command (such as Type) as necessary.
=
Shows the number of
the current line of text. For example, if the More utility is currently
displaying the 49th line in the file, you'll see Line: 49 as part of the More prompt.
?
Shows the list of extended commands.
<space>
Displays the next page of the file.
<enter>
Displays the next line of text in the file.
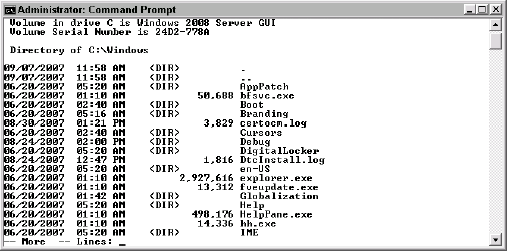
The More utility
provides a simple prompt at the bottom of the command window for
entering display commands. You can only move forward in a file, not
backward. Whenever you enter a command, the More prompt extends to request any additional information. Figure 2 shows the Moreprompt after typing the P command. Notice that the prompt contains the Lines: entry, which lets you input the number of lines to display.