1.3 Creating the Workflow Document Class
The purpose of a workflow is to automate all or
part of a business process. To do this, it must be possible to define
various rules over the document that is being processed by workflow. In
Dynamics AX 2009, these rules are referred to as conditions.
A business user creates conditions in workflow when configuring the
workflow. Conditions can be used, for example, to decide whether a
purchase requisition should be approved automatically (without any human
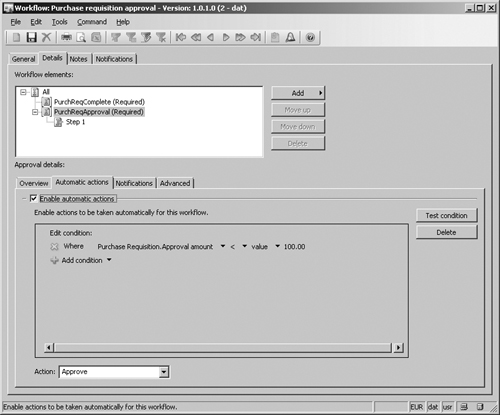
intervention). Figure 4 shows a simple condition defined in the workflow configuration form.
When a business user is configuring a condition
by using the workflow configuration form, he or she needs to make sure
the users have a way to select the fields from the workflow documents
they want to use. On the surface, this configuration seems simple, but
two requirements complicate the task. First, the user must be able to
filter the available fields because not all the fields in a table might
make sense to the business user. Second, it must be possible to use calculated fields (also referred to as derived data).
The workflow document class meets these two requirements by functioning
as a thin wrapper around an AOT query that defines the available fields
and by providing a mechanism for defining calculated fields.
The AOT query enables developers to define a
subset of fields from one or more related tables. By adding nested data
sources in a query, you can model quite complex data structures, but
most commonly the nested query is used to model a header-line pattern.
At design time, when the business user is configuring a workflow, the
AOT query is simply used by the condition editor to figure out which
fields to display to the business user.
The workflow infrastructure uses a prescriptive pattern to support calculated fields using parm methods that are defined within the workflow document class. These methods must be prefixed with parm and must implement a signature of (CompanyId, TableId, RecId). The workflow infrastructure then, at run time, calls the parm method and uses the return value in the condition evaluation. This design enables developers to implement calculated fields in parm methods on the workflow document class.
Note
When
the expression builder constructs the list of fields, it uses the
labels of the table fields as the display name for the fields. The
display name for calculated fields is defined by the extended data type
label of the return types. For enums, this is defined by the enum element label. |
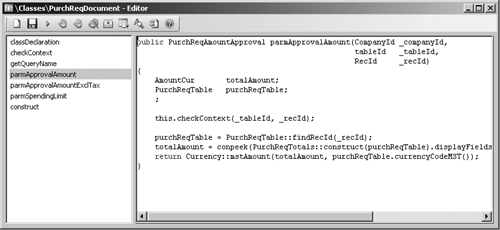
Creating a workflow document class involves creating an X++ class that extends from WorkflowDocument. You must override getQueryName to return the name of the workflow document query. Figure 5 shows a sample X++ class that extends from the workflow document.

Creating a parm
method involves adding a method to the workflow document class and then
adding X++ code to calculate or otherwise determine the value to be
returned, as you can see in Figure 6.
Note
All condition comparisons assume that any literal monetary value typed into a condition is in AmountMST, which is the default company currency. Thus, if a parm method returns a value that represents a monetary amount, it must always be returned in AmountMST. |
1.4 Adding a Workflow Display Menu Item
The workflow display menu items enable users to
navigate directly to the Dynamics AX 2009 client form (or Enterprise
Portal Web page) upon which they can select one of the available
workflow actions. A user is prompted to participate in a workflow when
he or she receives a work item from the workflow at run time. When
viewing the work item, the user can click Go To <Label>. This
button is automatically mapped to the workflow display menu item, and
the button text (“<Label>”) is the label of the root table of the
workflow document query.
This design enables developers to
create task-based forms that are focused on the particular task at hand,
rather than having to create monolithic forms that assume the user
knows where in the process he or she is acting and which fields and
buttons to use.
