Stepping inside the frame and column formatting of
paragraph text, CorelDRAW has extensive options for specifying how lines
of text look compared with one another, how tightly characters and
words are spaced, and how you want individual paragraphs to separate
from each other. The following sections cover the use of the Paragraph
Formatting box.
Paragraph Alignment
The Alignment settings on the
Paragraph Formatting box affect the spacing for the entire selected
paragraph; you can choose the entire paragraph text object using the
Pick tool, or choose only pages by highlighting them with the Text tool.
Horizontal and Vertical Alignment at the top of this box pertain to the
orientation of the language set of the font used; American and European
users will want to use Horizontal Alignment.
Spacing
Below Alignment on the
Paragraph Formatting box are controls for inter-line spacing (leading),
for how much space should go before or after a paragraph, for
inter-character and inter-word spacing, and finally for indent
preferences. Note that proper typographical form dictates that separate
paragraphs are usually indicated by either a first-line indent or a line
space between paragraphs, but not both.
Paragraph and Line Spacing
Depending on your layout,
you might choose to separate paragraphs by using the Before Paragraph or
the After Paragraph spin boxes, but not both. The spacing between
paragraphs is measured by default as the “% Of Char. Height” (percent of
the character height), the total height of a character in a digital
font, which is not always easy to discern; typically it’s about 30
percent taller than a capital letter in the font. If this proves to be
too time-consuming to calculate, you can always choose Points or “% Of
Pt. Size” (percentage of point size) from the drop-down list. In the
following illustration, 200% of the character height is chosen to
separate paragraphs. This is an option you want to experiment with,
depending on the typeface you’re using. Anywhere from 125% to 200% can
work from an artistic standpoint.
Line
spacing is used to let some “air” into paragraph text and is especially
useful when you have a font whose ascenders or descenders are unusually
tall. You can also use very wide Line spacing to create an artistic
effect when starting, for example, a magazine article. It’s been
fashionable in layout for several years now to put about 300% Line
spacing in the opening paragraph: it lightens the page when using a bold
font and also allows the reader to see more of any decorative
background.
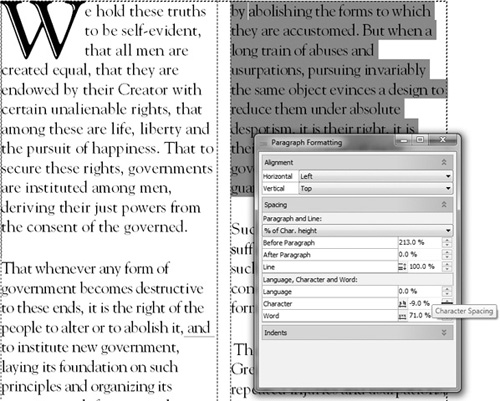
Language, Character, and Word Spacing
If you’re typesetting, for
example, an article using an Asian font, Language spacing will be
useful to space non-left-to-right sentences; if not, you have very
little use for this option. You can set how much extra space is added to
the default inter-character space for the paragraph as a whole by using
the Character spacing. The values are a percentage of a normal space
character for the current font. You can also modify the inter-word
spacing—this has the effect of adjusting the width of the space
character. The following illustration shows some adjusted text at right
(highlighted), and you can compare the effect to the default paragraph
text at left.
Tip
Remember
the control handles on the bounding boxes of paragraph text. They offer
less precision when setting character and line spacing than the
Paragraph Formatting box, but they’re quick to use and provide a good
coarse view of how your layout is shaping up.
Indentation and Margins of Paragraph Text
You can set the sizes of the
indents of the left and right margins, as well as the size of the
first-line indentation, just as you do in a word processor. These can be
set precisely from the Paragraph Formatting box, or you can set them
with a little less precision using the triangular markers on the ruler,
which are shown here:

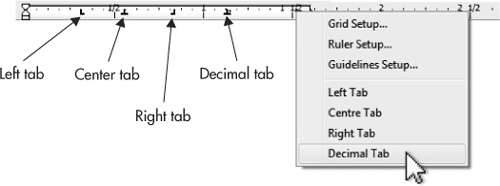
Formatting Tabs
Tab stops for paragraph text can be edited either directly in the ruler or in the Text | Tab Settings dialog, as shown in Figure 1. CorelDRAW supports left, right, center, and decimal tabs, just like most word processors do.
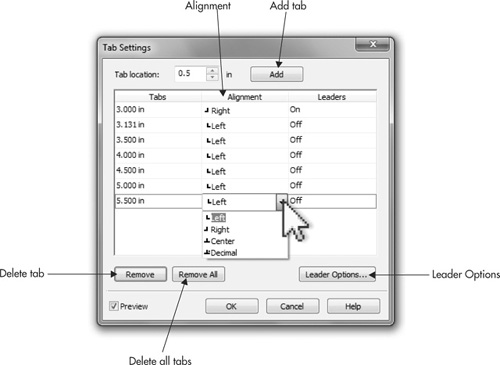
Adding, Moving, and Deleting Tabs from the Dialog
Tabs can be added to the
current paragraph in the Text | Tab Settings box by first entering a
value in the Tab Location spin box, and then by clicking Add. To set the
type of the new tab, choose from the drop-down list associated with the
tab. Similarly, you can adjust an existing tab by clicking its position
(thus opening the value for editing) and then typing in a new value. To
delete a tab, select it in the list, and then click the Remove button.
When you create a new paragraph,
unless you have modified the default paragraph style, tab stops are
positioned every half-inch. To remove all the tabs, click the Remove All
button.
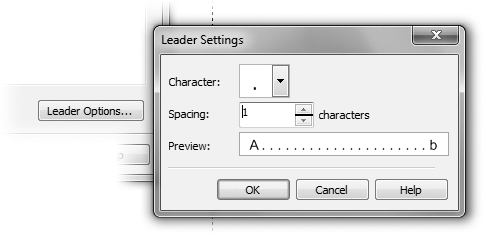
Formatting Tab Leaders from the Dialog
You can choose whether
text positioned to any tab has a leader between the tab settings from
the Leader Settings box reached by clicking the Leader Options button in
Tab Settings. Leading characters
are often used in tabulated lists such as tables of contents and menus
to join the section titles or menu items on the left with their
respective page numbers or prices on the right.
Leaders are usually displayed
as a series of dots, but they can be changed to any of the characters
shown in the Character drop-down list (unfortunately, you can’t make a
leader using a font other than the one used in the paragraph text). To
change the leader character, select
a Character from the drop-down list. The distance between the leader
characters is set with the Spacing setting: this value is the number of
space characters to insert between each leader character. A preview of
the leaders appears in the Preview box.
Using the Ruler to Set Tabs
To
edit tab stops on the ruler, the ruler must be visible (choose View |
Rulers), you use the Text tool in selecting the paragraph text, and you
click to set or edit the tab stops. To view tab characters in the body
of your paragraph text, press CTRL+SHIFT+C (Text | Show NonPrinting Characters).
Tip
Before
creating new tabs, you should delete all the tabs that are already in
place—select Remove All from the Tab Settings dialog.
To create new tabs with the
ruler, use the Text tool to select the paragraphs to which you want to
add tabs, and then click on the horizontal ruler where you want to add
the new tab stop. The type of the tab can be set by right-clicking over
the tab. There is also a selector button where the ruler origin usually
is when working with paragraph text. Clicking the selector button cycles
between the four tab states: left–right–center–decimal. See Figure 2.
To move a tab, drag it to its
new position on the ruler. To delete a tab, drag it off the ruler and
into the workspace. To change the type of a tab, delete it and create a
new one of the correct type, right-click it in the ruler, and select a
new type from the pop-up menu, or change its type in the Tab Settings
dialog. Tabs cannot be added to artistic text.
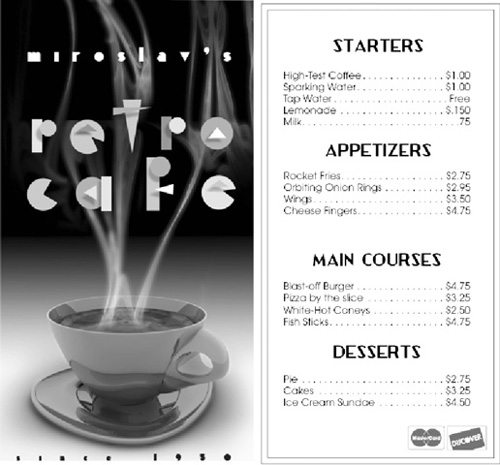
Here’s a practical example of
the value in knowing how to set up tabs: create a folding menu design,
and then create paragraph text with menu items and their corresponding
prices on the same lines (make up anything you like; have fun here!).
Here’s how to create a dot leader so the guests can see the prices at
far right easily, based on the menu items at far left.
Picking Up the Tab
With the Text tool cursor inserted in the body of the text, choose Text | Tabs.
Create a tab at the end of the line, just short of the end of the paragraph frame; give it the Right tab property.
Unfortunately,
you can’t have a decimal leader and a regular text leader on the same
line of text, but this, for the most part, is okay. With most typefaces
the decimal in the price column will line up fairly evenly with a leader
tab in place on lines. Click Leader Options.
Choose a period as the character, or if you want something fancier, you might try a single right-pointing angle quote (“>”; ALT+155) if your font supports this character.
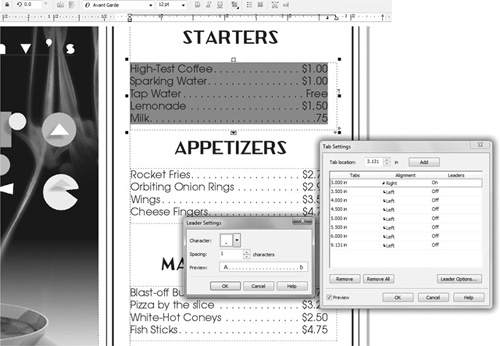
Set
the Spacing for the leader character. Notice that your document updates
live, so you can preview how your dot leader looks before clicking OK.
Click OK and the menu will certainly look more appetizing after applying your newfound typographer’s skills.