7. Saving as Illustrator EPS
If you do have to place your
Illustrator document in a non-Adobe program, such as QuarkXPress, you
may want to save the file as Illustrator EPS (Encapsulated PostScript).
First, choose File =>
Save As to display the Save As dialog box. Then select the Illustrator
EPS option in the Save As type list box (Format popup menu), name the
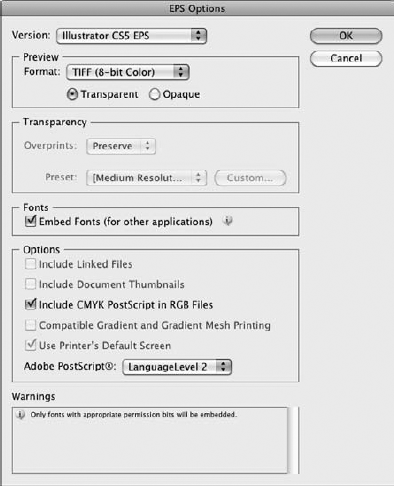
file, and click Save to open the EPS Options dialog box, as shown in Figure 3.
The following Preview
options affect the way that other software programs see Illustrator
files when you save them as Illustrator EPS files:
None.
This option lets most software programs recognize the Illustrator
document as an EPS file, but instead of viewing it in their software,
you see a box with an X in it. Usually, this box is the same size as the
illustration and includes any stray anchor points or control handles.
The file prints fine from other software.
TIFF (Black & White).
This option saves the file with a preview for Windows systems.
Page-layout or other software programs for PCs that can import EPS files
can preview illustrations that you save with this option.
TIFF (8-bit Color).
This option saves the file with a color preview for Windows systems.
Page-layout and other software programs display this file in 8-bit color
(256 colors) when you place it in a document. An Illustrator file that
you save with a color preview takes up more file space than a file saved
with any other option.
NOTE
Two additional
preview options are available on a Mac. Macintosh (8-bit color) maps to a
selected 256-color panel. In Macintosh (Black & White), anything at
50% or higher intensity maps to black, while everything else maps to
white.
In addition to the Preview options, you can choose from several other options that affect how the EPS file is saved:
Transparency.
You can Preserve or Discard Overprints. Overprinting allows underlying
colors to appear through transparent areas of the drawing.
Fonts.
Choose to embed the fonts with the file (although this makes the file
larger) so you don't have to worry about font substitution if someone
else doesn't have your font or the same version of your font.
Options.
These let you include linked files to ensure that any necessary files
are included. Click the following check boxes to ensure you gain the
best results when saving as an EPS:
Include Document Thumbnails. Allows someone to determine the file contents without opening the file.
Include CMYK PostScript in RGB Files. Allows for more accurate color printing.
Compatible Gradient and Gradient Mesh Printing.
Allows older (10+ years) printers to do a better job of printing
gradients, but decreases the quality of gradients in most printers.
Adobe PostScript®.
Allows for compatibility with applications that don't support newer
PostScript versions (you can choose from Level 2 or Level 3 here).
NOTE
The Mac version also
provides a Use Printer's Default Screen check box. It instructs
Illustrator to use any default screen defined in the printer's PPD file.
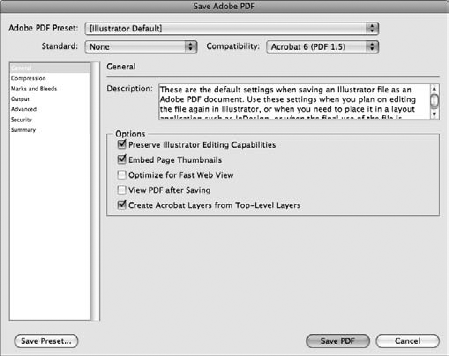
8. Saving files as Adobe PDF
One reason for saving a
file in Illustrator as PDF (Portable Document Format) is because anyone
can load Adobe Reader for free and view the file. But the better reason
is that all applications you will probably ever deal with can open,
view, and place PDF files. To save your document in PDF, first choose
File =>
Save As and select Adobe PDF in the Save As type list box (Format popup
menu). Click Save to display the Save Adobe PDF dialog box, as shown in
Figure 4.
This dialog box includes
seven areas that you can use to set options. You select the settings by
choosing from the list on the left side of the dialog box. The
following lists the areas and their options:
General.
Under this category, you can set the Compatibility ranging from Acrobat
8/9 (PDF 1.7) to Acrobat 4 (PDF 1.3). If a user has an older version of
Acrobat, you may need to save with backward-compatibility so the user
can read the file. Depending on the PDF version you select, the
following options may also be available:
Preserve Illustrator Editing Capabilities. Saves all Illustrator data in the PDF file so that you can reopen and edit the PDF file in Illustrator.
Embed Page Thumbnails. Includes a thumbnail image that appears in the Open or Place dialog boxes.
Optimize for Fast Web View. Creates a file that can be viewed more quickly in a Web browser.
View PDF after Saving. Opens the document in your PDF viewing application after it's saved.
Create Acrobat Layers from Top-Level Layers. Creates layers in the PDF file (useful for multilanguage versions of your file, for example).
Create Multi-page PDF from Page Tiles. Combines all pages of your document into a multipage PDF file.
Compression.
In this area, you can change compression settings for Color Bitmap
Images, Grayscale Bitmap Images, and Monochrome Bitmap Images. You also
have a check box that determines whether to compress text and line art.
This makes for a smaller file for e-mailing or uploading files to other
users. These image types offer similar options, but you can choose
different compression settings for each of them. These options are
available:
Downsampling. Reduces the file size by reducing the number of pixels in the image.
Compression type.
Allows you to choose from no compression, JPEG, JPEG2000, and ZIP
compression. You may need to experiment with the various options to see
which type of compression produces optimal results for your particular
document.
Image Quality.
Allows you to choose the level of quality for JPEG and JPEG2000 image
files. Lower-quality files are smaller but may not result in quite the
appearance you want.
Marks & Bleeds.
In this area, you set the Printer's Marks — lines printed outside the
image area that show how to trim the drawings once you get them back
from the printer or how to register the multiple color pages — Printer
Mark Type, Trim Mark Weight, and how far to offset it from the artwork.
The Bleeds for the top, bottom, left, and right of the page are set
here. Bleeds are used to print images slightly oversize so that white
edges won't appear once the images are trimmed.
Output.
You use this category to specify how colors are converted between the
RGB and CMYK color profiles when the file is saved. RGB is typically
used for on-screen display, while CMYK is generally considered a more
accurate profile for printed documents.
Advanced.
The Advanced PDF settings are Fonts and Overprint and Transparency
Flattener Options. Use these options to embed fonts for use in other
applications and to set your transparency and overprinting abilities in
other applications (if you're saving the file in PDF version 1.3). The
transparency and overprinting options control the way underlying colors
appear through transparent areas of the drawing.
Security.
Under this area, you set whether the document requires a password for a
user to open it and whether the password restricts editing. You also
set the Security Permissions and the Acrobat Permissions (printing
allowed, changes allowed, copying of text, images, or other content and
enabling text access of screen-reader devices for the visually
impaired).
Summary. In this area, you can see all the other options that Illustrator saves with the file.
|
You can save all the options
under the Save Adobe PDF dialog box as presets by clicking Save Preset.
This makes it easier for you to reuse the same settings in the future.
|
|
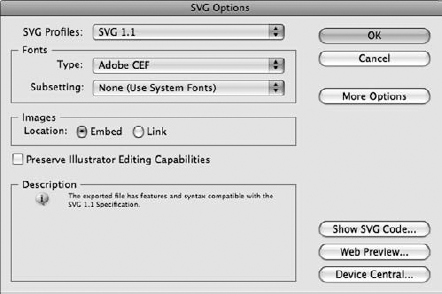
9. Saving files in SVG
Scalable Vector Graphics (SVG) is a vector-based
image format based on XML (eXtensible Markup Language), and it's one of
the formats supported by Illustrator. Vector-based formats often have
smaller file sizes than do bitmap image formats, so utilizing
vector-based images for the Web can offer some important advantages in
keeping Web page load times to a minimum. Figure 5 shows the SVG Options dialog box.
To save Illustrator documents in SVG format, choose File =>
Save As to display the Save As dialog box. In the Save As dialog box,
choose SVG from the Save As type list box (Format popup menu). You can
also choose the compressed SVG option to create an even smaller file.
These are the SVG options:
SVG Profiles.
This option allows you to specify the Document Type Definition level
for your XML file. Older browsers may not support all features of newer
DTD levels, but you generally want to choose SVG 1.1 for maximum
flexibility.
Fonts Type and Subsetting.
These options allows you to specify the type of fonts to embed and to
choose which characters are included — such as the characters that are
actually used rather than the entire font set. You can choose None, Only
Glyphs used, Common English, Common English and Glyphs used, Common
Roman, Common Roman and Glyphs used, and All Glyphs.
Images Location (Embed or Link).
If you choose Embed, the file size is larger because it includes the
placed image as part of the file. If you choose Link, it looks for the
file on the system and accesses it that way (smaller file size).
Preserve Illustrator Editing Capabilities.
This option lets you choose to keep the editing capabilities in
Illustrator. That way, you can use Illustrator to do any edits on the
file.
